

Introduction: Worm Bins - Vermi-composting With Rabbits


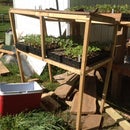
I completed this simple project for an Environmental Anthropology class, and designed it to work with a Rabbit Hutch in order to take advantage of the rabbit's feces as part of the composting process. I chose a layered design in order to accommodate for food at various levels of disintegration, and made the dimensions to fit the rabbit hutch. A composter of this size is able to cope with the food waste of our three-person house, but may not need to be so big if you cook infrequently.
Step 1: Materials

You will need;
2"x 2"x 8 (2)
1"x 6"x 8 (5)
Screws 2" (60)
Washers (60)
2' x 12' x 1/4" gauge Hardware Cloth
Staples
Tools:
Saw
Drill
Drill bit to pre-drill screws
Right Angle
Measuring Tape
Staple Gun
Step 2: Cutting

I designed this to fit into the 3'9" x 1'9" space underneath a rabbit hutch to take advantage of their waste, but dimensions of 4' x 2' will work as well and not waste small bits of wood.
2"x 2"x 8 (2)
C - Cut these into twelve 5.5" sections to allow the boards to sit without the corner joints interfering with one another.
D - Cut these into three crossbeams that will each be 1'6" long.
1"x 6"x 8 (5)
A/B - Cut these into six 1'6" long sections (A), and six 3'9" long sections (B).
Screws and Washers
Pre-drill every screw and apply a washer to ensure strength.
Hardware Cloth 1/4" gauge
This will need to be cut into three four foot long sections.
Step 3: Assembly
Finish the project by putting the screws into their correct predrilled location and attaching the hardware cloth.
For each joint, pass a screw through the bottom and top of the end of the 3'9" plank and into the but of the 1'6" plank. Then place the six inch bracing 2"x 2" into the joint, and screw two screws from the 1'6" plank into it, just a little inside the initial two screws. Place a final screw through the 3'9" board and into the brace in between the second two screws. Repeat this process for all four corners. Although this should provide enough strength against twisting, the hardware cloth will provide much more once it has been attached.
Staple the hardware cloth into the bottom of the box, such that the staples hold the cloth into the insides of the lower inch of the container. You may need to cut the cloth to fit the corners more precisely.
Then pass one screw through the middle of each 3'9" plank about 1" from the bottom, and into the but of the central crossbeam. Repeat on the other side. Do this such that looking from above, the beam is over the mesh and secures the mesh by sandwiching it between the beams ends and the planks. Lastly, staple the cloth into the bottom of the crossbeam to provide extra strength.
Repeat this process for the other two identical sections.
Step 4: Use

Insert worms and organic material and stack the flats on one another. A ratio of one part dry organic matter (leaves, shredded paper, hay etc.) to one part wet organic matter (vegetable food scraps, fresh lawn clippings etc.) is ideal. If grubs appear, this indicates that the composition is too moist and more dry matter must be mixed in to eliminate the problem. If ants appear or the contents appear dry and crumbly, this indicates that the mixture is too dry and water or more organic material will solve the problem. Check on the worms at least once a week, and rotate the most composted layer to the top to allow the worms to work their way downward and leave the material free for use. No mixing of the components is required if you layer the materials evenly as you put them into the bin.


