

Introduction: Airmonica - a Free-air Musical Instrument


improvise + harmonize + customize
The airmonica is a easy-to-learn tweakable musical instrument that you can use to perform harmonic musical ditties by accompanying a tri-tone arpeggiator. There are endless opportunities to expand the airmonica in any way that will make it your your own custom instrument. The airmonica consists of three parts:
1. a wii compatible nunchuck as the instrument interface
2. an arduino micro-controller board as the brain
3. a ginsing shield as the synthesizer
In addition to this instructable, you can visit the project webpage at http://www.engeldinger.com/services/latest-project/airmonica.
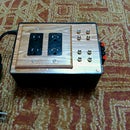
Step 1: Airmonica Parts

a stack to hack
The airmonica consists of 4 basic parts, all of which are easily acquired and require little or no modification. Aside from preparing the nunchuck and installing the software the airmonica can be assembled by just pushing it together. All of the parts in the airmonica can be reused on future projects, and together provide a great prototyping environment for experiments in human interface, computing, and complex waveform synthesis. Here's what you'll need:
1. A Wii compatible nunhuck
The nunchuck shown here is an inexpensive 3rd party controller (NYKO Kama). This was chosen because its about half the price of an official Nintendo controller, its clear, has cool flashing lights, and most importantly, can be taken apart with a screwdriver and can put back together later. You can get one for about $10 on Amazon:
http://www.amazon.com/Nyko-Kama-Wii-Nintendo/dp/B001PAAE7I/ref=dp_cp_ob_vg_title_0
2. An Arduino Uno microcontroller ( blue as pictured )
The Arduino Uno is a complete programmable development kit that allows you to run C/C++ code to control is various inputs and outputs. If you don't have one already you should really get one - its a great way to learn about hardware, software, and embedded applications. It is very affordable and has great support. You can pick one up for about $22 and then download the development environment from the Arduino support page:
http://www.amazon.com/Arduino-A000046-UNO-board/dp/B004CG4CN4/ref=sr_1_cc_1?s=aps&ie=UTF8&qid=1331048877&sr=1-1-catcorr
http://www.arduino.cc/
3. A GinSing synthesizer shield ( yellow as pictured )
The GinSing is synthesizer board (shield) that plugs onto the Arduino and contains a digital synthesizer chip and an amplifier you plug directly into a speaker (or stereo via 3.5mm jack). For this project the Ginsing is used to create the mellow polyphonic tones you hear produced, but is capable of wide range of sound related applications like synthetic speech, waveform synthesis, and more. The GinSing is available in either kit ($35) or assembled ($45) form from their website:
http://www.ginsingsound.com
4. (Optional) proto board ( red & green as pictured )
One thing you may find helpful is an Arduino compatible prototyping shield. In the picture you can see that the nunchuck is connected to the proto board, which not only makes it easier to connect, it also allows you to use the metal pins on nunchuck cable rather than having to cut the cable. If you don't use you such a board you would just insert the wires into the connector on top of the GinSing board instead (not pictured). The board pictured here is from SparkFun, and an nice because it can be use on other projects that may require switches and LEDs as well:
http://www.sparkfun.com/products/7914
Step 2: Prepare the Nunchuck

grip it and rip it ( or snip it or clip it )
To connect the nunchuck to the circuit boards, you will need to expose bare wire or lead pins. In the case of the NYKO Kama controller used here, simply unscrew the connector and slowly pull the wire leads from the connector with pliers, leaving metal tabs that can be inserted into the header pins or proto shield. You can also put the controller back together by reversing the procedure to regain use of the controller at a later time in this case.
Although not used in this project, there are several non-invasive slide-in connectors that expose the contacts of the connector to the circuit board, such as the WiiChuck adapter board available from SparkFun:
http://www.sparkfun.com/products/9281
Step 3: Connect It All Together

get to together, man
1. build the shield stack
The Arduino, GinSing, and optional ProtoShield can be stacked on top of each other to connect them. Although you could run wires between the boards, they are designed to seat to each other. Start by placing the GinSing board on top of the Arduino board by aligning the pins on the GinSing to the headers on the Arduino. Note that when placed properly the headphone jack faces way from the USB connector on the Arduino. Depending on your Arduino, you may have extra slots on your headers that have no pins on the GinSing board - this is fine as they are not needed. Be observant when seating the boards together to avoid bent pins; they should fit nicely together but visual alignment is a good precaution.
The ProtoShield can be placed on the GinSing board if you are using one. In the picture below you can see that small wires are used to connect the breadboard rails to the header pins, thus allowing the nunchuck pins to be placed into the corresponding rails. If you are not using a ProtoShield you can skip this step and use the GinSing board header to connect to the nunchuck instead.
2. connect the nunchuck to the stack
The disassembled nunchuck will have either 4 or 5 wires. You need to connect 4 wires, so depending on your controller you may have one you do not need to connect. In the picture below you can see that the Kama nunchuck has 5 wires, but only 4 are connected to the header. Although the color coding of the wires may be different for various controllers. its standard for the power to be red, and the ground to be black, making it easy to find out what the others may be. On the Kama controller, the color coding is:
signal nunchuck header pin
------------ ------------- -----------------------------------------
power red 5V ( power header - pin 5 )
ground black GND ( power header - pin 6 )
SCL (clock) green A5 ( analog header - pin 6 )
SCA (data) yellow A4 ( analog header - pin 5 )
If you find that your controller does not have this coding, you can experiment with the SCL and SCA lines (analog header pins 5/6) when you are ready; swapping these lines will not damage the airmonica. You may also check the comments on this instructable; it may be possible that others have posted the color coding for the nunchuck you are using.
3. connect to speaker or sound system
The GinSing shield can be connected either directly to a speaker using two contact leads on the board, or through a 3.5 mm stereo jack to either headphones or a stereo system (recommended) using an iPod like connector (typically 3.5mm to RCA ). A thumb wheel on the edge of the board is the volume control. It is recommended to you first set the volume to its lowest setting (fully clockwise) to avoid damaging your ears and bring up the volume once you confirm the airmonica is operating; you'll see an amber light on the GinSing board glowing as the airmonica starts doing its thing, which is your cue to bring up the volume.
Step 4: Load the Brain

The secret sauce is software
The airmonica software that runs on the Arduino contains the logic to read the nunchuck, select musical notes, sequence the arpeggiator, and send commands to the synthesizer board. The software is available for free, and we encourage you to tweak, bend, twist, crinkle, mutilate, and otherwise morph THE airmonica YOUR aimonica. We only ask that you do not use the software for commercial gain, and when redistributing your software you credit the original authors as indicated in the source code.
1. install the Arduino SDK
If you are are new the world of Arduino please do a quick read of the Getting Started section on the Arduino website - it contains all of the information you'll need connect the Arduino to your PC, download the IDE, and have the ability to program the Arduino with the software for this project. You can find the Getting Started section here:
http://arduino.cc/en/Guide/HomePage
2. install the GinSing library
The Arduino talks to the GinSing shield with a library that is supplied with the GinSing. The airmonica code makes function calls to the GinSing library to make the sounds you hear. The GinSing library is available for free download at the GinSing website along with simple installation instructions:
http://www.engeldinger.com/ginsing-archive
3. install the airmonica software
The source code for the airmonica software is attached. The software comes in a single folder that you can put anywhere on your PC. To launch the software simply double-click on the ino file in the folder; that should launch the Arduino IDE as pictured below. You can download the airmonica software here:
http://www.engeldinger.com/projects/8-airmonica
To build and run the code on the airmonica, first make sure you have the USB connected between the PC and the Arduino, and that you have the proper port specified that you used during initial IDE installation. Click on the upload button in the IDE (the round button with the right arrow). After a few seconds the output window at the bottom should appear as pictured below. When the upload is complete you should see the amber LED on the GinSing board flashing indicating the airmonica is running. At this point you can slowly turn on the volume on the GinSing board to behold it sonic wonderment.

Step 5: Playing the Airmonica

let the good tunes roll
The nunchuck provides the human interface for the airmonica. The interface operates in one of two modes depending on the state of the C button on the controller. When in default mode ( when the C button is not pressed ), the airmonica can be used for performance. When the C button held down, the airmonica can be used to tweak the arpeggiator.
harmonizer mode ( C button not pressed )
In harmonizer mode, you can combine the use of the Z button and the twist of the controller to play musical notes like any other instrument. Unlike most instruments, however, the musical notes that you play are in harmony with a specific key and flavor. This is similar to how you might select up a real harmonica for whatever key the song is in.
Furthermore, a built-in arpeggiator will follow that key with a 3 note sequence backing up your playing with complimentary beat. Using the joystick you can change the key (+/3 major 3rd) and the flavor (major/minor) while playing. The harmonizer and arpeggiator are in sync and will transition keys based on completion of the 3 note sequence.
C - unused Z - play note X - change key flavor Y - change key twist - select note
arpeggiator mode ( C button held down )
In arpeggiator mode, you can adjust the relative octave, tempo, and legato of the arpeggiator. Twisting the controller in this mode will select the relative octave of the arpeggiator w/r to the current key of the harmonizer. Using the stick you can change the temp (+/ 10 bpm) and the duration of the notes played (+/ 10%) from staccato (short plucky notes) to legato (long continuous notes).
C - held Z - not used X - change tempo Y - change legato twist - select octave
Step 6: Playing Tips

bravo maestro
tips to make you a better airmonicist
Start by first figuring out the basic playing mechanism between the twist of the controller and the use of the Z button. For example, tapping the Z button while twisting will produce short fixed notes. Observe the rotation position for each of the notes in the octave that you can play. With practice you should be able to hit each of the notes with precision.
Note that when you hold down the Z button you can move across the musical scale continuously, but in exact musical steps. This allows you to do note runs that can start and end where you want and adds some diversity to your playing style.
When in harmonizer mode, the joystick is setup to allow for both key and flavor changes simultaneously. Think of the vertical axis as phrase change - it adjusts your key up or down a major 3rd harmonically and keeps the tone but offers a break. Think of the horizontal axis as a mood change - left darkens the mood (minor key) and right brightens the mood (major key). You can do diagonal movements that combine the two effects for more variation. Going to and from diagonal moods can offer dramatic mood changes.
When using the arpeggiator, you can produce a wide variety of themes with only three notes. You can change the arpeggiator octive to be either below, on, or above the harmonizer voice. You can work with the tempo to go in out, or between the notes for varied styles. Note that when you slow the tempo down to its lowest setting you will get a tri-tone that adds a weird background to your playing. Typically you wont be chaning the arpreggiator in performance - its more of a setup mode.
The controller also responds to translation - this can be cool to add vibrato to your playing style.
The airmonica is always a work in progress, and this is just the first step! We encourage you to tweak and and bend this code - there is a lot of hidden coolness waiting for you to discover to convert this from airmonica to your monica. Hints: The controller has a LOT more input functionality (other axes, shake), the GinSing has a LOT more capability (tones, envelopes, polyphony), and the Arduino awaits your commands to implement your own algorithms!

Participated in the
Arduino Challenge


