

Introduction: Bits and Pieces Steady Cam


The steady cam, its been done before and it will be done again, but there is never a perfect way to make anything. whilst feeling a little bored and looking over some footage i had shot I was a little annoyed to see that the pan shots i had taken were a little wobbly.
After taking a quick inventory and coming up with a simple plan I started to make my steady cam. the whole thing cost me nothing apart from my time and the parts I used can easily be found or salvaged from places around the house or from a reclamation site.
In advance I should apologize that I forgot to take photos of some of the steps and processes but its all pretty self explanatory. I quite like to keep things short and simple so this instructable is just that, short and simple. enjoy...
Step 1: The Bits and Pieces

main materials
- old bike wheel. the outer diameter of the one I used was 320mm, but the bigger the better (within reason).
- scrap wood. mine was a 45-15-300 bit of pine, but anything that will fit across the inside of the wheel will do.
- wood screws
- long (ish) bolt, I had a headless threaded bar about 100mm in length. Most cameras have a 1/4-20 (1/4" diameter, 20 threads per inch) screw fitting so bear that in mind when selecting your screw
- (optional) paint
- (optional) thick rope or rubber to go around the rim of the wheel
- drill
- crow bar/jemmy (something to remove the tire and inner tube from the wheel)
- hack saw
- pliers + wire cutters
- sand paper to finish up the materials
- you may also need a file
- epoxy or similar
Step 2: Remove the Tire


I started by removing the tire and inner tube from the wheel with the jemmies. After that I cut the spokes off leaving just the rim. my wheel was off an old go cart so I had to sand off the rust from the rim first.
Step 3: Mounting Beam


using the rim as a guide, I marked out the length and curves on the pine. in order for the camera to sit roughly in the middle of the ring I wanted to mount the beam about 1/4 of the way from the bottom of the rim.
once cut, I drilled a hole through the top of the beam in the middle to mount the camera mounting screw. be careful to make sure that the hole is straight other wise the camera wont sit straight!
Step 4: Putting It All Together


using the spoke holes in the rim as a guide, i drilled hols in the mounting bar to fit the screws that would hold the bar in place. once mounted, I simply spray painted everything and touched up the edges.
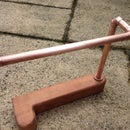
Step 5: Final Product

All in all the whole thing including planning, producing and finishing too me no more than an afternoon and cost me nothing. I may also upload some comparison shots once I get a chance.
Just a bit of technical info, the reason why things like this work is that your hands are moved further away from the camera so small movements or shakes in your hands don't have as much of an effect on the footage. with that in mind, as long as your rig is moving your hands further away from the camera it should reduce wobble.
with improvements in mind, I would like to add interchangeable mounts, LED lighting and possibly a Mic / mic mount. another thing that helps with stability is weight so I can also hang/attach a weight to the bottom of the rig to keep it steady and level.
additionally I'm always open to feed back and suggestions.


