

Introduction: Flexible LED ETextile Ribbon Array


Yet another method to create eTextiles and wearable computers: an easy sew flexible ribbon array for LEDs.
Want more eTextile How-To DIY eTextile videos, tutorials and projects?
Then visit The eTextile Lounge!
Step 1: Gather Parts

Ribbon
Thread
Needle
Scissors
Sewing Machine
LEDs
Power Source
Step 2: Sew Conductive Thread to Ribbons


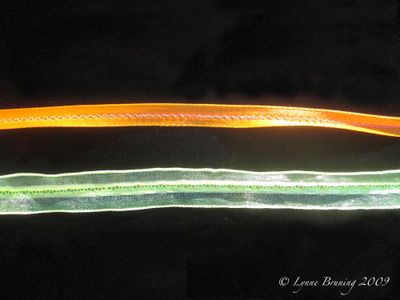
With a zig zag stitch sew conductive thread to ribbons.
Step 3: Tailor Tack Ribbon Array Together


Form an array by tailor tacking the conductive thread ribbons together.
Negative ribbon with conductive thread facing down.
Positive ribbon with conductive thread facing up.
Loosely sew the ribbons together at crossing points.
Step 4: Slide LED Legs Into the Array


Gently bend the legs of the LEDs.
Slide negative leg into negative trace zig-zag by puncturing thru the ribbon to reach the conductive thread zig-zag channel. Feed the negative leg thru the channel making contact with the conductive thread.
Slide positive leg into positive trace zig-zag channel making contact with the conductive thread.
Gentle snug the LED into their zag-zag channels.
Step 5: Connect to Power Source


Make a master positive ribbon trace and a master negative ribbon trace.
Lay the master negative trace on the negative array ribbons with conductive thread touching.
Using conductive thread sew the negative traces together.
Lay the master positive trace on the positive array ribbons with conductive thread touching.
Using conductive thread sew the positive traces together.
Connect master ribbon traces to power source.
Let there be light!
Step 6: Make Something!


I used this eTextile method to create a UV LED illumination system inside a lobster bustle for Mrs. Mary Atkins-Holls' evening gown.
More about this Victorian raver black light ball gown - Mrs. Mary Atkins-Holl.
To learn more about wearable tech and eTextiles please visit my website.
Runner Up in the
Light Up the Night! Contest


