

Introduction: IPhone Window Pocket (or Is It a Shorts-shaped Case)


This is the most ridiculous yet in my series of iPhone pocket mods. Now you don't even have to take your iPhone out of your pocket to write text messages, open apps, or potentially have a facetime call (although it could be blurry).
BTW, my family are officially sick of my instructables. The constant talk of views and comments has dominated dinner conversation for the last few weeks and is driving them spare. But, as long as you good people like (or at least view and comment on) my ridiculous ideas, I feel I have a mandate to keep supplying them.
What you'll need:
1) A Window. You'll need a piece of PVC that you can use as a window. We have been remaking the tent on a 1970s Camplet Trailer tent so I had some offcuts. The piece I used was 0.8mm thick but it's on the thick side. I would probably recommend the 0.5mm stuff which you can buy by the metre at Spotlight in New Zealand (fabric/craft store) or perhaps a hardware store. If you know of a supplier in your country, add a comment and I'll update.
2) A sewing machine. My wife jokes that I will do anything to avoid hand sewing! I did manage to do this without hand sewing but perhaps it could have been neater doing some of it by hand. However, if you are going to do it by hand, get a thimble! The PVC is a pain to sew through, even with a machine.
Attachments

Step 1: Choose a Pair of Deep Pocket Pants


It's important to find a pair of pants where the pockets are deep enough that your iPhone won't be too high up your leg for you to use it while sitting down. Of course, if you don't have a fat belly like mine, it might not be a problem.
To make sure everything is going to work, we start by marking out where you want the window pocket to go.
My sub-steps were:
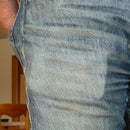
1) Put the iPhone on the outside of your pants and decide where you want to the phone to end up (Pic 1&2).
2) Make sure there is pocket under your phone. You want to avoid making a new pocket if you can (Pic 2).
3) Turn the pants inside out and trace around where your iPhone where the window is going to go (Pic 3&4).
4) Transfer the window shape to the inside of the shorts (Pic 5).
Step 2: Cut, Fold, Iron, & Sew the Outer Hole


Now we need to cut and finish a hole in your pants that will become the "frame" for your iPhone window.
Sub-steps are:
1) Cut out the pants fabric about 10mm (or more if you are nervous) inside the the line you drew around your phone (Pic 1).
2) Fold back the edges (towards the inside of the shorts) and iron it flat so the crease is on the line (Pic 2). You'll need to snip bits out of the flap so the corners can be folded back. If you want to make a sharp corner, you can cut a diagonal snip into the corner but I wanted a rounded corner so I made two snips in each corner. You could do more, but the tiny bits are hard to sew down.
3) Sew the ironed flap down. This is probably easiest to sew with the inside (flap side) up (Pic 3).
4) This stage done. Sewn hole from the inside (Pic 4) and from the outside (Pic 5)
Step 3: Mark, Cut, Iron, Fold, Sew Inner Hole


Now that you've got the hang of finishing the outer hole, lets do it with the inner hole. The inner hole is like the back of a frame. It's not visible unless the phone isn't there.
Sub-Steps:
1) Lay out the shorts and you'll (hopefully) be able to see the pocket through the hole (Pic 1)
2) Trace the hole shape to the pocket (Pic 2).
3) Cut 10mm inside the line (Pic 3).
4) Fold, Iron, and Sew down the flap at the crease (Pic 4)
Step 4: Put It All Together and You're Done!


Now, if you reaching the end of your patience, perhaps now is a good time to take a break. The next stage is a pain and any mistakes are going to be visible. Go for a run, take a nap, go to work, or whatever you do to relax....
Welcome back. Feeling better?
The concept is pretty straightforward but the space is limited. Think of the rectangular window as a U-shape with a lid on it. The U-shape needs to be sewn through all 4 layers: Outer fabric, PVC window, outer pocket (with hole), and inner pocket. The Lid, however, only needs to go through 3 layers: Outer fabric, PVC window, and Outer Pocket. If you sew through all 4 layers for the lid, you won't be able to get your iPhone in or out!
OK, Sub-steps:
1) Cut the PVC to a size that is quite a bit bigger than it needs to be and lay out the layers (Pic 1)
2) Pin all the layers in place (Pic 2)
3) Sew the U through all of the layers (Pic 3)
4) Pin the Lid section together (Pic 4)
5) Sew on the lid, and you're done! (Pic 5)
Now, the worst part of the sewing was the lid section. This was hard because the underside of the seam is inside the original pocket.
Next time (haha) I do it, I think I would try to sew the lid section first (Sub-steps 4-5) then sew the U last (Sub-step 3).
Good luck.

Participated in the
BurdaStyle Fashion Challenge


