

Introduction: Laser Etching a School Logo on a Glass


I recently took the rotary laser class at the TechShophttp://www.techshop.ws and tried putting the school logo (Which I had saved in Corel Draw from an earlier project) on a small drinking glass
Step 1:

the TechShop http://www.techshop.wsuses either Corel Draw or Adobe Illustrator. I have Corel. I made the design and then used drop box to send it to myself at the TechShop. The advantage of Drop Box is that it is a file folder - sort of like having a drive. I can access it from anything - a computer, my phone, ipad, etc. I opened it on the TechShop computer which is assigned to the laser cutter.
I sized it according to the nice flat band at the top of the glass (the rest of the glass has an angle to it and would have required adjustments in the design).
Step 2:


I put the rotary attachment in to the machine. - It allows for easy rotation while setting the machine for a rotary job. Putting in the attachment sends the command to center the head to the center of the attachment. I used a level (handily close by) to level the cutting field of the glass by cranking up the back rollers of the attachment .
Step 3:


Once the glass was in place, I made the settings for my project according to the chart in the room. (you are only allowed to etch class and not cut - so this is a 'raster' project NOT 'vector' )
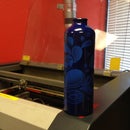
Step 4:
The laser etched the glass. I learned from this project that etching means that the design is white on the glass - all parts of the design are etched white. Greys are hard to adjust for - you need a really sharp contrast for the design to show any subtleties. As a result, my wolf howling at the moon sort of looks like a seal balancing a gigantic ball on its nose at a quick glance. But another design problem I was made aware of is that since hairline lines are vector cuts and no cuts are to be made - all hairlines need to be bumped up to a greater thickness or they probably won't show up at all.


