

Introduction: Led Homemade Heatsink


Small leds of 1watt are now commonly available which require a small heat sink. cheapo led when bought with attached heat sink almost costs double, so I decided to built some homemade heat sink with worn away parts.
list of parts required=
1.Hammer
2.Big sand paper
3.Iron cutting hand blade
4.Aluminium panels like in glass sliding
5.Useless choke of a tube light from scrap
6.glue
7.screwdriver
Step 1: Aluminium Base


An aluminum or copper base is necessary as it dissipates heat much faster than iron.
it is used to attach to the led.
angles or panels can easily be straightened by few gentle strokes of hammer.
a thickness of 2mm and above will be preferred. cut its piece of approx. 1*1 inch.
Step 2: Led Attachment

use a super glue to attach led with aluminium which has less viscosity and dries too fastly this is good conductor as compared to some epoxy glues and makes a very thin layer.
http://www.ebay.co.uk/itm/Elfy-Super-Glue-Gel-/360932142835?nma=true&si=HnykzmGhtn7FtG91Wf9rxU0neOE%253D&orig_cvip=true&rt=nc&_trksid=p2047675.l2557
I think so it is Cyanoacrylate
Step 3: Iron Strips

Use an old choke from tube light as it has got many wrought iron strips a screwdriver usually can open it up by some applied leverage.
Although iron is a bad conductor as compared to al but as you have increased surface area by using aluminum pieces so it will serve the purpose of heat dissipation into air well.
Step 4: Cleaning Strips

These are usually rusty when taken from scrap.
Clean then using sandpaper.
apply glue in their centers.
five strips for 1w led usually serve the purpose.
turn them at different angles as shown in intro pic.
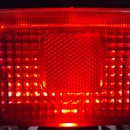
Step 5: Light Your Led

I checked it at about 4 volts for an hour and it did the job after some time its temp got constant.
(Note: leds and glue types differ greatly so beware)


