

Introduction: LittleBits Buggy


Our shop, TechShop Chandler was lucky enough to have been selected by Instructables for a littleBits build night last month! We decided to focus on projects that children would enjoy, so the build night could be fun for everyone - families included. So I went down to the nearby thrift stores and started hunting for toys, odds n ends, and craft supplies.
I really lucked out and found a big bag of K'nex. It was a mixed bag of regular K'nex, K'nex-Lego adapters, and a partial set of the mini K'nex for a rollercoaster! Cool, huh?! All for $3! Hooray!!!
I didn't have a full set, or a pattern - so I just kinda tooled around until I came up with this. The beauty of it is that you too will have to tinker through the problem solving of getting the moving components to line up correctly.
Step 1: Build the Chassis

I started by figuring out what littleBits components I wanted to use - I then built a simple frame with those in mind.
You want to build this with a fair amount of strength to hold the weight of your motor and battery, so think about that as you reinforce your frame.
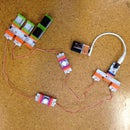
The littleBits I used for this are:
1 - Power Supply with 9V Battery
1 - RGB LED
1 - DC Motor
1 - Buzzer
2 - Buttons
1 - Fork
4 - Wires
Step 2: Make It Roll!


So, in this case I had a couple of gears from the K'nex set that fit together, I also found a little blue piece that fits perfectly into the white adapter that came with the DC motor. So I slid this piece into the adapter, put the gear over that piece and used a small screw to hold it in place.
Then I put the other gear on the axle that is attached to the wheels. Luckily the gear fits tightly on the larger K'nex rods and wont slip around.
I made a bracket for the DC motor so that it will stay in place and engage with the axle gear - just so. That part was a little tricky. The placement was key, but luckily K'nex are pretty versatile in how you can space them... it just took a little finagling to sort out.
Step 3: Secure the Bits!


Did you know that K'nex makes Lego adapters!?!? WHAT?! COOL! I didn't know until I found that grab bag at the thrift store... and I was maybe even a little too excited about it.
Anyway, I used said adapters to add Legos to the frame, making it easier to create sturdy shelves upon which my littleBits could nestle.
So I built it up, taking into account where the Bits would fit, and how I would try to streamline wires, etc.
Notice I bracketed in the fork, where all of the components join, and made a cubby to tightly fit the battery - so that while it is moving, none of its Bits come apart.
Then, on the front I simple used an existing part of the frame and added another K'nex piece, that can slide up and down - so the headlight is snug.
Step 4: Look at It GO!


Connect your final bits, and admire your handy work!
Experiment with this project, you could add tail lights as well! Make the horn honk at intervals using the pulse Bit, add a dimmer for speed control, or add additional DC motors to the wheels and a servo for steering!
Or light the whole thing up with EL Wire Bits!
Have FUN!
**BEEP BEEP**


