

Introduction: Sailboat to Ukulele


In 2006 my son and I each built a skiff /sailboat from plans by Iain Oughtred a great father and son project.
unfortunately that fall while on the trailer in the back yard a large tree limb fell on my sons boat taking out most of one side. He thought that maybe he would repair it but never got the time. After several years it ended up in the pasture with trees growing out of it.
So after years of thinking of those beautiful mahogany seats I talked him out of one them. For his birthday I cut it for a custom ukulele.
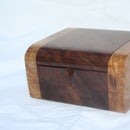
Step 1: The Seat


The front seat you can see in the photo the hole is where the mast for the sail went through. I was thinking I would make the sound rosette out of leather like the leather mast protector but n the end it didn't work out. I used a table saw to cut the 3/4" thick mahogany to 1 piece 22x4 and 2 pieces 13x6 then re sawed each to a book matched 1/4" thick 1 back 1 side and 2 sides also I joined the 2 pieces of the top and 2 pieces of the back. After joining the plates I surface sanded them with a drum sander to .07 thick sides .10 for the back and .08 top
Step 2: The Bender


The side bender I use I made Its a fox style with 2- 200 watt light bulbs heating up sheet metal formed around ukulele shaped sides held in shape by clamps it works great and was cheap to build about $30.00
Step 3: The Plan


I got this tenor ukulele plan from Stewart McDonald it seems to be a good one. I had it copied it several times to cut up for templates it has worked well for me
Step 4: The Mold
The mold is 2 pieces each 1/2 the uke. using the plan as a template I cut the 3/4 plywood and triple stacked it and glued it together one half at a time leaving the two sides separate this lets the mold to split for marking plates and getting the completed body out of the mold, I then clamped the mold together and drilled a 1" dowel at each end to make for easy line up.
Where the 2 pieces join is also used as a center line through out the build (very important)
Step 5: Bending the Sides


First turn the bulbs in the bender on for about an hour while soaking the sides in water for 10 minuets drip a little water on the metal form if it steams its hot enough. I've never gotten it too hot with this bender but I do have A variable resister on it if I need it. I place the wet wood in side by side. Place a piece of spring metal over the and slowly clamp the waist down. Then start bending the upper and lower bouts anclamping in place. It takes about 15 minuets to bend the set. After bending I turn off and leave in the mold over night.
Step 6: Compleat the Rim


After sitting in the sides will hold the shape when removed. Next clamp in the mold and mark the center lines and carefully trim away excess. Glue the end and neck blocks staying on center line. Next clamp on the kerf lining a little proud of the sides.
Step 7: The Back and Sides


After joining the top
and back and thickness sanding I first cut the sound hole. I would normally cut in the rosette but as I said I was going to use leather for it so I left out this step.Basically following the bracing pattern from the plans. Using small planes and braces and tone bars tune up the braces and tone bars fin tuning with sandpaper.
Step 8: Closing Up the Box


After sanding the kerf lining and blocks down flat with the sides I use a radius dish covered with sandpaper to put a 15 foot radius on the back. The back and top are then glued on. Then I use a router to flush trim to the sides.
Step 9: The Neck


The neck is made from 2 pieces of the mahogany seat and a walnut center. This laminated wood makes for a very stable neck. I use templates mad from the plans to rough shape and then use sanders, planes, rasps and chisels to shape. Then I glue on the head plate and fret board and finish up the neck.
Step 10: Inlay


The design of the headplate I kind of got from a lot of different pictures of the Internet, I had to have a sail boat you know.
The moon is yellow mother of pearl and the sails are white MOP.
I used a jewelers saw to cut the shape and sanded true. Then with a detail router to rout out the cavity's
after gluing the pearl in I mixed ebony sand dust with yellow to make a filler paste to fill in any gaps.
the boat is a pies of the seat also.
Step 11: The Neck Joint


I used a bolt on neck joint to attach the neck to the body. After dry fitting the joint I used a brass insert drilled into the heel of the neck and a bolt through the body. No glue is needed and makes a very stable joint.
Step 12: Binding the Body


I bound this ukulele with curley koa binding top and back and used black whiwt black purffling on the top only.
I use a router with a straight bit and bearing set up for my binding channel. The first bearing leaves a channel that is wide enough for the binding and and pruffling as deep as the purffling and the second cut is as wide as the binding as deep as the binding. Does that make scene? I'm tired! The channel on the back is just for binding no purffling. After routing and cleaning up the pre bent binding is glued in taped down until the glue dries. I use a cabinet scrapper to clean up and sand flat
This is to me one of the most difficult part of the build because things could go very wrong very fast.This one went well ,best iv'e done so far. I think I came up with just the right router set up.
Step 13: The Finish


The finish I used on his ukulele is nitrocellulose lacquer. I finish the neck and the body separately it is much easier to sand and join after polishing. With the parts sanded to 220 grit I fill the pours with epoxy sand to 400 and spray with sealer sand to 400 and spray 3 coats nitrocellulose lacquer let dry over night. Next I wet sand to 400 grit to level out finish. After sanding it down dull I can see shinny spots these are low places. I repeat the spray/sand process untill all the shinny spots are gone and everything is dull 12 coats on this one. after 3 days I thin the nitrocellulose lacquer and spray 3 more coats and wait 2 weeks then sand to 5000 grit. Next I buff out the finish and join the neck to the body.
Step 14: Fret Board and Bridge


The fret board is ebony I used a luthiers miter box, template and fret saw to make it. I also added mother of pearl dots and plastic sides.
Step 15: Putting It Together


After bolting the neck on I glued the bridge on and set up with a bone nut and saddle strings,tuners and a little tinkering its ready to go. I love the way it sounds and plays This is my 5th ukulele build this on turned out great ill try to put a video up soon.Thanks for viewing Ricky Sp8

Second Prize in the
Before and After Contest

Participated in the
Outside Contest

Participated in the
Summer Fun Contest


