

Introduction: Wooden Honeycomb Pendant


With some Yellowheart wood left, I decided to make a pendant inspired by yellow honeycomb! But this time, I lightly sanded then lightly varnished the result.
I used a Pro Grade Extra Fine sanding sponge, and a fast-drying clear satin spray varnish from Minwax. Make sure you use a spray, to avoid streaking.
I picked up these earring earwires from Michaels pretty cheaply: make sure you get Hypoallergenic!
I made this at Techshop!
Step 1: Start With Making the Hexagon


To make the template hexagon we will use for the whole design, create two squares - the second by copying it and pasting in place (hotkey ⌘⇧v).
Rotate (hotkey e) the second square 90 degrees (hold the Shift key, or ⇧, down to get 45 degree increments).
Select both squares (hotkey v, or select all by ⌘a). Now to use the infamous Shape Builder Tool (new to CCS5) via the hotkeys ⇧m.
With the Option key pressed, delete the corner shapes where both squares intersect.
Swap the fill color to stroke, making sure the stroke is around 8 pixels.
Step 2: Duplicate and Expand


Duplicate the hexagon by selecting it then holding down the Option key and dragging. When dragging, press the Shift key to keep it in line with the original.
Select both hexagonal shapes and repeat this process, this time dragging downwards, to create four copies. Make sure each edge is aligned exactly on top of each other.
Select all four and Expand them to strokes and fills under the Edith menu --> Expand. Use the defaults in the following dialog box.
Step 3: Now to Get Creative


This is where you can copy any amount of hexagonal shapes to make the whole group interesting.
Make sure you hold down the Shift key (⇧), to constrain the axis. To check all your points are aligned, select ones that should be in perfect rows (hotkey a) and use the align tools in the Align palette.
Next, fill in the squares in between the hexagons, by making a square and duplicating it over each hole.
Expand everything again, under the Edit menu.
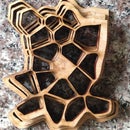
Lastly, before laser cutting, combine all the shapes into one, using the Unite tool in the Pathfinder Palette.
After you cut them, you can lightly sand them using an Extra Fine sound paper, then spray-varnish them by applying about 5 or 6 coats (make sure each coat is dry before adding the next).


