

Introduction: Advanced Modeling


More by the author:


About: Autodesk helps people imagine, design and create a better world. Everyone -- from design professionals, engineers and architects to digital artists, students and hobbyists -- uses Autodesk software to unlock t…
This lesson will outline some of the more advanced modeling techniques in ArtCAM Premium.
Note: All files can be found at the bottom of each lesson. Feel free to save the files to your own directory.
Step 1: Tea Releaf Tutorial
- Open Tea Releaf.art
- Shape Editor - text Tea Releaf - Round Shape – 45º
- Reset the created relief
- Contour Blend
- text Tea Releaf
- Side Profile – Linear – 45º
- Check Preserve Interior corners
- Contour Blend
– large middle leaf
- Selected Vector – select wavy cross-section – click Set Profile Vector
- Override Width = 0.625” (15mm)
- Select smaller top and bottom leaves
- Override height = 0.2” (2mm)
- Override Width = 0.5” (12.5mm)
- Shape Editor
- all leaves, Add
- Flat Sape – 0.02” (0.5mm)
- Smooth Relief – 20%
- Vector Layer = Outside , Relief Layer – elliptical sign base
- Contour Blend – Outside vector
- Set Profile Vector – wavy cross-section
- uncheck both Override height and width


Step 2: Feature Machining Book
Create a clean 2D-style engraved toolpath over a 3D relief surface.
- Create a New Model 300mm x 250mm (12” x 10”)
- Origin in the lower left corner
- Open the Relief Clipart Library , import Book, from
the Objects section
- Width = 275mm (11”)
- F9 to center
- Z = 20mm (0.75”)
- Check Paste Outline Vector
- Paste
- Import Vectors – Rose1.eps
- Manually center on left page
- Text Tool
- Text = Arthur
- Size = 17mm (0.5”)
- Justification = centered
- Type the following:
- and they
- lived
- Size = 25mm (1”)
- Happily
- Ever After
- Feature Machining Toolpath - rose
- Recessed
- Depth = 1.25mm (0.05”)
- Check corner sharpening for top and bottom
- Tool = V-Bit 32mm 90 degree (V-Bit 1.25 Inch 90º)
Rotate model to view form side, see toolpath following relief, always 0.05” into the relief.
- Feature Machining Toolpath - text
- Recessed
- Depth = 1.25mm (0.05”)
- Check corner sharpening for top and bottom
- Area Clear
- Tool = V-Bit 32mm 90 degree (V-Bit 1.25 Inch 90º)
- Machine Relief Toolpath
- Selected Vector – book outline
- Tool = 6mm ball nose (1/4 Inch ball nose)
- Simulate All

Step 3: Texture Flow Fish
- Open Model Fish Scales.art
- Texture Relief
- Selected Vector, Size = 0.5 and Z Height = 0.1
- Select green boundary vector and click Add
- Reset Relief
- Texture Flow tool
- Set Object = blue scale clipart
- Set Flow Vector = red ‘Flow Vector’ vector on the fish
- Select Reset in the Presets section
- Select Mirror Along
- Select Keep
- Select the pre-existing boundary of the fish body
- Click Calculate
- Reset Relief
- In the Along Flow Vector section, input the values of 75 to 90% of width.
- In the Away from Flow Vector, insert the values of 50 to 50% of height.
- Re-select the texture boundary and click Calculate.
- Reset Relief
- In the Along Flow
Vector section, check the Vary Scale
box
- Start Point = 90%
- Position 2 = 150%
- End Point = 65%
- Click Set Position 2 and then click in the middle of the red flow vector near upper part of the tail
- Randomise Object, input the Scale values of 100 to 110% as the scaling limits.
- Angle variance of 10 degrees.
- Re-select the texture boundary and click Calculate.
- Select the large vector representing the entire fish Zero Outside Vector

Attachments
Step 4: Sculpting a Wolf Tutorial
- Open Wolf.art
- Reset Relief
- Duplicate Original Vector Layer
- Rename copied layer = My Wolf
- Edit vectors
- Smooth sharp edges
- Extend to cover body parts
- Discuss design
- Overlapping vectors (blend)
- Spaces between shapes (definition)
- Shape Editor – entire wolf
- Outline – Add & Apply
- Far legs - Merge high & Apply
- Close legs - Merge high & Apply
- Tail - Merge high & Apply
- Stomach - Merge high & Apply
- Neck - Merge high & Apply
- Head - Merge high & Apply
- Ear – Add & Apply
- Inner ear – Add & Apply
- Eye – Add & Apply
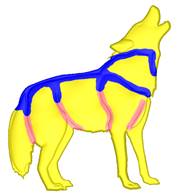
- Greyscale
- Primary colour = yellow
- Sculpting Step 1 – smooth edges
- Smooth
- Radius=30, Strength=25%, Smoothness=100%
- Excluding Colour yellow
- Drag mouse around every raised vector edge once
- Snapshot
- Sculpting Step 2– raise area’s
- Smooth
- Radius=30, Strength=50%, Smoothness=100%
- Combine mode = Raise Only
- Excluding Colour yellow
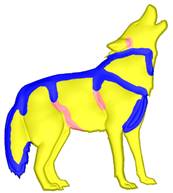
- The darker lines (blue) require much more sculpting, pass over them with the sculpting tool several times
- The lighter lines (pink) only need two or three passes
- Snapshot
- Sculpting Step3 – re-smooth and blend
- Smooth
- Radius=30, Strength=50%, Smoothness=100%
- Combine mode=Normal
- Excluding Colour yellow
- The darker lines (blue) require much more sculpting, pass over them with the sculpting tool several times
- The lighter lines (pink) only need two or three passes
- Snapshot

Attachments
Step 5: Beagle Tutorial
- Open Beagle.art
- Reduce Contrast slide bar
- Window – Tile Vertically
- Toggle off Vector Visibility in 3D view
- HideDog details Vector Layer
- Shape Editor
- lower jaw – Add & Apply
- tongue - Merge High & Apply
- main head - Merge High & Apply
- larger ear on left - Merge High & Apply
- ear on right - Merge High & Apply

- Show Dog details Vector Layer andhide Dog base
- Shape Editor
- outer nose - Add & Apply
- inner nose - Add & Apply
- thin ear on right - Add & Apply
- thin ear on left - Add & Apply

- 3D Blend - eye patch - Add
- Smooth, Centre of Border vector, Inner 1mm (0.05”), Add
- Repeat for other eye
- Hide Dog details Vector Layer and show Dog base
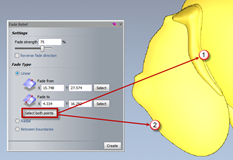
- Fade Relief -
left ear
- Fade strength = 75%
- Linear, 1st mid right, 2nd mid left
- Window – Tabbed View – 3D view
- Show Dog details Vector layer
- Shape Editor- two outer oval vectors for both eyes
- Add Dome 25 º & Apply
- Shape Editor- inner oval vector for both eyes
- Add Dome 30 º & Apply
- Rename Relief Layer to Dog Head
- Greyscale From Composite Relief – yellow primary
- Smooth Sculpting
- Sculpt excluding colour
- Radius 100, Strength 20%, Smoothness 100%,
- Run tool generally across entire model to soften edges
- Smudge Sculpting
- Radius 40, Strength 20%
- Blend top of ears with head.
- Drag top of nose towards top of head
- blend lower jaw with face
- Smooth Sculpting
- Radius 10, Strength 20%
- Smooth outside edges of eye ovals into face

- Beagle Image Bitmap Layer
- Create Relief
Layer
- New Height = 0.5mm (0.02”)
- Rename Beagle Image Relief Layer to Beagle Texture
- Bitmap Layer activate Greyscale Bitmap Layer
- Zero Under Colour
- Smooth Relief - Whole Layer – 20%
- Sculpting Smooth
- Radius 15, Strength 15
- Smooth eyeballs
- Smooth nose (avoiding groove down middle)
- Slightly smooth tongue
- Carve Sculpting
- Radius 15, Strength 15
- Carefully deepen nostrils
The exercise is complete.


