

Introduction: Bevels and Mitres


Up to now we've been focused on right angles with our wood projects, but there's going to be times when you're going to want more complex shapes to your woodworking. The next step to adding interesting details to your work is with angled cuts, in woodworking terms angled cuts are called either bevels or mitres.
This begs the question: what's the difference between a bevel and a mitre?
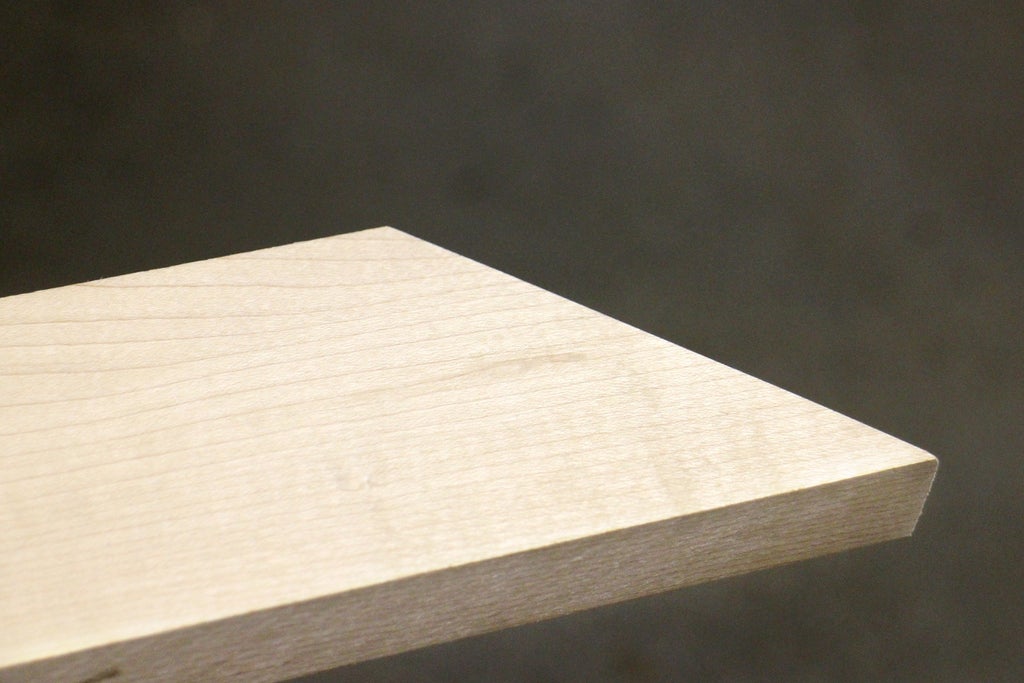
Bevel
A bevel is an angled cut relative to the face of the material. This can be an angled cut along the entire side of a plank of wood, or cut at the end of the wood. The picture above is a bevel cut into the end of a piece of wood.
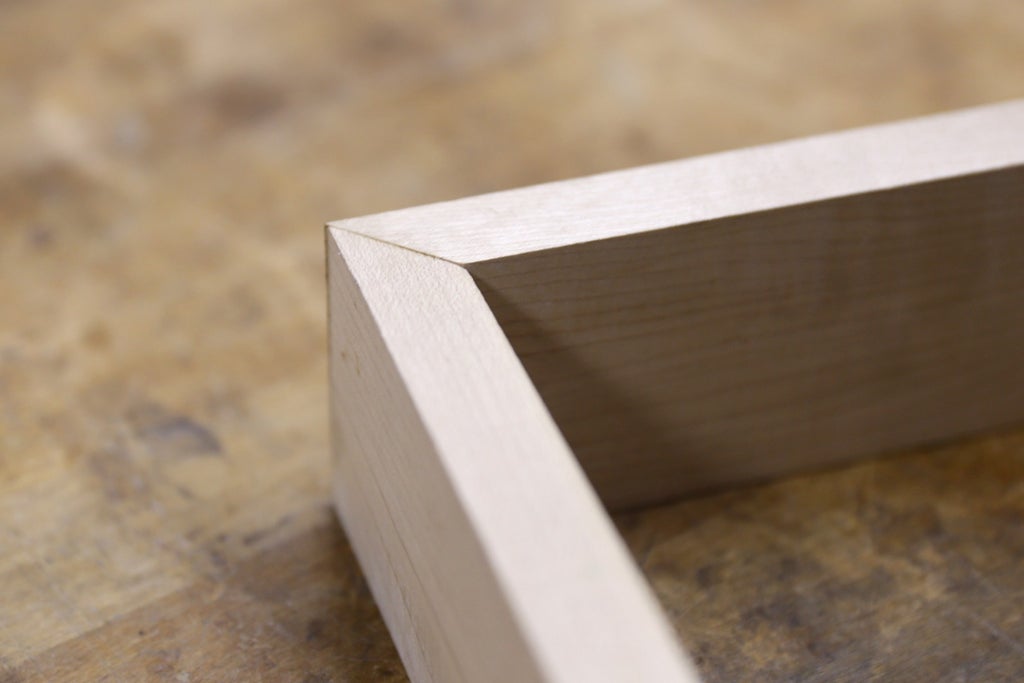
Mitre

A mitre is an angled cut cut relative to the square side of the material. This is most typically seen on wood picture frames. The image shown above is a typical mitre.
Both a bevel and a mitre are types of angled cuts, and both are easy to make without a compound mitre saw. However, bevels and mitres are also easy to cut with the humble circular saw. Almost all circular saws have a pivoting base that will allow a bevel cut, and a mitre cut is just an angled variation of the straight cuts we learned in the Making Perfectly Straight Cuts Lesson.
As you'll see, angled edges are tricky as the cut surfaces don't line up as perfect as you expect - this problem is multiplied when you try and create a squared box with mitred edges. We'll look at techniques to minimize these errors and make clean cuts.
Step 1: Bevel Without a Table Saw

Making a bevel with a circular saw is just as easy. Almost every circular saw has a tilting baseplate that allows the angle to be set. The thumb screw or catch to loosen the tilt will be in front or behind the blade and off to the side, usually in line with the trigger.

The base can be tiled with a rough degree of accuracy, which is usually enough as most bevels are used for trim work and not intended for joining where precision would be needed.
After getting the angle right the blade depth will need to be changed to only a little deeper than the thickness of the cut to be made. Blade height can be changed by a catch that will move the baseplate up or down and expose more or less of the blade.


It's important to not extend the entire blade when cutting for safety reasons, any more blade exposed than what you need can be a hazard as the exposed blade will be under the work piece and outside your view - making it very easy to accidentally cut into your workbench, the power cable, or yourself (yikes!).
To cut a straight and even bevel without the aid of a table saw and fence, you'll need to make your own fence. Accounting for the width of the baseplate and the blade kerf, a fence can be set up along side the wood to be cut, either by clamping (more stable but longer setup) or with heavy-duty double-sided tape (easier but less stable)

With everything set up the circular saw can be run along the wood to create the bevel. As with other cuts, it's advisable to position your work so that the cut off portion falls away from the wood. In the video example below I was cutting directly on top of my workbench, which has the potential for the blade to cut through the wood and into the bench.
As seen in the next picture below, I had the blade set slightly less than the full thickness of the piece, leaving a ridged profile.
Step 2: Mitre Without a Table Saw

Cutting a mitre with a circular saw is almost the same as making a straight cut as learned in Making Perfectly Straight Cuts, only we're cutting at an angle. Measure and then mark your mitre with a pencil on the face of your wood, continue the mark from the face over the edge and onto the side of the piece - this will help keep reference when you're cutting.
If you're cutting a 45° angle the measurement is easy with a speed square, just line the flange edge of the speed square on the side of your wood with the flat side of the square on the face of your materials and scribe the angle with a pencil. If you're doing an angle other the 45° then the speed square has you covered with the markings on it, or you can use a protractor and a straight edge to achieve the angle you want.


As with the Making Perfectly Straight Cuts Lesson, set up a fence along the angled cut line, remembering to offset the distance of your circular saw base plate and blade kerf and to set the fence on the side of the wood you wish to keep so the cut off portion falls away. Then, clamp your wood to a stable workbench and cut your mitre.
With the fence set up correctly, your cut should be clean, accurate, and have minimal tear out.
Step 3: Cleaning Bevels

Sometimes, even when you double check everything, bevels can come out irregular. Most of the time the result are thin fins of wood where the saw blade didn't cut, these can be easily resolved with a small trimming plane.


The plane works by having a flat and level bottom with a small notch cut out from which a sharp blade protrudes, it works much like a shaving razor except with this razor you can control how much of the blade is exposed. It's best to start with very little blade, then work your way up exposing more blade as required.
With the base positioned flat against the wood, run the planer in the direction of the wood grain with the blade facing forwards in one smooth motion. If done correctly the wood will curl as it's shaved (planed). Hand planes aren't just for corners, they're also commonly used on relatively flat surfaces to help level any high spots - look for another lesson on planes in a future class.
Step 4: Truing Up Mitres

After a few cuts, something you're sure to notice is that the mitres don't line up, even when you're checking with a square and sure you cut everything as precise as possible - this is where an ugly truth emerges about mitres: they're really hard to get right!
The good news is there's some things we can do to try and make the mitres fit better. Clamp your sander into a bench vise so that you're got a sturdy station to sand at, put a 150 grit sandpaper on the sander and gently press the mitre onto the sander making sure the contact is as level as possible.


The idea here to to try and even out any small variations from the mitres and get a better fit. Go slow and check your work for squareness often, using a carpenter's or speed square. Eventually you will get to a place where your frame will be mostly square and the mitres tight (this is a Sisyphean task, as getting perfect mitres can be tough even for seasoned woodworkers).
Step 5: Filling Mitre Gaps
Flip the frame over so the front is facing upwards. If your frame has any gaps that couldn't be trued up by sanding they should be apparent now with the corrugated fasteners installed.
In a similar way to when we learned that sawdust can be used to clean up excess glue in the All About Glue Lesson, we can also use glue and sawdust to act as a filler for small gaps.

Apply glue on top of the gap and use a toothpick or sheet of stiff card to force glue into the gap, push sawdust from the same same wood as the frame into the gap. Since sawdust is a great at absorbing moisture you can apply another layer of glue on top (if needed) and then another layer of sawdust to fill the gap.
A clamp was used to keep the wood tight. Allow the glue to dry overnight before sanding.
Step 6: Sanding + Finishing Mitres

From the Sanding Lesson we know to start with a coarse sandpaper of about 100 grit, paying special attention to the transition between joined pieces and the corners, and working our way up to higher grits. If sanding reveals any more voids at the mitres then reapply the glue and sawdust trick again, wait until dry and then continue sanding.

Work up the sandpaper to about a 220 grit for your finish sanding. Clean off the frame after sanding to remove any dust or debris with a tack cloth or lint-free rag.
Step 7: Quiz - Bevels and Mitres
{
    "id": "quiz-1",
    "question": "Bevels and mitres are the same.",
    "answers": [
        {
            "title": "Yes, the terms are interchangeable.",
            "correct": false
        },
      {
            "title": "Depends what side of the Atlantic you are on.",
            "correct": false
        },
        {
            "title": "They are totally different cuts.",
            "correct": true
        }
    ],
    "correctNotice": "Correct!",
    "incorrectNotice": "That's incorrect"
}
{
    "id": "quiz-2",
    "question": "A table saw is the only way to get a bevel",
    "answers": [
        {
            "title": "True",
            "correct": false
        },
        {
            "title": "False",
            "correct": true
        }
    ],
    "correctNotice": "Correct!",
    "incorrectNotice": "That's incorrect"
}
{
    "id": "quiz-3",
    "question": "Your circular saw needs to have a tilting base and depth gauge in order to make bevel cuts.",
    "answers": [
        {
            "title": "True",
            "correct": true
        },
        {
            "title": "False",
            "correct": false
        }
    ],
    "correctNotice": "Correct!",
    "incorrectNotice": "That's incorrect"
}
Step 8:
Mitres might be challenging at first, but they add great dimension to woodworking projects, as they don't leave unsightly end grain. With practice, you'll be a master of bevels and mitres in no time.
In the next lesson we'll learn about stains and finishes that will help make our work really shine.


