

Introduction: Build a Photo Booth!


Now you have all the power in your hands to create a fun photo booth. You've done all the hard work already, writing the pieces of code and building the circuit that will all come together in this lesson. Here you'll learn to package it all up into a stand-alone structure, but you can design any enclosure you want for your photo booth.
I've attached the final Python program for my photo booth. It uses all the example code used in this class, rolled up together-- don't forget to update your four Tumblr API keys and username (using a text editor like Leafpad or a command line app like nano) before running the script using the Python 2 IDLE environment or with the command-line. As a refresher, I'll go over this script later in the lesson.
If you download the sound files to your Pi, move them to your sounds directory.

Step 1: Connect Components


To build the final circuit for the photo booth, it needs to be moved from the breadboard. The circuit used is the same one you built in the earlier lesson GPIOs + More Python: one switch and two LEDs. Reconnect the components using either an EzConnect board (terminal blocks) or a soldering iron. You can learn to solder in Randy's Instructables Electronics Class. However, you can also twist wires together and use electrical tape to get the circuit working if that's all you have on hand.
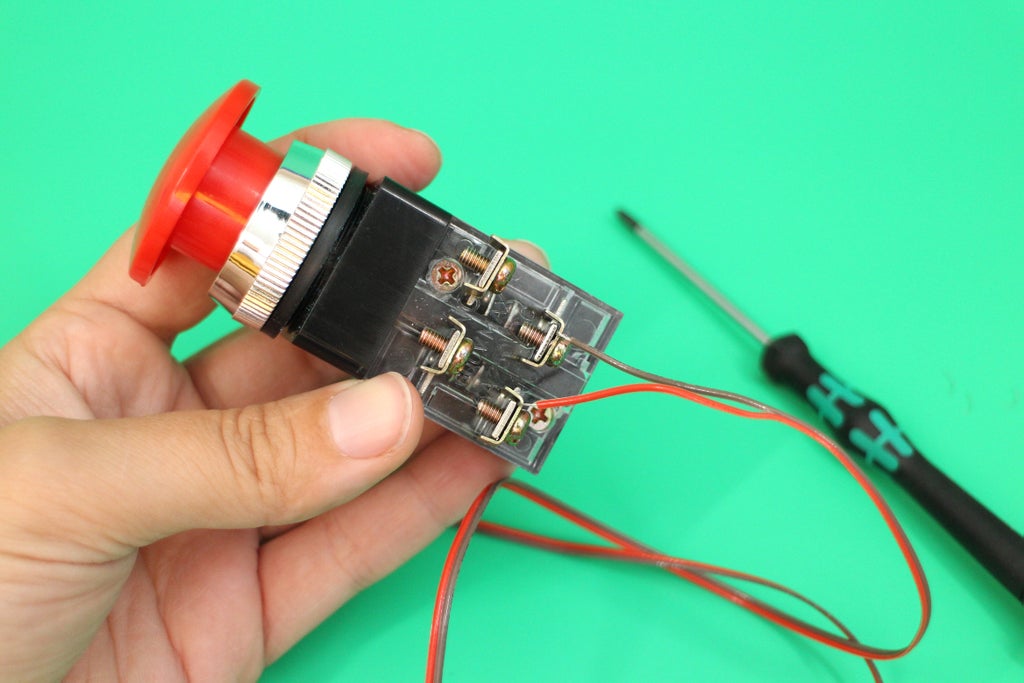
To wire up to the large arcade-style button used in this photo booth, unscrew the terminals on the switch and connect two wires stripped off of the ribbon. The female headers on the end of the jumper cables slip over the pins on the RPi. To extend the length of these wires, cut the opposite end off, strip and twist around the end of some ribbon wire.


You can plug the components right onto the RPi or you can screw them into the EZ-Connect shield if you purchased one.

Step 2: Build Enclosure


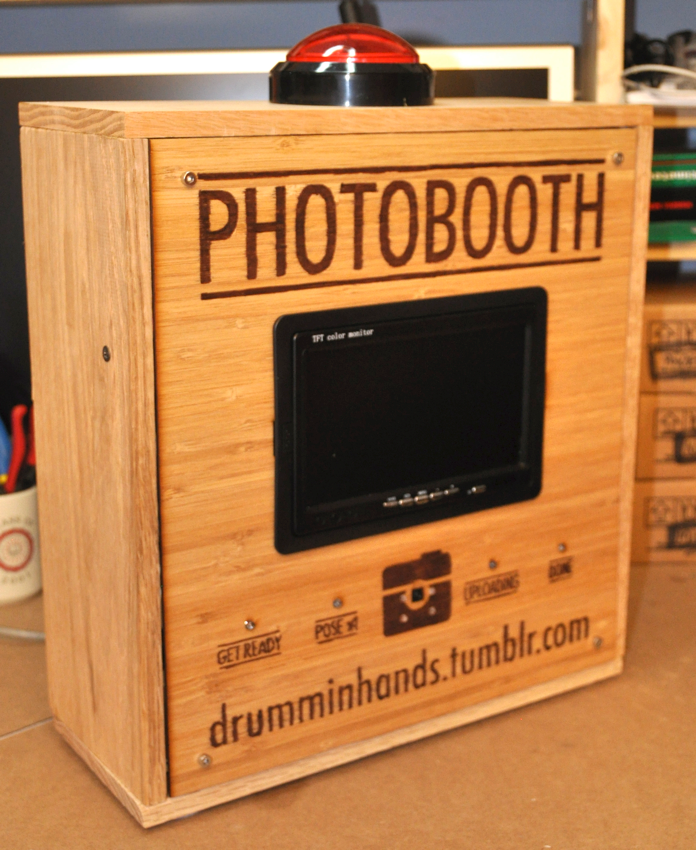
The enclosure can be small, medium or large. The talented Mikeasaurus built a stand-alone facade for this photo booth along with a bench. Four holes were drilled, two for the LEDs, one for the switch, and one for the camera lens. A rectangle was cut out for a 22" screen and a frame designed was cut, painted gold, and mounted. Everything was painted a bright color and vinyl stickers printed to label everything. A small side wall was created on one side to hold an iPad so participants could see their final uploaded GIF.
For inspiration, here are some Raspberry Pi photo booth enclosures I found while researching. All are photo booths that use the Raspberry Pi but some use additional hardware too. There are always multiple angles to approach one concept.

Photo Booth WiFi by Harm Aldick

RPi 3 Photo Booth by kevino, Justin Shaw, and Jenny Ching

Step 3: Mount Circuit + Screen

Except for the screen (which has a little clamp to sit in), I mounted everything using industrial strength double-stick tape and hot glue. Make sure the camera lens is close to the surface it's behind. Otherwise, the edge of the hole will be seen around the image. I shaved off the back where the camera is mounted to remedy the situation.


To mount the switch, unscrew the red pushbutton mechanism and silver ring. To diffuse the LEDs, a ping-pong ball was cut in half and centered around each LED hole with the help of two laser-cut rings.


Step 4: Final Code
The final code below is the same as the file included in the first step.
What it Does
Push the button, the yellow LED flashes in two speeds. It takes six photos and then creates a GIF with a resolution of 640 x 480 pixels. After the GIF is uploaded to Tumblr, the blue LED goes on and a sample of a cat meowing plays two times then the blue LED turns off. Refresh the Tumblr account page and see the uploaded GIF!
This final program puts together parts of previous lessons. Use the script as-is (with your keys and username) or modify it to use your own sounds, change the resolution of the images, change the speed of the GIF, or anything else.
Import Python modules:
#import modules
import RPi.GPIO as GPIO
from time import sleep
import os
import picamera
import pytumblr
from fractions import Fraction
Sending commands from Python to the Linux shell:
#create variables to hold commands
makeVid = "convert -delay 50 image*.jpg animation.gif"
meow3 = "mpg321 sounds/meow3.mp3"
meow2 = "mpg321 sounds/meow2.mp3"
Python variables:
#create variables to hold pin numbers
yellowLed = 17
blueLed = 27
button = 18
Create Pytumblr client, substituting your details for the four keys:
# Authenticates via OAuth, copy from https://api.tumblr.com/console/calls/user/info
client = pytumblr.TumblrRestClient(
  'your_consumer_key',
  'your_consumer_secret',
  'your_token',
  'your_token_secret'
)
Set up GPIOs:
#set up pins
GPIO.setmode(GPIO.BCM)
GPIO.setup(button, GPIO.IN, pull_up_down=GPIO.PUD_DOWN)
GPIO.setup(yellowLed, GPIO.OUT)
GPIO.setup(blueLed, GPIO.OUT)
Use picamera module to access camera:
camera = picamera.PiCamera() #initiate picamera module and class
camera.resolution = (640, 480) #set resolution of picture here
camera.brightness = 60 #set brightness settings to help with dark photos
camera.annotate_foreground = picamera.Color(y=0.2, u=0, v=0) #set color of annotation
Create main while loop with an exception:
try:
    #read button
    while True:
        input_state = GPIO.input(button)
        if input_state == True:
            print('Button Pressed')
            sleep(0.2)
            #if pressed blink yellow LED at two speeds
            for i in range(3):
                GPIO.output(yellowLed, True)
                sleep(1)
                GPIO.output(yellowLed, False)
                sleep(1)
            for i in range(3):
                GPIO.output(yellowLed, True)
                sleep(.25)
                GPIO.output(yellowLed, False)
                sleep(.25)
            #start camera preview
            camera.start_preview()
            #display text over preview screen
            camera.annotate_text = 'Get Ready!'
            camera.annotate_text = '1'
Take series of photos:
            #take 6 photos
            for i, filename in enumerate(camera.capture_continuous('image{counter:02d}.jpg')):
                sleep(2)
                if i == 1:
                    camera.annotate_text = '2'
                elif i == 2:
                    camera.annotate_text = '3'
                elif i == 3:
                    camera.annotate_text = '4'
                elif i == 4:
                    camera.annotate_text = '5'
                if i == 5:
                    break
    	    camera.stop_preview() #stop preview
            os.system(makeVid) #send command to convert images to GIF
            print('uploading') #let us know photo is about to start uploading
Upload GIF to Tumblr, substituting your username:
            #upload photo to Tumblr
            client.create_photo(
		'your_username',	#update to your username
		state="draft",
		tags=["pi photobooth", "raspberry pi", "instructables"],
		data="animation.gif")
            print("uploaded") #let us know GIF has been uploaded
            #turn on uploaded LED and play meow samples
            GPIO.output(blueLed, True)
            os.system(meow2)
            os.system(meow2)
            GPIO.output(blueLed, False)

    GPIO.cleanup() #cleanup GPIO channels

#hit Ctrl + C to stop program
except KeyboardInterrupt:
    print ('program stopped'))
Step 5: Power and Run Program
Power the screen and mount and plug in the Pi with a USB AC power supply or battery bank. Once the Raspberry Pi boots, there are a few things you may want to do to clean up the desktop. To remove any icons such as the trashcan icon from the desktop, right-click and choose to remove. To hide the taskbar, right-click on the taskbar and choose Panel Settings. Click on the Advanced tab and tick the box next to "Minimize panel when not in use". Your desktop should now be clear of all icons.


If you mounted the screen upside-down like I did, you can rotate the display by adding a modifying the bottom of /boot/config.txt:
sudo nano /boot/config.txt
Scroll down the file with your cursor and add this line to the very bottom of the config.txt file.
display_rotate=2 180 degrees
Save and exit Nano then reboot:
sudo reboot
Run Program
In the Linux shell, run the program using Python 2.
python PhotoBooth.py
Step 6: Set Up Speakers (optional)
If you have a sound effect or song you want to play, plug a speaker into the 3.5mm jack using an audio cord. In the final code, the booth plays a sample of a cat's meow twice after the GIF has uploaded.
Step 7: Props and Curtain (optional)

For me, grabbing and pulling the curtain shut is part of the photo booth experience. With Mikeasaurus' help, a PVC pipe was bent and screwed in at the top. A shower curtain works nicely as the photo booth curtain.

When in a photo booth, sometimes people need some inspiration to start pulling shapes and having fun. Grab some fun items for people to dress up in while in the booth such as wigs, masks, jewelry, wood cutouts and hats.
Step 8: Throw a Party

When the photo booth is set up play with the lighting. The better the lighting, the better the photo. Consistent bright lighting set up behind the camera pointed at the subject works best. The below GIFs were taken at two parties, with two different lighting situations. The first two that are more saturated with color were taken with a large light set up at the top of the booth. The second set of photos were taken with ambient room light.


Step 9: Build a Photo Booth!
Show what kind of booth you made! Upload a video or photo of a sketch or of the real thing.


