

Introduction: Custom Leather Bag


Now that we've created a pattern for the bag we're making, let's cut all the pieces of that pattern out in the leather you've chosen, and prep them for the next steps in assembly. In the process, I'll teach you about skiving and using a hole punch to help create non-circular cut-outs.
I've created two variations of the basic bag design to show you how easily you can adapt one pattern to create multiple looks. Both patterns are included for download here so you can choose which one to create or make your own variation using your new patternmaking skills! Once you've chosen your design, print your pattern and cut it out, or use a pattern you've drafted by hand.
In this lesson I'll be using:

Step 1: Design Options

One of my designs is made from the original pattern we drafted. It is a small bag in brown leather with a contrast strap-and-buckle closure in black, and loops at the top to connect it to the strap of your choice. I made two copies of this bag to show you how it can be turned into a nice underarm holster bag by attaching it to a shoulder harness. I'll be mostly showing you the steps involved in creating this bag as we move forward, but you can create other variations with most of the same techniques.
The second style I've constructed is just a larger bag with the same proportions made in a slightly thinner black leather with a thicker leather for the straps. In this permutation the bag is designed specifically to be a purse. I've eliminated the strap and buckle closure on this bag and instead added fringe to the pocket and along the bottom back seam. I've also added a braided strap across the front of the bag which is sewn into the back side seams. This strap is a nice detail that will help hold the flap of the bag closed. Last, I've changed the orientation of the the strap attachments and riveted them to the gusset of the bag instead of sewing them into the back side seams. This will make the bag be more balanced to hang as a purse whereas the strap orientation on the small pouch makes it more suited to hang as underarm holster or hip bag.
Below are the patterns for the small bag and fringed bag options. I have included two versions of each pattern which are simply laid out differently. In the "Letter Size" versions I've split some of the pattern pieces up so they will fit on 8.5"x11" paper, and I've indicated where to tape them back together. When you print out your patterns, make sure you keep them scaled at 100%. For reference, I've also included files with larger layouts that show the whole pattern pieces.

Step 2: Order of Opperations
There's just one more thing I'd like to mention before we get started on our bag.
To keep the topics in this class coherent, I am presenting skills in a certain order, but when you start making your own leatherwork, you will see that this order of operations sometimes needs to be re-arranged on a project-by-project basis. For example, I am including hardware (like buckles, and snaps) as the last step in the bag project, to be added once you have completed the rest of your bag. This works fine in this case, but sometimes the way a project is structured means that you need to add some of the hardware before putting the other pieces together.
Figuring out the most efficient order of operations is one of the most important parts of planning any project, and if you don't think it through fully, you will sometimes find yourself in a jam later! I spend a lot of time thinking about how everything will go together every time I make something. Keep in mind that time spent planning this way is not time wasted, it is time saved.
I will give you some suggestions as I present each skill here, but you will sometimes have to let logic guide you to figure out the best order of operations when you start creating your own projects.
Step 3: Cut Out Your Pattern in Leather

Once you've chosen your design, and cut out your paper pattern, go ahead and cut it out in the leather you've chosen for your bag and straps. If you've chosen to create the fringed bag design, the process of constructing your bag will have some variation in a few places. If you're making that version, you can also take a peek at my instructable on How to Make Leather Fringe, to get more details about cutting fringe.

Lay the paper pattern pieces on your leather, arranging them to take up as little space as possible, and taping them down in a few places.


Mark your pattern edges, rivet holes, and the ends of sewing lines, with an awl.


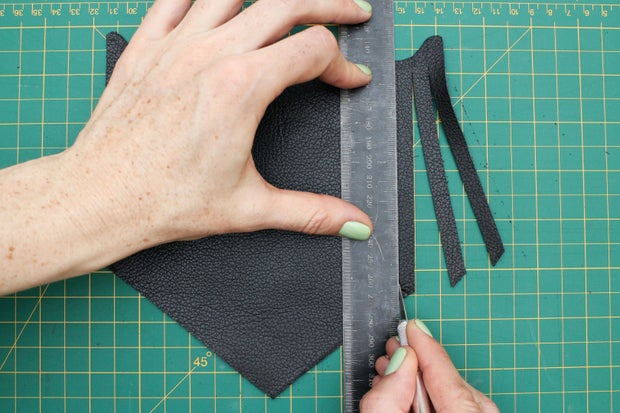
I used sharp scissors to cut most of my pieces, and a ruler and x-acto or cutting wheel to cut the straps and pieces with straight edges, like the gusset.


When making the fringed version, I cut my pattern pieces out like any others, but made sure to mark the top and bottom of each fringe cut-line with an awl first.


It is usually easier to incorporate the fringe into a pattern piece like this if you can, but sometimes it doesn't work. For example, on the back seam of my bag, if I had just extended the back of the bag down to make fringe, the flesh side of the fringe would have ended up facing forward, and that wasn't the look I wanted. This is why I had to create a separate piece of fringe that would be sewn into the back seam. I cut this piece out the same way as the pocket piece, marking the ends of the fringe cuts with an awl.

When I had both pieces cut out, I used a metal ruler and an x-acto knife to cut the fringe following the marks I had made with my awl on the leather.

Step 4: Punch Holes and Cut-Outs

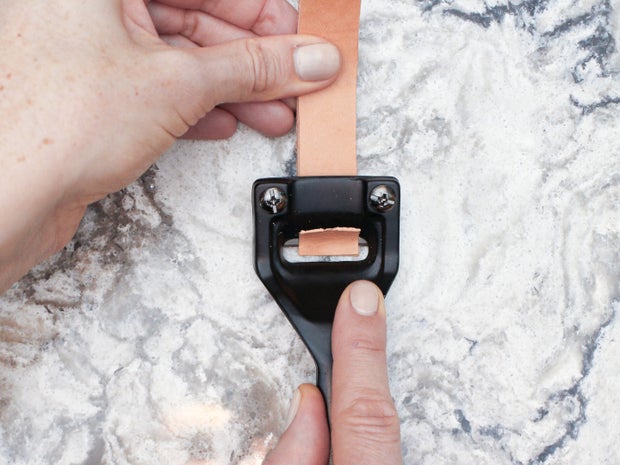
Now we are going to punch holes in all the places we marked through from the pattern on the straps and the larger pieces, you can refer back to the pattern to see where these are.


To create the slot on the buckle strap and the two slots that the strap will run through on the front flap, punch a hole at each end of the slot, then use your x-acto knife to cut between the holes.
Start your cuts from one side, but don't cut all the way to the other hole, or you might cut farther than you want to. Instead, remove your knife, rotate the pattern and then cut the rest of the slot by starting in the hole on the other side and cutting to meet your first cut. This cutting strategy is good practice to help prevent over-cuts whenever you make internal cut-outs.


Step 5: Skiving

When you are layering several pieces of leather on top of each other, as you do in seams or riveted loops, you sometimes need to thin the edges of the leather pieces so they stack together cleanly. Thinning leather pieces like this, by creating a long tapered bevel along the edge, is called skiving. There are a few different tools you can use for skiving, but I'm just going to show you my favorite, which I think is also the easiest and safest.
The Super Skiver is a skiving tool that basically works like a razor, and even comes with replaceable blades. You pull it along your leather to shave away layers you wish to remove. Pulling your skiver parallel to the edge you want to skive is usually the best method when you are skiving a relatively long edge. To do this, place your leather on a hard surface like your quartz slab. Line the edge you want to skive up with the edge of the quartz, about 1/6" from the edge. Then start pulling your skiver along the leather, shaving off an angled strip. It usually works best to start skiving a little ways in from the end of the leather, finish the skive, and then turn the leather around to skive the bit you missed at the beginning.
If you find it hard to maintain an even angle, you can try drawing a guide line on your leather where you want the bevel of your skive to start, and then follow this line as you pull the skiver toward you.


If you need to skive a smaller area, like the end of a strap, which you do quite often in leatherwork, you use the skiver a bit differently. In this case you skive perpendicular to the edge you are skiving, starting your skive where you want your bevel to start, angling down and pulling out to the edge of the leather.

An x-acto knife can also work as a skiver in a pinch, especially on strap ends. Start your skive by placing the blade of the knife where you want your skive bevel to start and pushing away from you towards the strap end.
As with any knife, your job will always be easier if your blade is sharp, so change your blades often.


Step 6: Skive Your Straps

For our bag project we are going to skive the inner edges of the top loop pieces, and both ends of the small buckle strap. Practice skiving on some scraps and then try it on your straps. Don't worry if you mess up, they are small pieces and you can always cut them out again.


Step 7: Gouge and Fold the Pocket

We are going to use the gouging and folding technique we learned in lesson 4 to create a pleated pocket on the front of our bag. Adding a double fold, or pleat, on each side of this pocket will allow it to open wider and give it more capacity.
First you need to mark your leather where you are going to make a fold. I have marked the four fold lines in red on the pocket pattern piece. Turn your leather pocket piece over so the flesh side of the leather is facing up, since that's the side we are going to gouge on.

Place your pocket pattern piece over the flesh side of your leather and line it up with the edges. Then use your overstitch wheel to trace over the red sewing lines on the pattern. Press down just hard enough so you can see a dotted line on the leather when you lift up the paper.


Make sure you've tested your V-gouge on a scrap of your leather before you gouge the lines on your actual pocket. Remember, you want to gouge deep enough so you can feel the leather fold easily, but not so deep that you come close to breaking through the grain side of the leather. When you think you've gotten the hang of using this tool, gouge the 4 lines on the back of your pocket. Now fold the edge of your leather over on one of the inner lines so the grain sides press together.


Use the cardboard and mallet trick to pound a crease into the leather along the gouged line. Then fold the edge back along the second line, and pound this fold down on the flesh side, creating a fold like an accordion.


Repeat this on the other side. Your folded pocket should look like this:

Step 8: Quiz
{
    "id": "quiz-1",
    "question": "To create an oblong hole in leather, you should:",
    "answers": [
        {
            "title": "punch two holes and cut between them",
            "correct": true
        },
        {
            "title": "fold the leather in half and cut on the fold",
            "correct": false
        },
	{
            "title": "freehand with an x-acto knife",
            "correct": false
        }
    ],
    "correctNotice": "Yup, that method works well.",
    "incorrectNotice": "No, try that again."
}
{
    "id": "quiz-2",
    "question": "To skive the long edge of a piece of leather you should:",
    "answers": [
        {
            "title": "skive perpendicular to the edge",
            "correct": false
        },
        {
            "title": "skive paralel to the edge",
            "correct": true
        },
	{
            "title": "use scisssors",
            "correct": false
        }
    ],
    "correctNotice": "Yes!",
    "incorrectNotice": "Sorry, that's not right, try again."
}
{
    "id": "quiz-3",
    "question": "The pleat we are making in the pocket of our bag is called:",
    "answers": [
        {
            "title": "an accordion pleat",
            "correct": true
        },
        {
            "title": "a fan pleat",
            "correct": false
        },
	{
            "title": "a trombone pleat",
            "correct": false
        }
    ],
    "correctNotice": "Yup.",
    "incorrectNotice": "Nope, guess again."
}
{
    "id": "quiz-4",
    "question": "When you're creating a leather project, which should you always do first?",
    "answers": [
        {
            "title": "attach snaps",
            "correct": false
        },
        {
            "title": "sew leather pieces together",
            "correct": false
        },
	{
            "title": "it will vary depending on the structure of the project",
            "correct": true
        }
    ],
    "correctNotice": "Yes! Well played",
    "incorrectNotice": "Nope, try again."
}
Step 9: What's Next?

Now that you've practiced, and re-applied some of the skills we learned in our first project by cutting out and folding your bag design, we can move on to learning some new skills that we'll use to assemble the bag. As I'm sure you noticed, different tools worked better for cutting out this project than the last one, since this leather was much softer. Remember, it's important to always try to use the tools that are best for your specific materials.
For instance, using rivets to join seams on leather as soft as the leather we're using for the bag wouldn't be the best choice. Instead, we are going to sew this bag together, and we'll start learning about creating holes for hand sewing leather in the next lesson!
Step 10: How's Your Project Going?
If you have any problems as you construct your custom bag, feel free to ask questions in the discussion section below.
{
    "id": "homework1",
    "actionMessage": "Share a photo of the pattern you've cut out, your skived straps and the pocket you folded to complete this lesson!",
    "actionCompletedMessage": "Looking good! You've completed this lesson"
}


