

Introduction: Fixing Knitting Mistakes


Mistakes are a natural part of learning to knit! Forgive yourself some funkiness in the early stages of your journey, but eventually learning to identify and fix mistakes will bring you flawless results and great satisfaction. This lesson covers some common mistakes you might make and how to get things back on track.
The only extra tool that comes in handy is a crochet hook. Choose one that's a few sizes smaller than your knitting needles. Precision is not required here-- if it fits though the loops of your stitches, it'll do.
Step 1: Tinking Vs Frogging
Finding a mistake in your knitting can be frustrating. To fix them, you usually have to reverse some of your stitches, undoing your hard work. There are two ways to undo knitting. Tinking is when you undo stitches one at a time, inserting your left needle into the loop supported by the working yarn, and pulling it off the right needle. Tink is knit spelled backwards.
The faster way to remove many stitches/rows is to remove the stitches from the knitting needles and quickly pull the working yarn to rip out rows of stitches at a time. As my mother says, "it's called frogging because you ribbit," which refers to the vibrating physical sensation of pulling out the stitches (similar to that of a zipper).
Step 2: Reversed Direction

If your knitting looks lopsided like this, you may have reversed your row prematurely. This is an easy mistake to make when knitting flat things, and usually happens when you set your project down halfway through a row. When you pick it up, you forgot which direction you were knitting and doubled back too soon.
To fix this error, take out the stitches until you get back to the location of the reversal, then finish knitting the complete row and continue as usual.
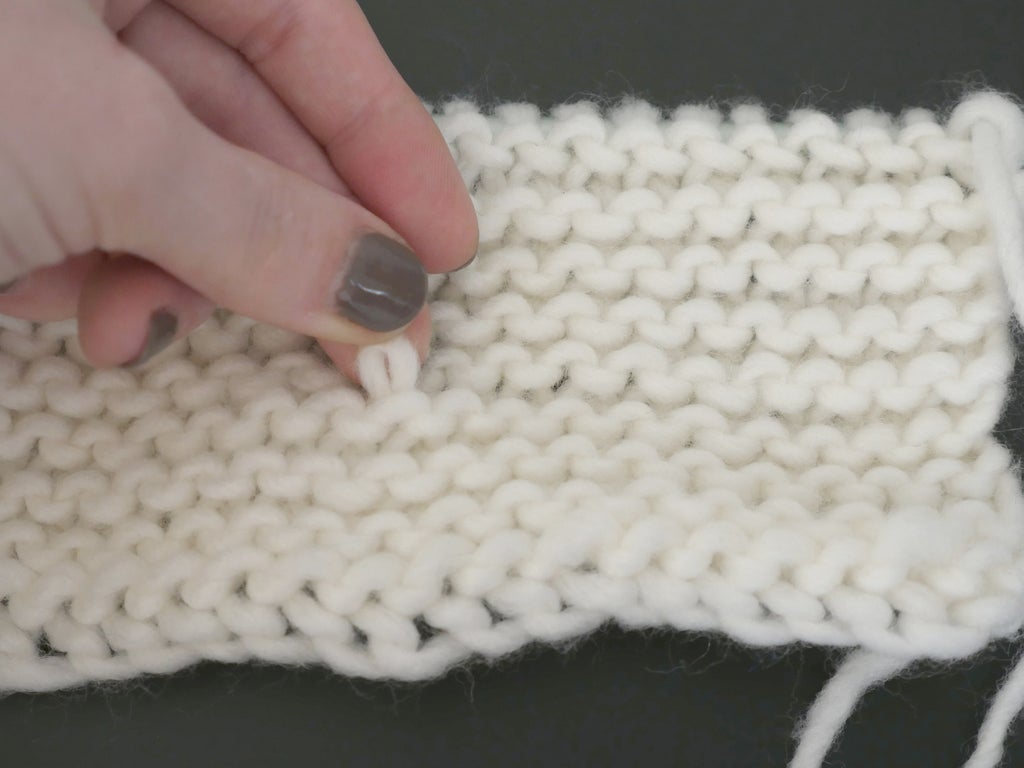
Step 3: Slipped Stitch

Another common mistake is a slipped stitch, which is a stitch that did not get knitted. This can be the result of an incomplete hand motion while knitting. It is possible to just pass the unknit stitch from the left needle to right, and the working yarn ends up looped over the needle. When you look at your row, it will look like an extra loop of yarn is spanning a normal stitch at a different angle than everything else.


This mistake is a super easy fix and doesn't even require any undoing! Just knit to the location of the slipped stitch, and use your right needle to lift the unknit stitch up and off the left needle, over the working yarn, which will now become the stitch it was always meant to be. Knit this stitch as normal and continue working.
Step 4: Dropped Stitch
Argh, the dreaded dropped stitch! Don't panic, but do take a deep breath. It's probably the most frustrating mistake to make, especially if you don't notice it right away.
First, assess whether you can fix it without undoing your whole project. Look at your knitting: was the stitch dropped in the most recent row or two? If you dropped a stitch many rows ago and kept knitting with fewer total stitches, there won't be enough slack in each row to pick up a new stitch. Remove the needles and frog back to the row where the stitch was dropped, then carefully put the stitches back on the needles.
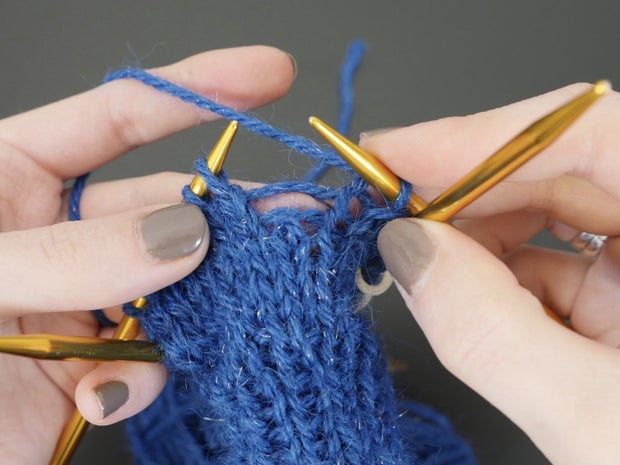


If you dropped the stitch recently, even if it created a run several rows tall, there's enough slack in the yarn to fix it with a crochet hook without undoing very much of your work. Tink back to the spot in your row where the stitch was dropped. Insert the crochet hook into the dropped stitch (catch the loop). The rows of yarn will look like a little ladder. Hook under the closest "ladder rung" and pull it through the loop that's already on the hook, sliding it over and off in the process. Repeat to climb all the ladder rungs until there are none left, then slip the stitch back onto your left knitting needle.
By know you have learned that purl stitches are just knit stitches in reverse. Well, if when you pick up a stitch and the result looks wrong, it's probably just backwards. Try working the crochet hook from the other side of the knitting to pick up a purl stitch. Remember your first scarf? You knit all rows, flipping direction after each row. The result is called garter stitch, where each row is entirely knit stitches or entirely purl stitches, alternating. When you pick up run stitch in garter, your crochet hook will have to switch to the other side of your knitting for each row. You'll have to hold the stitch with your finger while you remove the hook and bring it in from the opposite side. Garter stitch is the most inconvenient pattern in which to pick up stitches, which is one of the reasons you were encouraged not to worry about mistakes in your first project.
Class table of contents:


