

Introduction: Introduction to ArtCAM Standard


ArtCAM Standard is a single solution for designing and making with CNC in the woodworking industry. You can download a free 30 day trial of ArtCAM here, or subscribe to the full software package.
ArtCAM allows complex reliefs (ArtCAM 3D models) to be created quickly and easily from 2D vectors (ArtCAM Wireframe) or bitmaps (Image files). These vectors and bitmaps can be generated within ArtCAM or imported from other systems. ArtCAM can also import 3D Surface data, which is translated on entry or after as a Relief model.
ArtCAM contains tools for editing the reliefs and combining stored reliefs. Once a 3D relief has been created, toolpaths can be generated to machine it. Multiple toolpaths are easily generated for roughing, finishing and engraving. The toolpaths can then be simulated to allow complete visualisation of the product before machining.
This course will cover all the basics you need to know to create projects in ArtCAM!
Note: All files can be found at the bottom of each lesson. Feel free to save the files to your own directory.
Step 1: Flourish Tutorial
The following tutorial is quick introduction into the world of ArtCAM.
With a few simple steps, an image is imported, traced with vectors, and then modelled into a 3D relief.
1 OpenArtCAM![]()
The start up page is displayed. The Open option will load in existing ArtCAM Files and import images.
2Click Open

3Navigate to the training Data Files and open Flourish-Image.jpg.(Attached above)
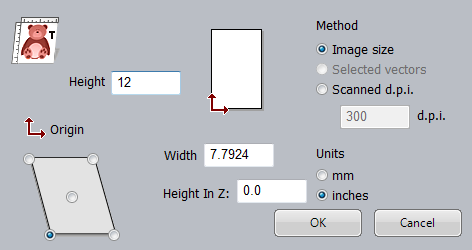
4In the Set Model Size screen, choose the Units as mm or inch and change the Height as follows then click OK:
- 300 mm or
- 12 inches
The image opens in ArtCAM in the 3D View.

The images contains multiple shades of black and white and needs to be reduced to allow ArtCAM to quickly trace vector wireframe around the image.
5Open the Bitmap to Vectorfunction ![]()

6Click on the Reduce Colors button.
This form allows the number of colours in the Bitmap to be reduced by entering the required number or moving the slider bar.
7Change the Number of colors to 2 before selecting Apply.
8Click the Create Vectors button

9Close the Bitmap To Vector page with the X
Next hide the image and use the vectors to create a 3D relief.
10Click on the Display Material button to hide the image and show the model in ArtCAM gold relief color.

11Drag a window with the mouse to select all the vectors.
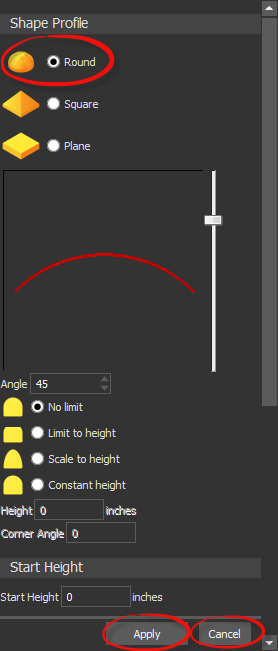
12Open the Shape Editor function ![]()
13Choose the Round as the Shape Profile.
14Then click Apply and Cancel.
The relief is now created and visible in the 3D view.
15Hide the vectors in the 3D by turning off the Toggle Vector Visibility button ![]()
16Rotate the relief by holding down the mouse wheel and moving the mouse.

The tutorial is complete!


