

Introduction: Painting and Finishing EVA Foam and Worbla


Once you've made a costume piece with Worbla or EVA foam, the real magic comes when you get to define its identity with color! There are a lot of techniques for finishing your costume pieces that can really make them resemble different materials. If you want to create something that looks like a very realistic piece of armor, or some other specific material, the process of finishing can really make or break the look of your costume. I am a bit impatient, and more interested in creating interesting original designs than trying to emulate something that already exists, so I usually don't spend a ton of time on finishing techniques, but you can still create some awesome looking pieces with some relatively simple techniques.
In this instructable I'll introduce you to some of the most common ways to finish EVA foam and Worbla, then show some materials and techniques for painting. If you have a specific look that you are trying to achieve, or just want to dive deeper into the world of Worbla and EVA foam finishing, check out some of the projects in this collection for some good resources.
This tutorial is part of my How to Become a Superhero collection which is a series of tutorials that walk you through designing and creating your own superhero costume. To learn about constructing costume pieces with EVA foam and Worbla, check out the two previous instructables in the series.
Constructing a Spandex Supersuit
Painting and Finishing Worbla and EVA Foam (*you are here)
Step 1: Tools and Materials

For EVA Foam
Materials:
- Plastidip
- Weldwood original contact cement
- Acrylic paints in the colors and finishes of your choice
- Metallic pigments and and acrylic medium (optional)
- Spray paint (optional)
- Through The Roof Sealant, Mod Podge or some other finish
Tools:
- Upholstery foam scraps or makeup sponges
- Disposable paintbrushes
- Nicer paint brushes in various sizes
- Gloves
- A protected well ventilated area
For Worbla
Materials:
- Flexbond, wood glue, gesso or another Worbla smoothing compound
- Acrylic paints in the colors and finishes of your choice
- Metallic pigments and and acrylic medium (optional)
- Spray paint (optional)
Tools:
- Head form (optional)
- Painter’s tape (optional)
- Gloves
- Paint brushes
- Sandpaper
Step 2: Priming EVA Foam

After you've glued your EVA foam pieces together, and before you paint them, you need to give them some kind of primer coat. One reason is that if you try to paint directly on the surface of the foam your paint will soak in somewhat, creating a rough uneven surface, so you need to seal the cells of the foam with something first.
Also, foam is not an extremely strong material and without some kind of sturdy finish it's more likely to tear at points of pressure when you're wearing it. This second reason is really more of a factor when you're making foam armor or weapons that are going to see some action, but it's still a good idea to seal your foam so your costume will be more likely to last a long time.
A great priming material that accomplishes both these goals and still leaves your foam with it's natural flexibility, is Plastidip. Plastidip is a liquid plastic material that comes in both spray and paint-on varieties, and is usually used to rubberize the handles of tools and other things. You can get it at any hardware store in a few different colors. It's a fairly nasty smelling material, so make sure you use it in a ventilated area.
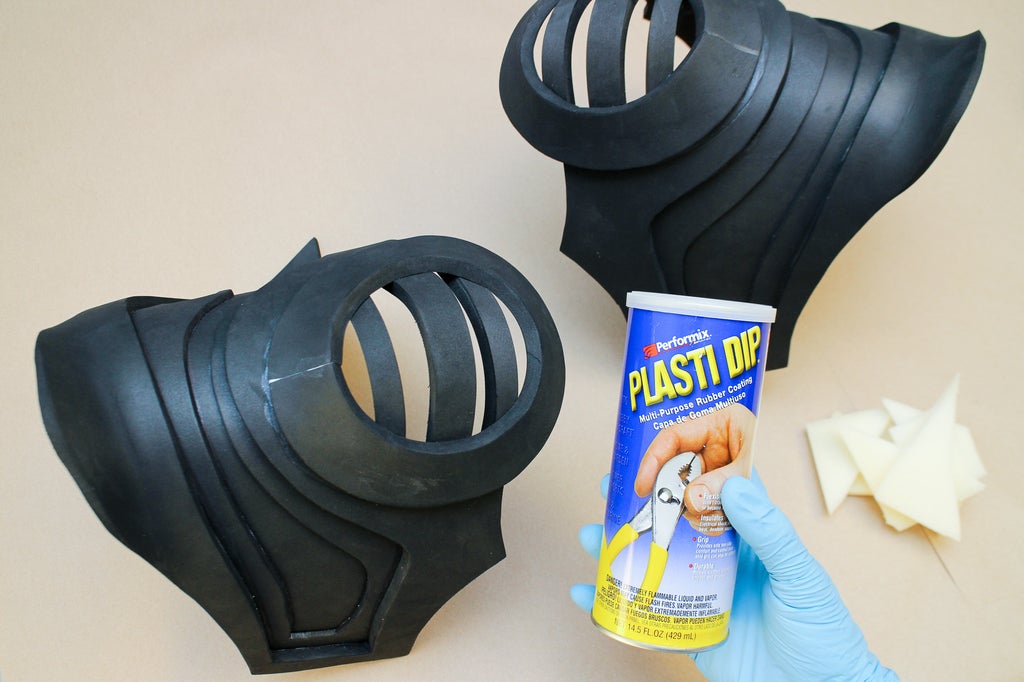
I think the most effective way to apply Plastidip to foam is to paint on a few layers, then add a top coat or two of spray to smooth out the brush strokes. The best tool for painting on the Plastidip is actually not a paintbrush but just a few scraps of couch foam cut into small wedges, or even makeup sponges. Paintbrushes will just get ruined, plus they'll leave too many brush strokes and sometimes drop bristles. Also, make sure you're wearing a pair of gloves because this can get a bit messy.
Before you start working on your actual piece try spreading some Plastidip on a scrap piece of foam to get the hang of applying it. Try to spread as even a coat as you can, not leaving too many blobs or streaks, though some of this will even out as it dries. Test pieces like this are also useful to have later when you want to test paint colors.

Spread layers of Plastidip on your piece, getting all the surfaces and edges of the foam, except the underside where you want to attach straps.


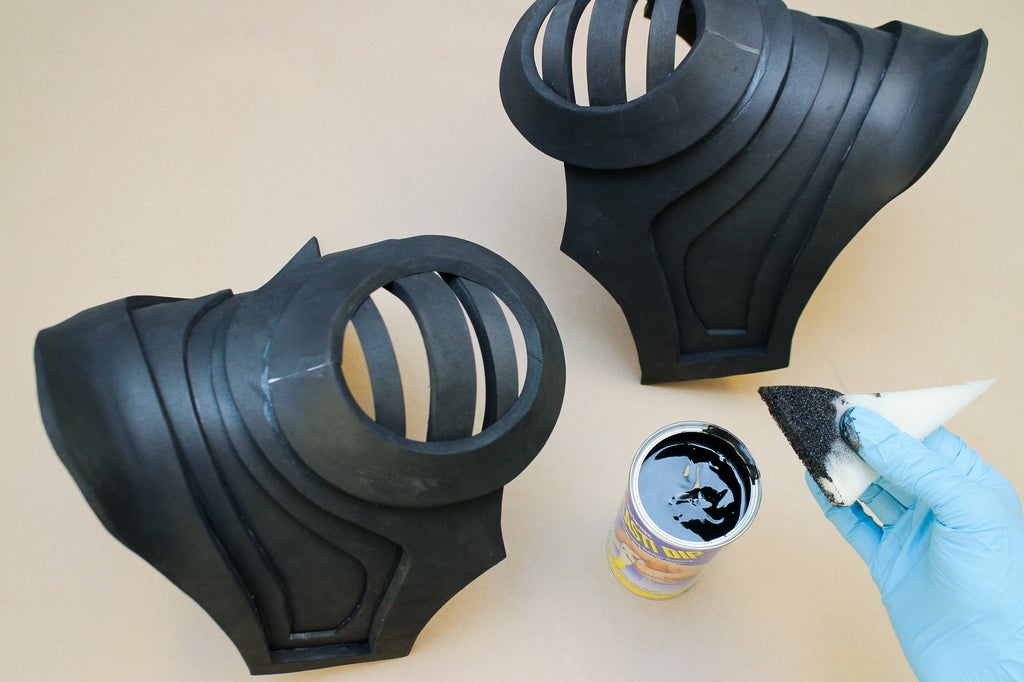
With a relatively large piece like this, by the time I was done putting a coat on the second piece the first piece would usually be dry enough to take a second coat.

I painted three coats on each shoulder, but if you really wanted it give your piece extra stability you could add as many as 10 coats.
Once my painted coats were dry, I added two spray coats of Plastidip on top. The spray Plastidip is a bit tricky to work with, you have to work quickly to get an even coat because it dries fairly fast, and can start to build up a speckled texture. But when you get it right, it gives a nice smooth finish.


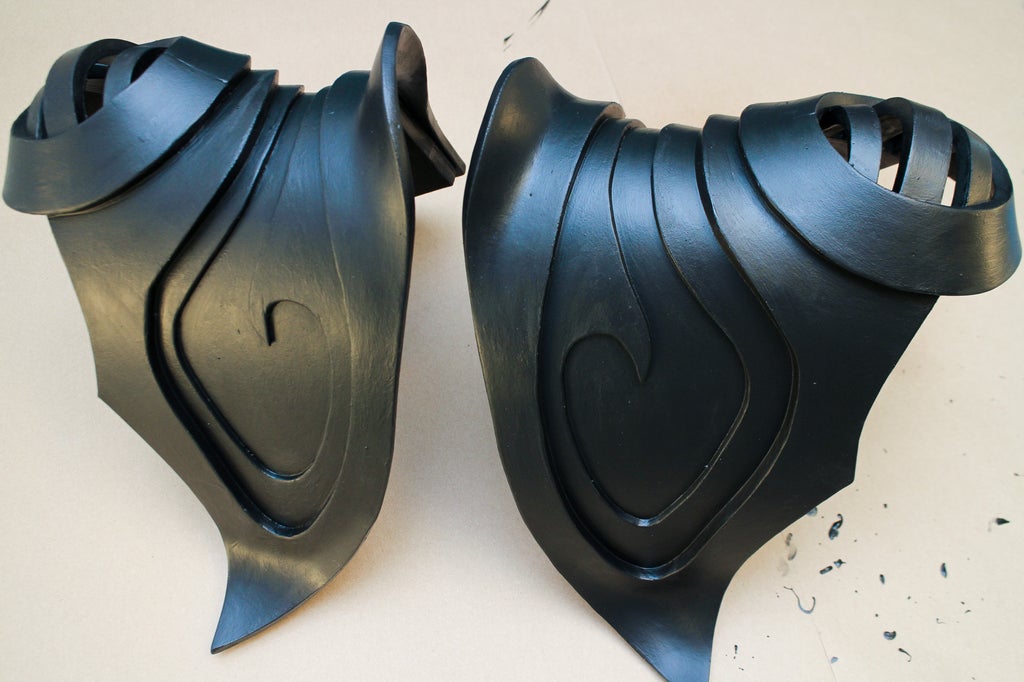
Plastidip has a really cool look all by itself, so if you were creating a black costume piece, especially something that that was supposed to look like rubber, you could even just stop here or add a sealer without any painting. In fact, I liked the look of my plastidipped shoulders so much that I almost just left them the way they were. But painting is fun to, so it really depends on your design.

Step 3: Priming Worbla

For similar reasons Worbla also needs primed before it can be painted. The surface of regular Worbla is somewhat rough, and depending on what kind of look you are trying to achieve you may need to add quite a few layers of primer, and possibly some sanding time to your Worbla.
There are many kinds of primers that will work on Worbla, and if you want to read about all of them in loving detail you just aren't going to find a better list of smoothers and primers than this one on the worbla.com website. I usually use Flexbond for my Worbla priming. Flexbond is a lot like wood glue, it's non-toxic, non-smelly, water soluble, extremely flexible, dries relatively quickly, and covers the grain of Worbla fairly effectively in 3-4 coats.

To use Flexbond on your Worbla just paint it on with a paintbrush, watching for drips and pools as the Flexbond dries.

When it's dry it will be clear and you can continue adding more coats. On your top coats you might want to dilute the Flexbond a little with water to help prevent visible brushstrokes.


If you have more patience than me, you can also wet-sand the flex bond to get especially smooth surfaces, though smoothing materials like gesso are really better if you want an extremely smooth surface.
Step 4: Painting


Now comes another one of my favorite parts in this costume making process, painting!
There are a lot of different ways to paint both EVA foam and Worbla, but I think the simplest and most fun usually involves acrylic paint. Having a good collection of acrylic paint colors around is a great idea whenever you're trying to mix specific colors for a project. Using a combination of fluorescent and standard paints works great on superhero costumes if you really want your colors to pop, and I also like to have a few different acrylic mediums around with different gloss finishes to mix with my paints.

To create metallic colors you can use metallic spray paints, buy pre-mixed metallic acrylics, or mix your own with metallic pigments. This last method is my favorite and another great use of the acrylic mediums. This collection of metallic Pearl EX powders in every shade of the rainbow is one of the smartest purchases I ever made. Mixing these pigments into a medium like acrylic Polymer Gloss, and even adding small touches of flat colors, lets you create an infinite variety of metallic and pearlescent finishes that you could never get from a spray can.

For example, when I was choosing the metallic paint for my helmet and shoulder armor I tested a few different kinds of spray paint and out of the bottle paint, but found that nothing was quite the metallic sheen that I wanted to match the warm brown in my wing fabric.


So instead I used my pearl powders and gloss medium to mix just the right color.

Start with your base coats and larger areas, then add details. Have a range of brush sizes available and use the right brush for the job at hand.


When you are painting your pieces you may or may not want to add a primer color or base coat before you paint, depending on what color you are trying to create.


The color of Worbla itself is neutral enough that it often doesn't need a primer for most colors. The metallic I mixed worked well on the Worbla with a few coats, but I had a hard time getting coverage with the fluorescent purple I used on the antennae, so for a color like that priming would be helpful. In general, if you are having a hard time getting good coverage from a color adding a little white can help, as long as it doesn't ruin the color tint you're going for.

Black can be a good base for metallics, especially if you're going for a more aged, gunmetal sort of look, not a brand new titanium look. My metallic worked fairly well over the black Plastidip, but required a few coats for good coverage.

Lighter colors like my fluorescent red, should really be given a white primer coat before they are painted over black as you can see on the right below.

Once you've added your main colors you may want to add some shading and weathering in some areas. While real armor may not have this same kind of shading, it can actually add a very nice effect to your pieces and make the details really show up.

To add shading to my pieces I usually like to work over a still wet area of base color and use a darker color to add definition to cracks and crannies, spreading the darkness out and fading it into the base color.

Step 5: Top Coats and Sealing
If you really want to protect the surface of your pieces after they're painted, or give them a nice shine, you can add a layer of some kind of sealant after your paint is dry.
Spray sealants like Mod Podge or acrylic mediums are convenient, but if you really want hard core protection, my friends in the foam weapons community recommend using Through The Roof - which is a clear roof sealant you can get at a hardware store.
Like many of the substances we've used here it's fairly nasty smelling stuff, so use it in a well ventilated area. Through the roof is a very shiny finish, and good for every type of look, but it's great for metallics.
Step 6: Adding Closures and Attachments

It's time to put the final touches on your costume. Even the most well made costume pieces will be useless if they don't stay on your body or fit uncomfortably, so we need to add straps and other means of attachment to our foam and Worbla pieces. The best Method for creating these attachments will depend a lot on your specific designs, but in general you want to choose materials and points of attachment that will be the most comfortable and the most visually in line with the rest of your costume.
For comfort and convenience, one of the best ways to attach things is to use elastic as straps. Elastic strips can stretch with the motions of your body, which often means you don't have to use any buckles, or clasps. Elastic also comes in a really wide variety of sizes and colors, so you can usually find something that will fit with the aesthetic of your costume or blend in if that's what you're going for.

Another very popular strap material are nylon straps, which also come in a lot of colors and widths. These straps are especially good for attaching EVA foam because they will melt a little when you use hot glue on them, and therefore stick really well.
If you are wanting to create straps and attachments that add to the aesthetic of your pieces, you might want to use a nicer material like leather. I cover how to make leather straps and belts, and add buckles, clasps, rings and snaps to leather in depth in my Leatherworking Class, so if you're interested in using leather to attach your pieces take a look at those lessons.


To figure out the placement of your straps you can put your pieces on a dress form, or on yourself, and tape or hold the straps in place to see where they need to be attached.


Then you can mark where the ends of the straps should sit on the foam.

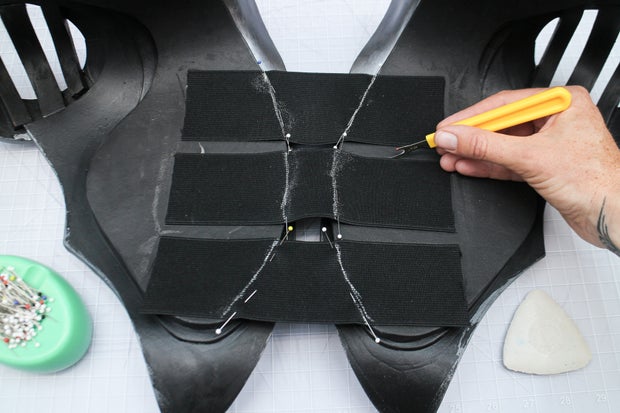
No matter what type of strap you've chosen you will still need a way to attach the straps to your pieces. This can be a bit tricky with EVA foam because of the tendency of foam to tear under too much focused pressure. Sewing or riveting to foam is therefore not an option, so the best way is to glue your straps down.
With pieces like my shoulders where the straps aren't going to be under a ton of pressure, you can use the same contact cement that you used on the foam, or you can use hot glue for a really secure bond.


To help the glue stick even better, score the area on the foam where your strap is going to sit so the hot glue can soak in and really bind with the foam.
Once you've glued your straps down you can add a layer of leather or fabric over them if you want to cover the ends and make the inside of your armor look nice. I like to glue my leather down with Weldwood.

To attach straps to Worbla you can do what I did with my headpiece and build attachment slits or holes into the structure of the Worbla.

If you want to create less visible strapping you can also use pieces of Worbla, or preferably Wonderflex, to secure the ends of your straps down to your piece.
Step 7: Are You a Superhero Yet?

What have you created, and how have you brought it to life with color? If you've created an EVA foam or Worbla project, post an 'I Made It' in the comments section below!
If you've been following all the tutorials in my How to Become a Superhero Collection, your transformation may almost be complete! Though, depending on your point of view, there's one more important thing we need to talk about... capes. If you're interested in adding a fun custom cape to your design, check out the last Instructable in this series which will show you how I created a Custom Printed Cape with Spoonflower!


