

Introduction: Sending a Job to the Printer


SEND THE TRAY TO THE JOB MANAGER
- Click the Tray Settings tab.
- Click Placement if you need to continue working on the placement of the model.
- Click Validate to ensure that the model is printable.
- If the part is orange, it isn't watertight.
- Use Netfabb or Meshmixer to fix the model.
- If the model is red, it is outside the printable area of the tray.
- Place the model directly on the tray.
- If the part is orange, it isn't watertight.
- Click Estimate to show build time and material use.
- See Shop Staff before starting any print with a duration of more than 12 hours.
- Click Build.
- If prompted with the message “Automatic Placement hasn’t been performed, do you want to proceed anyway?” click “Yes,” even if you have, to proceed.
- Otherwise, “No” will return you to the software without sending the job to print.


Select a Print Mode
Print Modes can be confusing, as the software may offer options that aren't possible. Be sure to read carefully.
- High Quality
- Both cartridges must be the same material.
- This mode prints in higher resolution than normal.
- Printing speed is normal.
- High Speed
- Both cartridges must be the same material.
- This mode prints faster than normal.
- Resolution is normal.
Save the file
- Select “No, use only the selected model material”.
- Save your tray.
- Do not save to a thumb drive.
- Save to “Documents” or “Z drive User Storage”
- Use the format First_Last_Project.objtf
- example: Chris_Smith_Gears.objtf

Step 1: Scheduling the Print Time
At The Pier 9 Workshop you need to schedule the print job so that you can be present when it finishes.
- You must be present when the print finishes.
- You can only schedule 24 hours in advance.
- You must clean the printer as soon as the job is complete.
- Only one job can be scheduled at a time.

- Right click on the job.
- Choose Stop.
- If the status is Waiting, the job has already been scheduled. You can skip to Step 4 and right-click the Scheduling Clock button.
- Wait for the job status to change to Stopped or Waiting.
- Right click and select the Scheduling Clock.
- Input the job start time.
Recording the print information
At the Pier 9 Workshop, you should let other shop users know the status of the machine by using the provided cards.
- Information to write on the job cards:
- Name
- Phone number

Determine the correct card to use
- Immediate Jobs (printing right now):
- Use the black card.
- Scheduled Jobs (printing in the future):
- Flip the Scheduling Card to the red Job Scheduled side to show that your print is scheduled.
- After cleaning the machine, flip the Scheduling Card back to the blue side to show it’s available.
Step 2: Start the Print
BRING THE PRINTER ONLINE
There is a computer running Windows XP inside each printer. It shares the keyboard, monitor and mouse with the design computer on the desktop. To switch between computers, press [scroll lock] [scroll lock] [enter].
- If the computer locks up, try resetting the switch.
- To reset the switch, press the buttons on the front of the KVM unit.
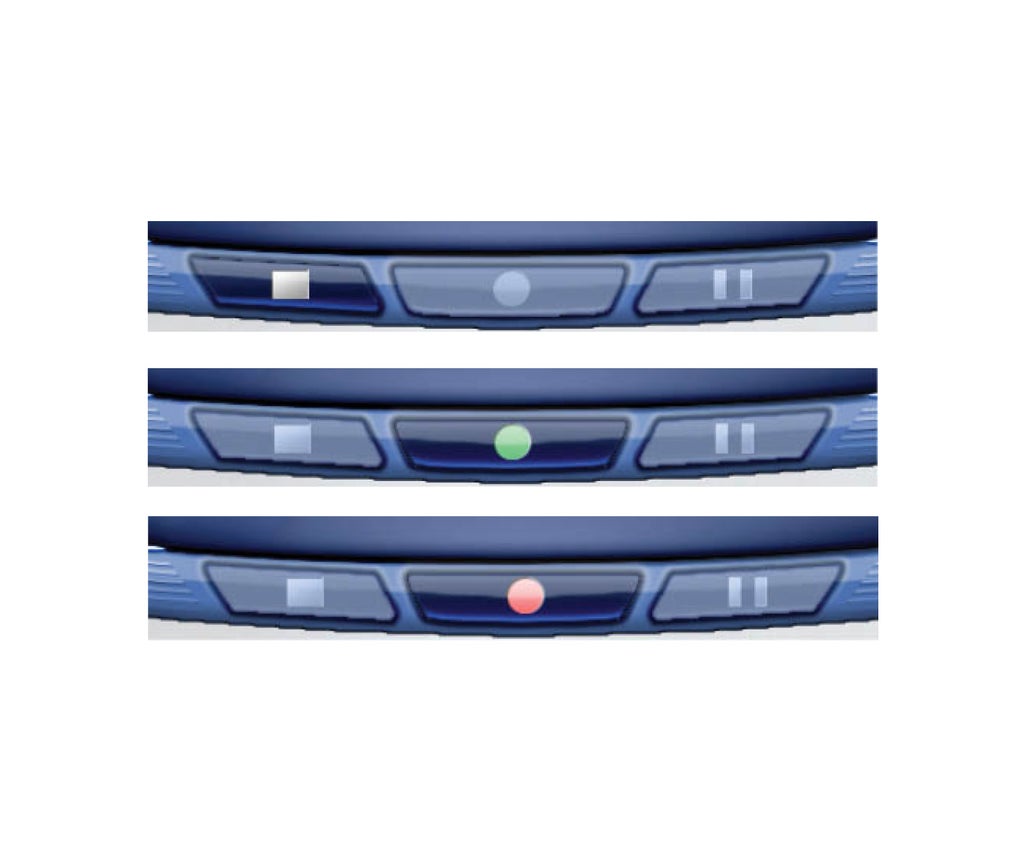
Check the status
There is a status light on the bottom center of the screen.
- Ghosted
- In use.
- Green
- Online; waiting for data from the Job Manager.
- Leave the printer in this mode after cleaning unless there is a job scheduled.
- Check the Job Manager for scheduled jobs every time you clean the machine.
- Red
- Offline.
- The printer will not function in this mode.
Change the status
If the button is red, click it once to change the status to green.
- Press the rotate button to see the temperature of the print heads.
- Once they are all green, the print will start.
Record the resin usage
Users must log print jobs for the Objet, Fortus and Zprinter on their individual print tracker.
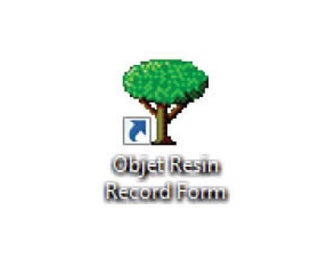
- If you do not have a print tracker, click the tree icon on the Design
Computer and fill out the request form.
- The form will be emailed to you.
- All resin use must be recorded and paid for.
- Model material = $0.41 per gram.
- Support material = $0.15 per gram.
- All project with 1,000 grams or more material (model and support combined) must have Shop Staff approval before printing.
- Once the print head is moving and printing layers, you can leave the area.
- You must be present at the end of the print job.
- Failure to clean the printer immediately after the job is complete may result in loss of printing privileges.


