

Introduction: 3D Printed Glass Shatter "Stained Glass"


Despite it being a bit dangerous, a little difficult to clean, and potentially a sign of a costly mistake, there is a kind of beauty to shattered glass. Shattered glass is at once causal, in that you can often tell where a piece of glass broke, and chaotic with shards of random sizes and with many facets around their edges. The light reflects off broken glass in highly complex ways.

So, I decided to embrace the destructive beauty of shattered glass and turn it into a kind of "stained glass" art using a 3D printer to make the frame that is normally soldered together by hand.

In this Instructable, we will cover a couple of skills and techniques that will hopefully be useful in other projects as well:
- Using vector image tracing to turn a photograph into a 3D model
- Transferring vector graphics into Fusion 360 3D models
- Correctly scaling 3D models to match the real world
- Using a 3D printing pen as "glue" in a 3D model
Supplies
The list of supplies needed to complete this project is not too long:
- Colored transparent glass sheets: the 3D printed "stained glass" we will be making in this Instructable uses sheets of transparent glass sheets for a starting point. I purchased a variety pack of 4 x 6 inch glass tiles from Amazon. You can choose glass sheets of whatever size and color you'd like. The glass should be transparent to allow light to shine through from the other side. As far as size goes, the finished artwork will end up being and inch or two larger in each dimension than the sheet of glass you choose.

- 3D printer: In order to make 3D printed stained glass you will, of course, need a 3D printer. The parts we will be printing are not at all challenging to print so just about any standard sized 3D printer will work just fine.
- 3D printing pen: In order to fix the shards of glass inside the 3D printed frames we will be creating, we will use a 3D printing frame. This guarantees that the color of the fastening matches the 3D printing parts. If you don't have a 3D printing pen, you can just use glue for this project.
- Hammer and screwdriver: In this Instructable we are going to be breaking some glass and we will use a hammer and screwdriver to do it.
- Gloves and safety glasses: You do not want broken glass in your fingers and you especially do not want broken glass in your eyes, so make sure you have gloves and safety glasses for this project.


Step 1: Break and Arrange the Glass


The first step in this project is quite a satisfying one; we need to select one of the colorful pieces of glass and break it. First of all, put on your gloves and safety glasses. Then, select your favorite color of glass and place it onto a plain, white sheet of paper. This piece of paper will help the edges of the broken glass stand out as much as possible, which will be important in the next few steps. Also, if you care about the surface you are working on, you may want to place a small piece of wood or cardboard or something under the paper to avoid damage to your tabletop. I am working on top of a spare piece of plywood.

Next, grab your screwdriver and place the tip wherever you want the center of the glass break to be. You will probably want to place it somewhat near the center of the glass so that the pieces towards the closets edge do not get too small.

Then, once again making sure you donned your safety glasses and gloves, give the back of the screwdriver a good, hard hit with the hammer to break the glass.

In all likelihood, pieces of glass will shoot away across the table top so you will need to gather them up. Arrange the pieces so that they all have gaps somewhere around 5-6mm, or really whatever you think looks aesthetically pleasing. In a couple steps, we will be 3D printing a frame that will fill in these gaps between pieces.
Step 2: Take a Top Down Photo of the Broken Glass


Now that we have some broken glass on the table, we can begin the process of translating the unique, random shapes of the spaces between the shards of broken glass into a CAD design. The first step is to take a photo of the broken glass. But there are some important considerations for this photo. It is very important that you take the photo with the camera (I am using my phone) pointed exactly straight down onto the table. This ensures that there are no errors in measurement caused by having the camera at an angle.
You can always just hold the camera very carefully over the table. However, I found it easier to use a standard, cheap microphone stand, fitted with a phone holder, to allow me to make little adjustments until the phone was perfectly level over the table. The other nice aspect of using a microphone stand like this is that you can tweak the position of the glass pieces until they are just right.

Once you get your camera positioned, simply snap a photo. I will look something like this one.

Step 3: Simplify the Photo


The first step towards translating the photo we just took of the broken glass into a 3D printed frame for the "stained glass" decoration is to simplify the photo. The photo will contain a bunch of little details, like bubbles in the glass, or differences in color on different parts of the glass, or shards around the edges of the pieces of glass. These small details and features will make tracing the image more difficult and less accurate.
To simplify the image, you can use any image editing software with a fill feature. I am using Photoshop here.

The first step will be to use the fill tool to even out the background and eliminate any shadows around the glass shards. So, first of all, set your color to white. Then, using the fill tool, just click on the background somewhere. You may need to play around with the tolerance setting on the fill tool, or maybe click a few times in the shadows to fill everything in. The goal is to have everything that is not glass in the image to be colored white.

Then we will give the pieces of glass a similar treatment. Using the eyedropper tool, grab a color from the glass. It does not actually matter what color you choose for the fill on the glass. Then, again use the fill tool to paint the glass shards as a single color, eliminating all the details and features in the photo.

So, the finished, simplified, image will consist of only two colors, white as the background and the color of your glass as the pieces of broken glass.
Step 4: Turn the Simplified Image Into a Vector


The next step in the process of translating the image of the broken glass into a 3D model is to take the simplified image we just created and use a vector graphics program to trace the image. Tracing an image is the process of converting a raster image into a vector graphic Tracing is a feature of many vector graphics programs but I am using Adobe Illustrator.
In Illustrator, open the simplified image. Then, under the Window menu, select Image Trace.

In the Image Trace dialog, set the Mode to Greyscale. Then, reduce the value of the Greys slider a bit. You will need to tweak this slider slightly to get the best results. You can either press the Trace button when you get the dialog box set up or check the Preview button to get a real time view of the trace.

It is a little difficult to tell if anything has changed right now. In order to separate all the individual paths making up the traced vector graphic, click the Expand button on the right side of the window.

After clicking on the Expand button, you will be able to see all the anchor points that make up the vector graphic.

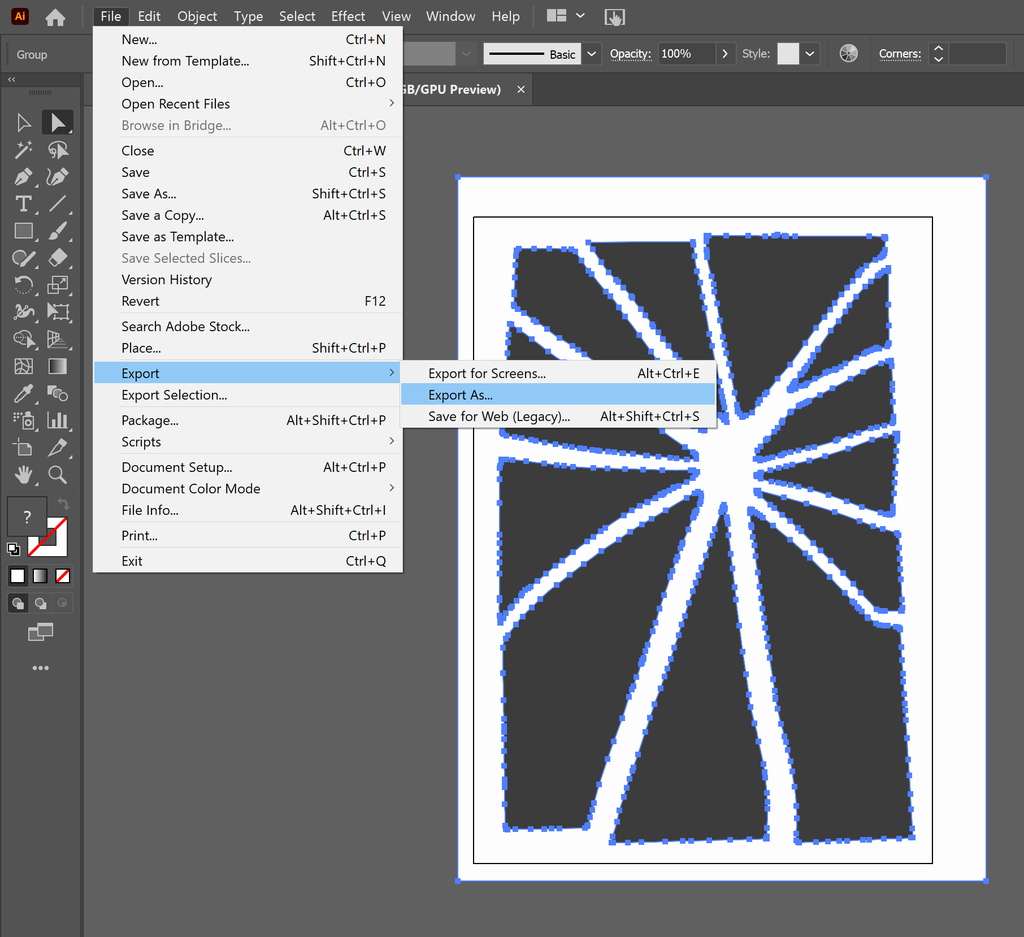
With the image trace done, we just need to export the vector graphic in DXF format, which is a format that CAD software can understand. To do this, go to File > Export > Export As... Then, in the dialog that resembles the save dialog, choose .dxf format.
Step 5: Turn the Vector Into a 3D Model


So, just to recap, we've broken a piece of glass, which was fun, took a photo of that broken glass, and traced the photo to turn it into a DXF. The point of turning the photo into a DXF is that the DXF format can be understood by CAD software (in fact, just about any CAD software because DXF is a kind of universal format). So, now we can import the DXF file into Fusion 360 to create a 3D model for the frame.
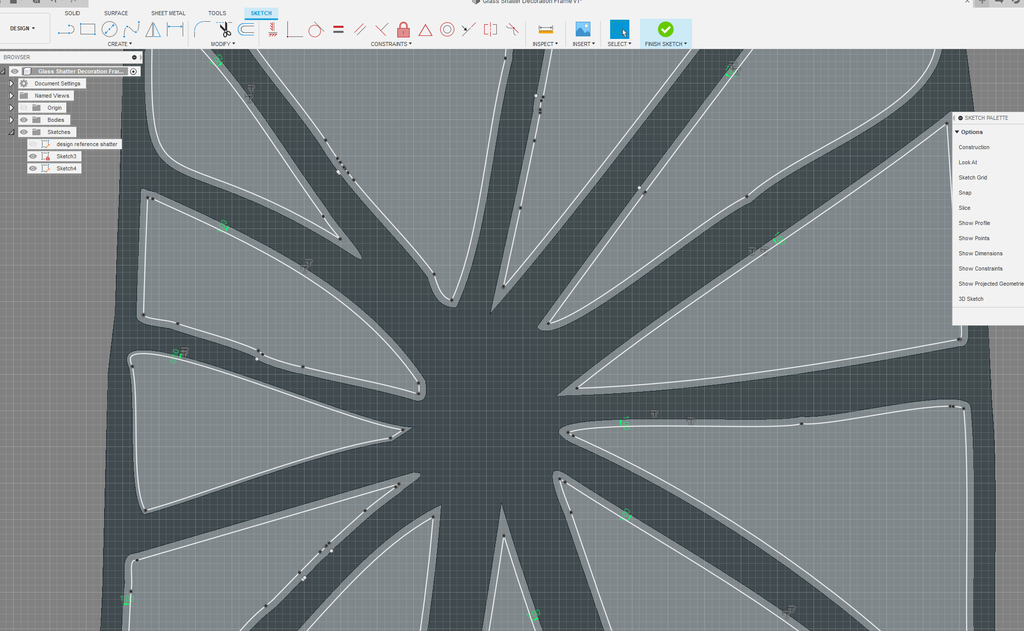
So, start a new design in Fusion 360. Then, under the Insert menu in the ribbon at the top of the window, select Insert DXF.

The inserted DXF will be converted into a sketch. However, the sketch will not be scaled correctly. It will most likely be much, much larger than the broken glass arrangement, depending upon the resolution of your camera.

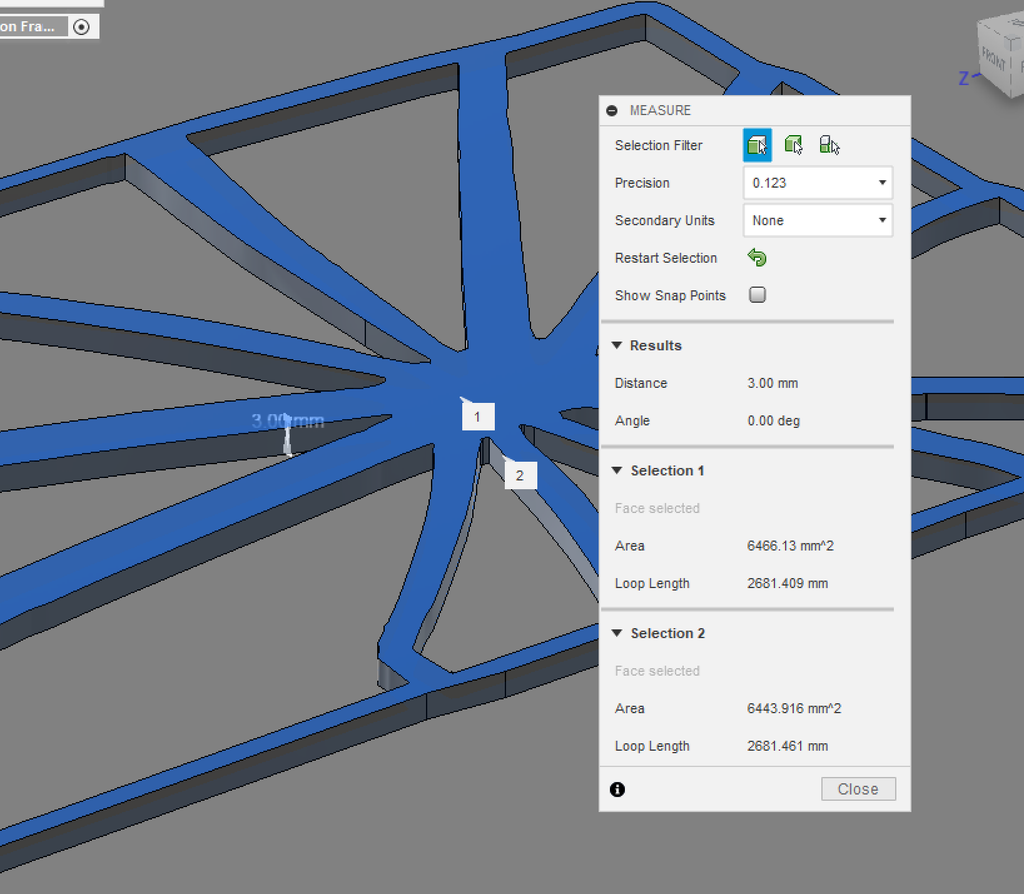
So, the first thing to do in the process of getting the sketch scaled correctly is to measure the broken glass arrangement, being sure that all the pieces are in exactly the same positions as when you took the photograph. I like to measure between two intact corners of the original glass since these sharp points will provide the most accurate measurement.

The math to figure out the scale factor that will make the design in Fusion 360 the same size as the real design is simple. Just divide the real dimension (the smaller one) by the sketch dimension (the larger one). You will end up with some decimal scale factor. Save that value for just a moment
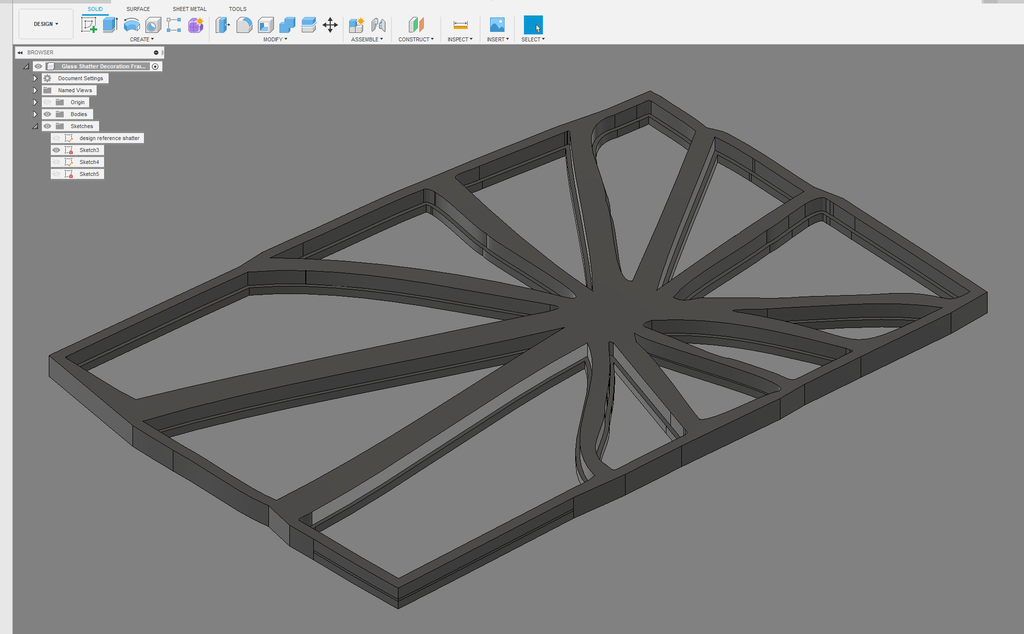
Before extruding the sketch into a 3D model, we will want to create a frame around the shattered glass design. There is no right or wrong way to do this. I made the frame by creating offsets from the edges of the broken glass pieces and then connecting them to create a solid frame.

With the frame in place, you can extrude the shape to about 8mm (this will make sense in a moment) the same way you would extrude any other shape. This will yield a frame that has cavities the same shape as the glass shards. But, the model is still far to large.

To scale the model down, go to Modify > Scale.

Last, we need to make the depth of this frame the same as the depth of the glass, which is 3mm. Before, we extruded the shape to a depth of 8mm. However, scaling the shape down affected all the dimensions, so the depth is unlikely to be 3mm. This is easy to fix, just use the Inspect tool to find the depth of the frame and extrude by the distance necessary to bring the depth up to 3mm.
Step 6: Add a Backing to the Frame


So now we have a frame with cavities the shapes of the shards of glass and scaled correctly. However, if we were to put the pieces of glass into the frame now, they would just fall through the bottom side. To avoid this, we will place a small lip on the inside of each cavity for the pieces of glass to rest against.
From the back side of the 3D model part, use the Offset tool in Fusion 360 to create an offset 1mm into the cavity. The lips on the bottom of the cavities do not need to be large.
Then, with the backing sketch done, extrude from the back of the frame by 2mm. The model you will end up with is basically the negative space among the shards of broken glass, with a backing behind each cavity to hold the pieces.
Step 7: 3D Print the Frame


And now we can finally get around to 3D printing the frame. First we need to export the 3D model from Fusion 360 as an STL. To do this, open the File menu and select 3D Print.

Then, if you are using Cura like me, open the STL file in Cura. This part does not require any special 3D printing techniques or settings. It does not require any support material and it can be printed with just about any layer height you'd like. On my Creality CR-10 Mini 3D printer, Cura estimated the printing time to be about 4.5 hours at a layer height of

After printing is complete, you will be left with a frame with cavities that are just the right size for your shards of broken glass.

Step 8: Put the Glass in the Frame


Now that the frame(s) are done printing, we can put the pieces of broken glass into the frames. Before getting started, make sure to put back on your gloves because the edges of the shards of glass can be razor sharp. If you still have your broken glass in the same place that you photographed it, transferring the pieces into the 3D printed frame is super easy. Just place each part into its cavity in the frame. The pieces should rest against the bottom of the cavities quite comfortably.

Depending upon how accurate the dimensions on your 3D printer are, there may be some pieces that are slightly loose or slightly too tight in the frame. For the parts that are too loose, just place them into the frame and they will be fixed in the next step. If any parts are too tight, you may need to apply heat from a heat gun to the plastic frame until it is soft enough to put the glass pieces in place.
Step 9: Hold the Pieces in Place With the 3D Printing Pen


The final step before the project is complete is to ensure the glass pieces are held in place. This could be accomplished with glue applied to the back side of the glass. However, I decided to go with a process that is a little closer to how real stained glass is made.
Using a 3D printing pen, we will apply a thin bead of plastic, the same black PLA used for the frame, around the perimeter of each piece of glass. These beads of plastic will ensure the glass shards are held in place securely in the frame.
The major goal is to apply just a thin line of plastic, just enough to keep the pieces of glass in place.

After you finish applying a bead of plastic around each piece of glass, you are all done. You can hand your shattered glass "stained glass" in your favorite window.


Second Prize in the
Glass Speed Challenge


