

Introduction: A Great Bending Tool for Solid Material


I've been making outdoor tables with curved steel legs. The need to bend heavy solid material in a uniform and controlled way resulted in a fairly simple machine that allows for innumerable rates of curvature and chord lengths.
The table you see in the image has four main legs that are made of 1/2" solid steel square stock. The legs are suited to the strength and stiffness required while also having the fluid quality that was desired.
This bending rig fit my needs and has changed how I bend things. I thought I might have to buy an expensive manufactured product, but this was both cheap and is highly adaptable.
Depending on your needs, a modification may be suitable. Whatever the case: get help checking that everything is strong enough to fully load the system....there are huge forces running through this type of device.
I hope this helps you save a few bucks and many hours when trying to make smooth bends in solid materials.
Step 1: The Basic Pieces: Front and Side View


The system consists of five main elements: An "I" beam base, a bottle jack, four pieces of threaded bar, two large angles and a range of bending templates. There are four bolts, various washers, rollers and a bunch of nuts.
The photos above show the machine without a bending template in place.
Step 2: Close-up Details


I'm not going to say this is complex.....it's just odd to write down what is simple. If you have questions, please send me a note and I can both answer the question and improve my notes here.
The first image of the front shows numbered holes in the pair of angles. One bolt without a nut is in hole #1. Adjusting the bolt positions (there are two bolts in two different holes at any one time) will adjust the chord length of the circle you are bending. Let's call those "chord length bolts". I number the holes such that I can record the criteria / parameters for each bend. The bolt on the upper left edge with a nut is a spacer bolt.
The second image is a side view and shows you a few things: The topmost bolt is the spacer bolt and the washers act to keep the angles apart to the right width. I'm bending 1/2" material I shimmed the distance to just over 1/2". I believe the spacer bolt nuts are best if slightly loose: this allows the angles to move a bit and keeps big loads out of the spacer bolts. When assembling, you need to make the angles all one distance from the bottom beam; this is done by leveling with the nuts on the threaded rod. As The chord length bolts have a simple short piece of steel pipe between the angle to act as a crude roller. As you place load on the system, these will roll, thus reducing friction on the bolt and piece you are bending. I've not found the need to use nuts on the chord length bolts, but I did select heavy bolts that were not threaded for the length that is within the angles. This put the load on a solid, cylindrical section of the bolt. (I don't think this is critical, but it makes things cleaner than smashing threads in the first few operations)
Step 3: The Bending Templates


As you can see in the first photo, I made four different templates to radii that suited my project. These are very simple: made of heavy 5/16" plate. The base has a hole in it, slightly bigger than the top of the piston of the bottle jack. The jack presses on the edge of the curved plate, not the base.
In the second photo you can see the bending template on the bottle jack, lifted to just into the space between the two angles.
In the third and fourth photos you can see the largest and smallest bending template in place. I note that the chord length bolts in the image with the smaller template are not in a useful position: i.e. they would be much closer so you create pressure between the bolt and template (more on this later).
Step 4: Bending the Bar


I mark the center of my bends on the top face of the bar, as that has proven to result in consistent bending. When you set a bar in the machine, you will be observing it's position through the open holes in the angles. Because of this, I mark the bend location with a magic marker and then a soap stone either side of that mark. Its simpler to see.
The second image has a bar loaded in the machine with a tail extending off to the left. The jack is centered between the chord length bolts and the bending template is centered between the angles. When you build yours consider this: the vertical position of your chord length holes is important. Ideally you would have the top of any bending template about 1/4" above the bottom of the angles, then space for your maximum stock thickness you want to bend, space for the thickness of the roller and then the bottom of the holes. I.e., the bending template must start the process by being between the angles, not below them, and you need space above that for a piece of straight stock to fit under the chord length bolts.
The third image is a completed bend. I note that in all bending operations, I drive the jack piston all the way to a tight fit between the bent bar, the bending template and the chord length bolts. This makes the bends consistent, rather than say, trying to measure travel of the piston somehow.
The fourth image has the bent bar placed on the machine.
Step 5: Multiple Bends, Multiple Legs and a Table


The first image has one bar bent three times to suit the design. I note that I cut and mark the position of center of all bends on all bar leg sock in one operation, followed by one type of bend on all bars. I move on to the next type of bend and pass all bars though the machine. For these legs, everything went through the machine in groups three times with three different templates.
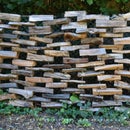
The second image shows a stack of four legs all bent to the same fluid profile. (No this is not aircraft tolerances and a little tweaking may be required if you are bothered by slight differences. These were not tweaked. The ends at the last tight bend need to be trimmed, but that will happen after I've welded them to the table top.) All told, from cutting the bar to lengths and up to completing the bends, takes under an hour. Setting up the initial mock-up and defining the lengths, rates of curvature and center points of bends requires an amount of time determined by your own ability to get to understand what you want as a final piece. Running material is very simple. As an example: my list for this run looks like this: 44" pieces, first bend at 8 3/4" with the large template and bolts at holes #1 &16, second bend at 26 3/4" with the middle template and bolts at holes #7 & 16, third bend at 40 3/4: with the smallest template and bolts at holes #7 & 11.
The final image is a completed base using four legs from this process. Other bent elements in the base are in smaller stock and some have much tighter radii. I may outline that bending tool in another Instructable.
I have my tables galvanized, hence the light color.
I hope this helps in whatever project you may be considering. Call me cheap, but I think I ended up a superior tool when compared to anything available.
As before, get some help selecting the jack, bolts, the beam, template stock and angles. You want this to work the first time as well as be safe.


