

Introduction: A Rose by Any Other Name


I have wanted to sew this Claire McCardell reproduction pattern for years. Of course, I have so many ideas for my next project swirling around in my head that this one dropped off of my top ten to-do list.
I couldn't find the perfect fabric in my stash, but it was only a matter of time until something suitable showed up.
And then I found an oversized rose print at an estate sale and there was enough yardage for the dress, miracle of miracles! It was certainly meant to be. I suspect the fabric is a quilting cotton from the 1980s or 1990s. I just love the graphic oversized print, and as soon as I found it I knew that it would be just perfect for this dress design.
Step 1: The Mock-Up


A muslin was made to test the fit and make any necessary alterations. This particular pattern did not require anything but my standard changes (add length to the torso and take a wedge out of the upper back) - but it's always best to check.
And the muslin convinced me that it's a fabulous dress! Which means it's time to cut into that floral print . . .
Step 2: Cutting Into the Fabric


The bodice of this dress is cut on the bias, meaning that the opening v-neck is on the straight of grain. I went a little overboard and decided to stabilize the opening anyway with a strip of rayon seam binding.
The seam binding I used to stay the neckline opening was stitched just inside the fold line, and if you look closely, you can see the white thread on the red and black portions of the fabric.
Rayon seam binding gets a lot of play in most of my projects, as it certainly did here.
One of the most frequently asked questions I receive about rayon seam binding is how it works on curved edges. The answer is, the product is woven on the grain, but because it is very thin and narrow and irons beautifully, you can ease it around curves without too much fuss.
I did forget just how much extra yardage is needed with an oversized print like this. So while I had slightly more fabric than the pattern yardage requirements stated, it was a fight to get everything cut out. I ended up piecing the sash because I wanted print placement on the front and back bodice to look as intentional as possible. I wasn't even planning on print matching . . . just making sure that none of the obvious seamlines at center front and back did not look terrible with duplicate roses directly across from one another. I achieved my goal, but I did have to piece one of the sashes. Which is not a huge problem, especially since that join gets lost in the bow that gets tied at center back.
A regular zipper was hand stitched into the left side seam.
Step 3: Finishing Touches


Because my favorite vintage style bra has very narrow set straps that like to peek out of necklines, I added lingerie guards to the shoulder seams.
It's easy to make your own with a snap and a short length of ribbon, and I think they look much nicer than the store bought options.
And I catch-stitched the hemline in place. Hand sewing a hemline takes longer than putting it through the machine, but the finish is so much nicer, in my opinion.
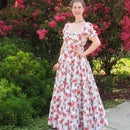
Step 4: The Completed Dress


And that means the project is finished, right down to the smallest detail. I suspected that I would like this dress from the start, but you never know until you put on the finished garment. And this one is a winner!
A necklace, earrings, bracelet, and some fabulous heels added to the mix finishes the look. And here we have a timeless dress that still looks fashionable more than 60 years after it was originally designed!

Participated in the
Fashion Contest


