

Introduction: The Whole Nine Yards


A few years back, I was lucky enough to find a vintage Singer Featherweight sewing machine at an estate sale, and I was determined to make use of some of the wonderful vintage feet that came with the machine and that I have collected over the years.
The fabric was initially purchased with the thought that it would make a lovely quilt backing, but I didn't love the color tone match with the quilt that I had in mind, and the more I handled the fabric and looked at the print, the more I was convinced that the fabric deserved better than to be hidden on the back of a quilt. Since I had a whole lot of yardage that had been intended for a queen sized quilt, I thought I might as well take advantage of that fact. The idea of a tiered maxi skirt was the first thing that came to mind. I mean, how often do you have almost 9 yards of fabric to play with?!
And this dress is the result! Between my determination to use the vintage sewing machine feet and all of that yardage to play with, I came up with a design that led me to try out four separate vintage sewing feet, two of which I ended up using for the final dress.
Step 1: Narrow Hems and Rufflers, Oh My!


A tiered skirt with all of that gathering was definitely going to be made easier with the help of a vintage ruffler, which meant that my Featherweight needed a little TLC. If it was going to create miles of ruffles, it was going to get a bit of a workout, so I figured it was time to get the screwdriver out and make sure she was ready for the task ahead.
I am no repair expert, but the nice thing about these machines is that everything is fairly basic and there is plenty of online information to be found. And clearly someone had taken some care with this Featherweight at some point in the not too distant past; I was expecting a lot more lint under the needle plate, for instance.
But back to those ruffles! I am not one for top-stitching as a general rule, but I had a crazy idea as the dress design was coming together in my mind. Why not use another vintage sewing machine foot if I was going to use that ruffler? And instead of gathering each tier and stitching right sides together, I might as well go crazy and apply each ruffle one on top of the other to create a visible fluted edge.
That was going to require more of the dreaded top-stitching, so why not go a step further and use a narrow hem foot for that top edge?
I recall using a modern version of the narrow hem contraption on at least one dress back in the day with my first sewing machine (a White with snap on feet). If memory serves, there was a few curse words uttered, and although the hem turned out pretty well, it was not perfect. But that was a curved hem, and a straight edge should be easier, right?! It took a bit of practice to get where I wanted to go, but overall, I am quite pleased with the end result. I have a few of these narrow hem feet for vintage machines. One is adjustable, but it wouldn't make anything narrower than a 1/4" hem. It looked okay, but slightly clunky for this application. The 1/8" foot was giving me grief because the needle placement was too far to the left to catch the folded edge of the fabric. But for some reason, after I cleaned the machine, this was no longer an issue. I am not sure why that fixed the issue, but I am very thankful that the narrower hem was achieved since it looks so much nicer!
One thing that I wasn't expecting was the fact that my pre-hemmed lengths of fabric reacted differently under the ruffler than a raw edged piece of fabric. The good news is that I tested scraps of hemmed fabric and calculated the amount of fabric taken up by the ruffler foot before cutting my actual dress pieces.
Step 2: Ruffles Galore


But before cutting out those really long strips of fabric, I spent quite a bit of time thinking about how many ruffles I wanted in the skirt, and what the width of each ruffle should be. I knew that I wanted a narrow width at the waist, grading to larger widths as they move toward the hemline.
For my skirt, I decided that the four finished tiers would be 7, 9, 11, and 13" wide, respectively. To create the ruffle tiers, I first calculated the length needed, and cut my four strips, each tier approximately 1.7 times longer than the next. Both edges of each piece were narrow hemmed, except for the very top edge that would be attached to the bodice, and the bottom edge of the lowest tier. I decided that the fluted edge would only add bulk at the waistline, so that one seam would be constructed in the normal fashion, skirt gathered down to the width of the bodice waist edge, and stitched right sides together. For the three lower tiers, the upper edge was put through the ruffler, to be stitched approximately 5/8" from the narrow hemmed edge. That left me with a mountain of ruffled fabric. It was then possible to measure down from the stitching line made by the ruffle foot to my 9" length, or 11" length, etc. I then marked that line across the length of the edge and applied the next tier along that line. Once pinned in place, each successive layer was stitched into place along the same line of stitching created by the ruffler. Because I was dealing with a massive amount of fabric, I went back to my contemporary machine for this step since there is a lot more room for maneuvering than with a small vintage one.
And that process was repeated for each layer of ruffle. Eventually, after hauling around a lot of fabric, the skirt began to take shape! I should also mention that I left the lower edge of the bottom ruffle raw. I decided that a narrow hem was something that I would find on a cheap maxi skirt at the mall, and a more substantial hem would add a bit of weight and create a much nicer finish.
That's a whole lot of floral fabric to haul about, and I love it!
Step 3: The Bodice


And now for the bodice! I knew early on that I wanted to use McCalls 7929 as a starting point. I used the pattern in the past and loved how it turned out. The only major change necessary would be to alter the button back to a zipper.
I actually began cutting out the bodice and sleeves prior to all of those ruffle calculations so that I would know exactly how much fabric was available for the skirt.
While I am not a huge fan of elastic casings in general, for some reason I really like this sleeve. For the arm casing, I decided to use some plain cotton from the stash because I was worried about the print bleed through after cutting out the bodice lining. When both layers were held up to the light, there was an obvious shadow from the lining. This bothered me for a couple of days, and I thought about recutting the lining, but soon realized that when the bodice was on a solid body and light was unable to filer through, all was well.
And since I can't imagine any bra strap working with these really wide-set sleeves, I added bra cups. They get loosely stitched into place along available seamlines and any edges that don't fit the design are trimmed away. This makes the dress much easier to wear in the long run, just step in, zip it up, and go.
I also added a few boning channels to the bodice lining (I did this on my previous version as well). For my purposes, the boning just adds a bit of structure to the lightweight cotton.
And that's about all there is to the bodice.
I did have to re-open those side seams even though I knew I would be adding ties right from the start, because somehow I always manage to forget something along the way.
Step 4: Adding a Sash


Although the idea for the dress came together rather quickly, the addition of waist ties came later on. I thought about it, decided it might be too much, and then decided that was the perfect reason to go ahead and do it. I wasn't quite sure about the length, so I pulled out some fabric scraps to approximate what the finished ties would look like.
I also happened to remember this blouse that I have made on a few occasions. The necktie portion of the pattern has a curve that eliminates a bit of bulk where the ties wrap around each other. I was curious to see if the same sort of thing would work with a waist tie.
I figured out the midpoint at my back waist and placed the deepest part of the cutout at that spot, adding seam allowance. And since a graduated tie, in my opinion, always looks nicer than an even width throughout, I made the lower end 1" wider than it is at the side seam (excluding that cutout).
I am definitely glad that I decided to add the waist ties. This dress is extremely girly, so why not go all out?!
Step 5: Gathering With Three Lines of Basting Stitches


And for the first time ever, I tried something different for the gathered skirt. I used my vintage gathering foot for the majority of this project, but the waist seam still needed to be gathered down the old fashioned way (which is not my favorite part of the process!).
As you can see from the first photo, the two lines of stitching were giving me attitude. I know that many people like to use three lines of stitching, one that sits just outside of the actual seam. I have never liked the idea of having to remove the line of basting after the garment is complete. What if it pulls the fabric, or the needle holes don't steam out? Well, this is quilting cotton, so I thought it was safe to try with this textile. And I have to say, it's definitely easier to manage the bulk of the gathers with that added line of basting. Will this be my new go-to? I can't say for sure, although I am certain that fabric choice will have to be considered.
Step 6: Putting It All Together


The zipper was lapped and applied by hand with pick stitches.
This is my favorite way to install a zipper. It gives me a lot of control, especially when I have yards and yards of fabric to manipulate.
I decided to line with self fabric. The skirt is, of course, unlined.
Because this fabric is somewhat lightweight, adding the boning to the bodice lining for this particular dress was absolutely necessary. I love the McCalls pattern for it's overall design, but there are some important construction steps missing, such as boning.
The lining was hand stitched into place.
I also added ribbon hangers at the waist. Because the shoulders are elasticized, hanging this dress (made from almost 9 yards of fabric) from the sleeves will not work!
And then, of course, the hem. There is a whole lot of it! Instead of using the narrow hem foot here, I gave the dress a more substantial hem. Of course, there isn't much I love more than hand sewing, so sitting with yards and yards of hand stitching to do is really a pleasure.
Step 7: Adding a Waist Stay


As with those ribbons that were added to support the weight of the dress while on a hanger, I also added a waist stay to support the dress while on my body.
I had to take off a significant amount of length in the torso (which NEVER happens to me). I know that the weight of all of that yardage gathered into the skirt had a lot to do with it, so the skirt needed to be supported at the waist instead of relying on the elasticized sleeves.
I definitely prefer true petersham to grosgrain for this purpose. And I also like to use two or three smaller hook & eyes instead of one larger sized one. Covering the majority of the metal from the hook & eyes also makes the waist stay more comfortable.
I also like to offset the opening of the zipper and the waist stay, especially when they are at center back. I tend to perch on the front of a chair rather than lean back, but if you can imagine leaning back on zipper teeth and hook & eyes right along the spine, it is not going to be the most comfortable thing.
For some projects, I like to secure the petersham all along the waist with a catch-stitch. But in most cases, a few strong stitches at each seamline and/or dart is sufficient as you can see here.
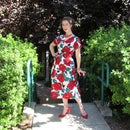
Step 8: The Finished Product!


Since I had almost an entire year to sketch out the idea for this dress, if only in my head, the actual process went quite smoothly and fairly quickly.
I tend to shy away from elastic and top-stitching, and this dress has both. So, I am not sure what possessed me, but the dress really did turn out almost exactly as I had envisioned it, and I got the opportunity to use some of those wonderful vintage sewing feet!
I have also decided that I need more maxi dresses in my life. They may not be the easiest garments to wear (beware the rolling office chair when wearing anything tea length or longer!) but they almost make me feel like I could be six feet tall, which has always been a dream of mine. Unfortunately, I don't think I'm going to make it, seeing as I haven't grown any taller since the age of twelve. So it shall be maxi skirts and high heels for the time being!

First Prize in the
Fashion Challenge


