

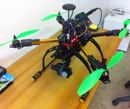
Introduction: Adding HML650 Retractable Landing Gear to HK X650F Quadcopter


I have always planned to improve my quadcopter based on Hobbyking frame HK X650F. My previous instructable describes the whole process of building this drone and can be found here:
Build a HK X650F quadcopter for GoPro style video and photography
I have thought about adding an FPV system, prolonging the folding motor arms from about 160 mm to 260 mm, but mainly getting rid of the standard plastic landing gear, both soft and heavy and getting in the field of view of my on-board camera. And this instructable will cover exactly this topic. The obvious solution to the problem was switching from standard landing gear ta a more sophisticated electric retractable landing gear. So lets get to it then...
Thanks to my friends atBanggood, one of the best suppliers of hobby parts and products in the world, I got my hands on a very interesting retractable folding landing gear, theHML650. It is an impressive piece, built mainly from carbon fiber plates and tubes, very light, including controller and wires it is only about 224 grams, not much heavier as the standard landing gear. The controller takes from 12 V to 22 V (3S-6S battery), is operated by a signal from the receiver or flight controller and has a built-in fail-safe function. The mounting options are very wide, from mounting on tubes (as in my build), to mounting directly onto the lower plate of nearly any drone imaginable. You can put quiet a load onto this thing, it can carry about 4 kg of weight and it is suitable for drones up to 700 mm of wheelbase. I have to stress out the simplicity of the installation process, how straightforward it was and I can highly recommend it to anyone interested in changing the landing gear on a drone for something really amazing.
Here is a short clip showing how the retracts work and a demonstration of fail safe function, where the retracts go down after I turn off the transmitter, simulating the loss of signal:
Step 1: So, What Is in the Box ??? What Else Do You Need ???


The landing gear came per registered post, shipping was really fast, from Netherlands, probably from a EU warehouse of Banggood. The cost of the landing gear is around 45 € (48 USD), with free shipping worldwide. Let me tell you, it is worth every penny....
It came packaged in a hard carton box, all parts neatly and safely packaged in bags, the one with the screws even had a few spare screws and bolts in it. Nice.
Included is also a pictorial assembly manual, with basic steps and dimensions. Helpful but absolutely not necessary.
All the carbon fiber parts have a nice finish, feel really good, no sharp edges or production errors. the controller is enclosed in a small plastic box with white markings, from both longer sides there are two-wire servo cables (each leg is moved by one servo), the shorter sides host one Black-Red wire pair for supplying power, the other side has one Black-White wire pair for connecting to a spare receiver channel or your flight controller. The servo cables are removable, with a JST battery style connector, so it makes it easier to install, repair or change parts. That is all there is, it is really simple and easy to understand and install.
You will need:
- a set of screwdrivers
- one JST splitter cable
- one female JST battery connector
- soldering station
- some zip ties
- a servo tape (double-sided tape)
- screw glue
- steady hands.
- If you have all of this, we can get to the next step.
Step 2: Putting It Together....


As I am going to install it on my HK X650F frame, I will use the option to use the mounting plate with rubber dampers and install it on to the two carbon fiber tubes used for attaching battery holder and brushless gimbal, underneath my bottom plate. I could try to install it directly to the frame, but I would need to drill new hole in the bottom plate and it would probably interfere with the folding design of the motor arms, so I chose the simpler path and go with the mounting plate.
First of all, attach the round rubber dampers into the mounting brackets, then screw each bracket into the corresponding holes on the mounting plate. There are 2 screws for each bracket, those are standard M3 screws, so it should be no problem. Obviously you have to install all four brackets on the same side of the mounting plate.... Use a drop of screw glue on each screw, to make sure the vibrations do not loosen it, causing a loss of landing gear mid flight, or worse...
When all 4 brackets are in place, continue by mounting both legs on to the short sides of the mounting plate and on the opposite side as are the brackets, so the leg are facing outside the plate. You can clearly see the correct mounting position on the pictures. Use 4 screws (M3) for each leg and do not forget to use some screw glue.
Next are the landing skids. Untighten the 3 screws on the T bracket on the end of each leg and insert the long thin carbon fiber tube inside. Use a ruler to find the center and tighten all the screws. It is very important that you center those tubes, otherwise the drone will not sit level and could tip over on takeoff or during landing.
Also make sure, that the landing skids are parallel to each other, again, use a ruler. or something similar and measure the distance between the corresponding ends.
After putting it all together, I decided to make the landing skids a bit longer, just to make my quad a bit more stable on the ground. I used the original carbon fiber booms (tubes) from the HK X650F frame landing gear and put them inside and through the new landing skid tubes. They happen to be perfect fit. I used the original spongy tube ends and fixed it all in place with a drop of glue. You can see it all in the last two pictures.
Step 3: Installing the Controller


Installing the controller is very simple.
First, the power wires have no connector, so you need to solder a new one. In my case, I am using a dual UBEC with 12V/3A power output to power my brushless gimbal. This is the place where I will connect my landing gear power cables. It is always better to power auxiliary devices on your drone from a separate regulated power supply, such as UBEC because of security. If you connected it directly to your battery or "God forbid" the Flight controller, the power pull of the servos could cause a brownout, total loss of control and presumably a hard crash.
So I decided to power it from UBEC, but there is only one 12V output. I used a JST cable splitter to make one output into two and so I can power my gimbal and my landing gear from the same power output. I will probably add another splitter if I ever install an FPV transmitter, but for now, I will be happy with what I have. :)
If you ask If I will not overload the UBEC, the answer is no. This UBEC has a power output of 3 Amps, the gimbal uses 0.3 Amps and the servos of the landing gear pull together max of 0.6 Amps. So I am OK, I guess. The FPV transmitter uses another 0.3 Amps, so it will be OK too.
I found that the best place for the controller is actually on the mounting plate of the landing gear, directly between the legs, from upper or even bottom side, it really doesn't matter. I used some servo tape to stick it in place, plugged the two servo cables into the sides of the controller, plugged one of the JST connectors from the JST splitter cable into the power connector of the controller (the other goes to the gimbal) and plugged the signal cable into one free channel on my receiver.
Step 4: Mounting the Landing Gear Onto the Drone Frame


First of all, I had to move the sonar sensor out of the way, it was mounted on the center of the bottom frame plate, where the landing gear will be, so I moved it to one of the front arms. I also did a bit of insulating with electrical tape, just to be sure it didn't short out against the metal tube.
Installing the landing gear in place is pretty straightforward, just pull out the two gimbal/battery carbon fiber tubes out from one side of the brackets, put the landing gear in place and push both the tubes back so it goes through frame bracket, then through landing gear brackets and again through the frame bracket. It is clear from the photos, no problems there. Now align the center of the landing gear mounting plate with the center of the frame and you are finished.
I then installed the battery mounting plate with the hooks on the back side, behind the landing gear and the gimbal with the hooks to the front of the landing gear and the drone.
Secure all wires in place with some zip ties, you do not want those to get in the way of propellers or rub against the sharp carbon fiber plates. Make it all nice and tidy.
Step 5: Controlling the Landing Gear From Your Transmitter
There are two possibilities how to control the landing gear depending on several factors:
1. Directly from the receiver channel
2. Through commands of the flight controller
I decided to go with the first option, because of the limitation of APM. You see, my flight controller, the APM 2.6 has very small internal memory, so not all code can be fit into it. The support for controlling a retractable landing gear is incorporated into AC 3.3 firmware, but the APM can only run AC 3.2.1 and lower versions. If I ever buy a new FC such as Pixhawk, I will surely switch the control to the flight controller, but now it is not an option.
More on this topic can you read here.
So, I used a free channel on my transmitter, plugged the signal cable from the landing gear into my receivers corresponding port and set up a two position switch to control the landing gear. How it is done, is very different for each transmitter, I use a Radiolink AT9, 9 channel transmitter and it is very easy if you follow the manual.
Last thing I want to tell you is, I highly recommend buying this retractable landing gear directly fromBanggood store,
they have an unbeatable price for this, I searched the web very long, but couldn't find a better price and service.
Here is the link again: HML650 retractable landing gear
So this is it guys, Happy flying !!!

Participated in the
Hack Your Day Contest

Participated in the
Digital Life 101 Challenge

Participated in the
Before and After Contest 2016


![Tim's Mechanical Spider Leg [LU9685-20CU]](https://content.instructables.com/FFB/5R4I/LVKZ6G6R/FFB5R4ILVKZ6G6R.png?auto=webp&crop=1.2%3A1&frame=1&width=306)


