

Introduction: Arduino Baby Sleep Monitor


This is a proof of concept for an idea I had to use a baby monitor pressure pad to show how well a baby was sleeping.
By connecting the pressure pad to an arduino I was able to detect movement in a cot and trigger an LED to flash in time with the movement. I could then vary the LED's brightness depending on the intensity of the movement.
With a sensitive sensor this project could be used to show the baby breathing by causing the LED to fade in and out in time with the baby's breath.
Step 1: Materials
You will need:
- An Arduino UNO or compatible board
- An LED and appropriate resistor (I used 220R)
- A pressure pad. I used the mat from the following link, but you can also make your own (not demonstrated here). http://www.amazon.co.uk/Tommee-Tippee-Closer-Digit...
- A breadboard and wires.
- A resistor for the voltage divider (I used 10K).
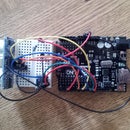
Step 2: Wiring

You will need to create a simple voltage divider circuit as shown.
- Connect the output LED to digital pin 9 of the Arduino (don't forget the resistor!)
- Connect the sensor to analog pin 0.
There is a good tutorial explaining this concept on Jeremy Blum's YouTube channel:
Step 3: The Sketch
Upload the following to the Arduino:
int sensePin = 0; // Analog 0
int ledPin = 9; // Digital 9
int minRead = 99999;
int maxRead = 0;void setup() {
pinMode(ledPin, OUTPUT);
}void loop() {
// Read from sensor
int thisRead = analogRead(sensePin);// Set max and min range (if appropriate)
if (thisRead < minRead) minRead = thisRead;
if (thisRead > maxRead) maxRead = thisRead;// Set LED output
int ledLevel = map(thisRead, minRead, maxRead, 255, 0);
analogWrite(ledPin, ledLevel);
}
Step 4: Try It Out
This video shows the sensor in place, the flashing green light on the floor can be seen when the sensor is triggered.
The sketch you uploaded in the previous step automatically adjusts the LED brightness based on the minimum and maximum values received from the sensor. This means that the LED will always operate with the largest range of values possible. It also means that if it receives a spike from the sensor then it will remember that as the maximum value and will therefore need resetting.
Future improvements could include a time dependant range, so that spikes are 'forgotten' after a certain amount of time.


