

Introduction: Arduino Car Controlled Via Bluetooth App


All we know that Arduino is an excellent prototyping platform, principally because it uses a friendly programming language and there are a lot of extra incredible components that provide us great experiences.
We can integrate the Arduino with differents shields or modules and build fantastic things. In this project i will show you how use the Bluetooth module to control a robot platform through commands coming from a smartphone.
Step 1: Parts


Hardware:
- 1x Arduino Uno
- 1x Motor Shield L293D Driver
- 1x Bluetooth Module
- 1x Robot platform
- 4x Dupont Wire for Bluetooth Module (Male to Female)
- 4x Dupont Wire for motors (Male to Male)
- 2x motors + 2x Wheels
- 1x Caster Wheel
Software:
- Arduino IDE
- A to B USB Cable
- Bluetooth RC Controller (you can download this app here)
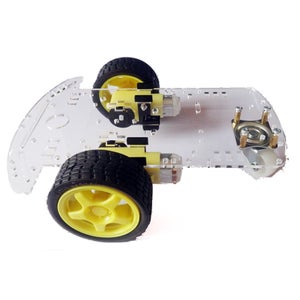
Step 2: Assembling the Arduino Car


The mounting of the robotic platform is very easy. If you buy one like that, you will receive a manual with all steps.
Firstly mount the 2 motor onto the robot platform.
Secondly mount the caster wheel onto the robot platform.
Thirdly mount the Arduino Uno onto the robot platform and place the motor shield onto the Arduino Uno.
Fourthly connect the left and the right motor's wire indicated in the picture. (Note: Red Wire is + & Black Wire is -)
Fifthly connect the Bluetooth Module:
- RXD to TXD on Arduino Uno
- TXD to RXD on Arduino Uno
- VCC to 5V on Arduino Uno
- GND to GND on Arduino Uno
Step 3: Software
The Arduino uno is very easy to program.
- To control the motors, I used the library AFMotor.h included above.
- The communication between the smartphone and the Bluetooth module was done using the serial communication arduino.
- The app "Bluetooth RC Controller" send to the bluetooth module the following commands:
- Forward -> F
- Back -> B
- Left -> L
- Right -> R
- Forward Left -> G
- Forward Right -> I
- Back Left -> H
- Back Right -> J
- Stop -> S
- Front Lights On -> W
- Front Lights Off -> w
- Back Lights On -> U
- Back Lights Off -> u
- Horn On -> V
- Horn Off -> v
- Extra On -> X
- Extra Off -> x
- Speed 0 -> 0
- Speed 10 -> 1
- Speed 20 -> 2
- Speed 30 -> 3
- Speed 90 -> 9
- Speed 100 -> q
- Stop All -> D
In this project I have programmed 2 commands:
1.Basic (Forward, Back, Left and Right)
2.Full Command (Forward, Back, Left and Right) and also (Forward Left, 1.Forward Right, Back Left, Back Right)
The entire code is available for you to download.
Step 4: Don't Forget to Share, Like and Vote!!!


Participated in the
Arduino Contest 2016

Participated in the
Homemade Gifts Contest 2016

Participated in the
Epilog Contest 8

![Tim's Mechanical Spider Leg [LU9685-20CU]](https://content.instructables.com/FFB/5R4I/LVKZ6G6R/FFB5R4ILVKZ6G6R.png?auto=webp&crop=1.2%3A1&frame=1&width=306)


