

Introduction: Arduino Distance Sensors


A distance sensor is the most important sensor for any robot. It's usually referred to as the "eyes" of a robot. Distance sensors are very useful as we can make systems that react based on how close we are to them or based on the presence of various obstacles.
There are two common technologies used in amateur distance sensing: infrared sensors, such as the classic Sharp IR, and ultrasonic sensors, usually called sonars. Now, let's build a distance-controlled LED!
To build a distance-controlled LED, we will need the following parts:
- An Arduino board connected to a computer via USB
- One LED
- A Sharp infrared proximity sensor or other analog distance sensors. We can find such sensors at Sparkfun, Adafruit, Pololu or other stores.
This instructable and many more can be found in my Arduino Development Cookbook available here. :D
Step 1: How to Connect the Sensor
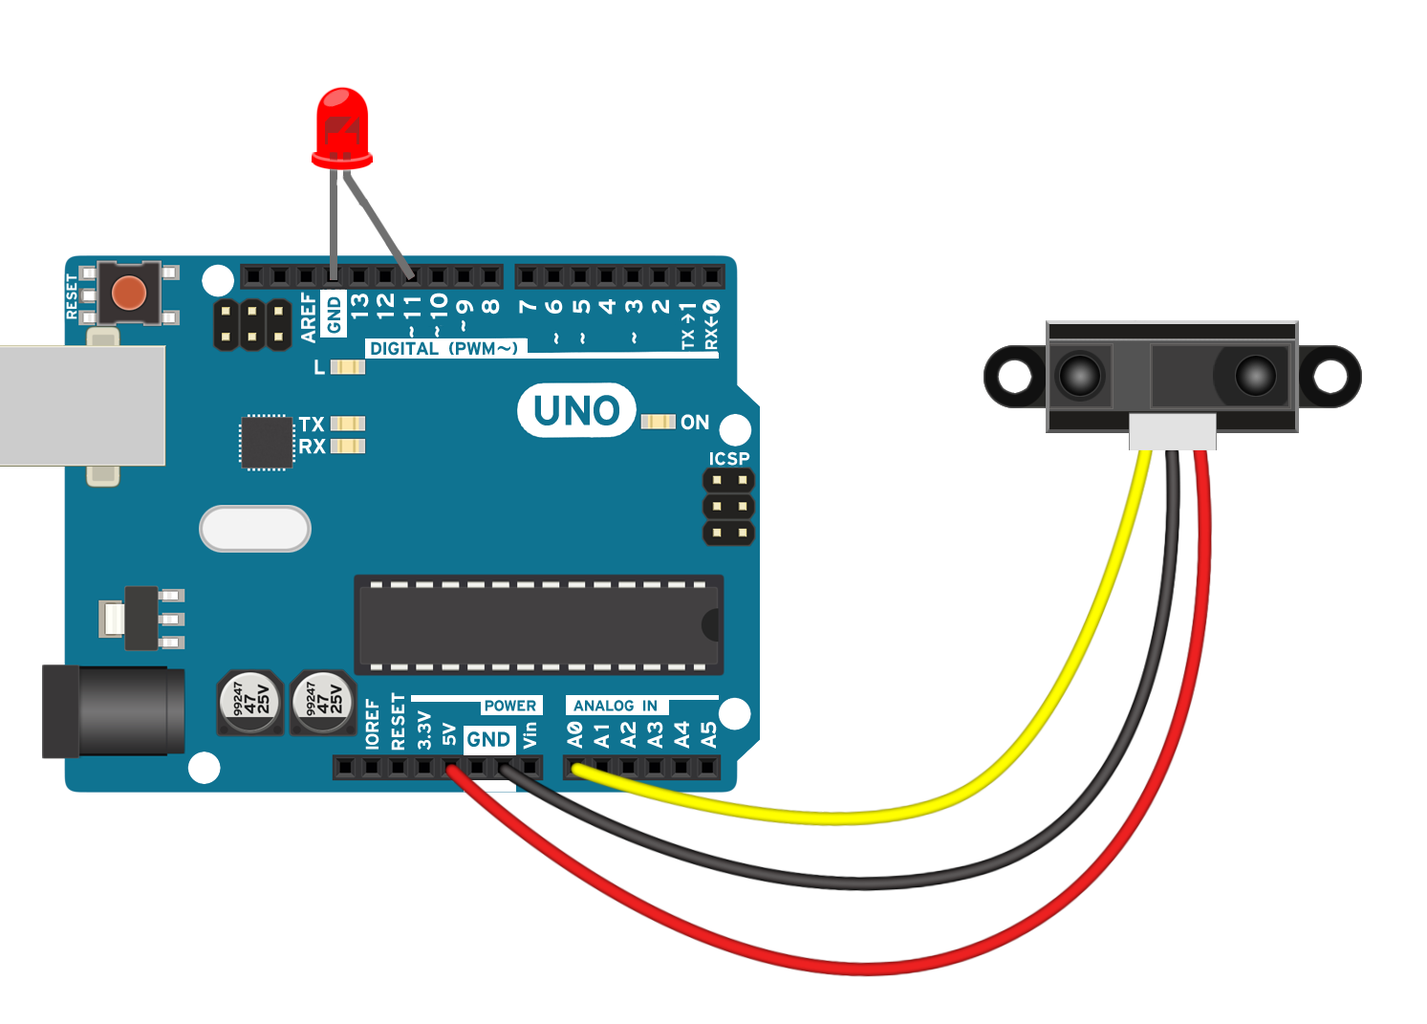
Connecting a Sharp IR is easy. Maybe this is why it's so popular. Follow these simple steps to connect one:
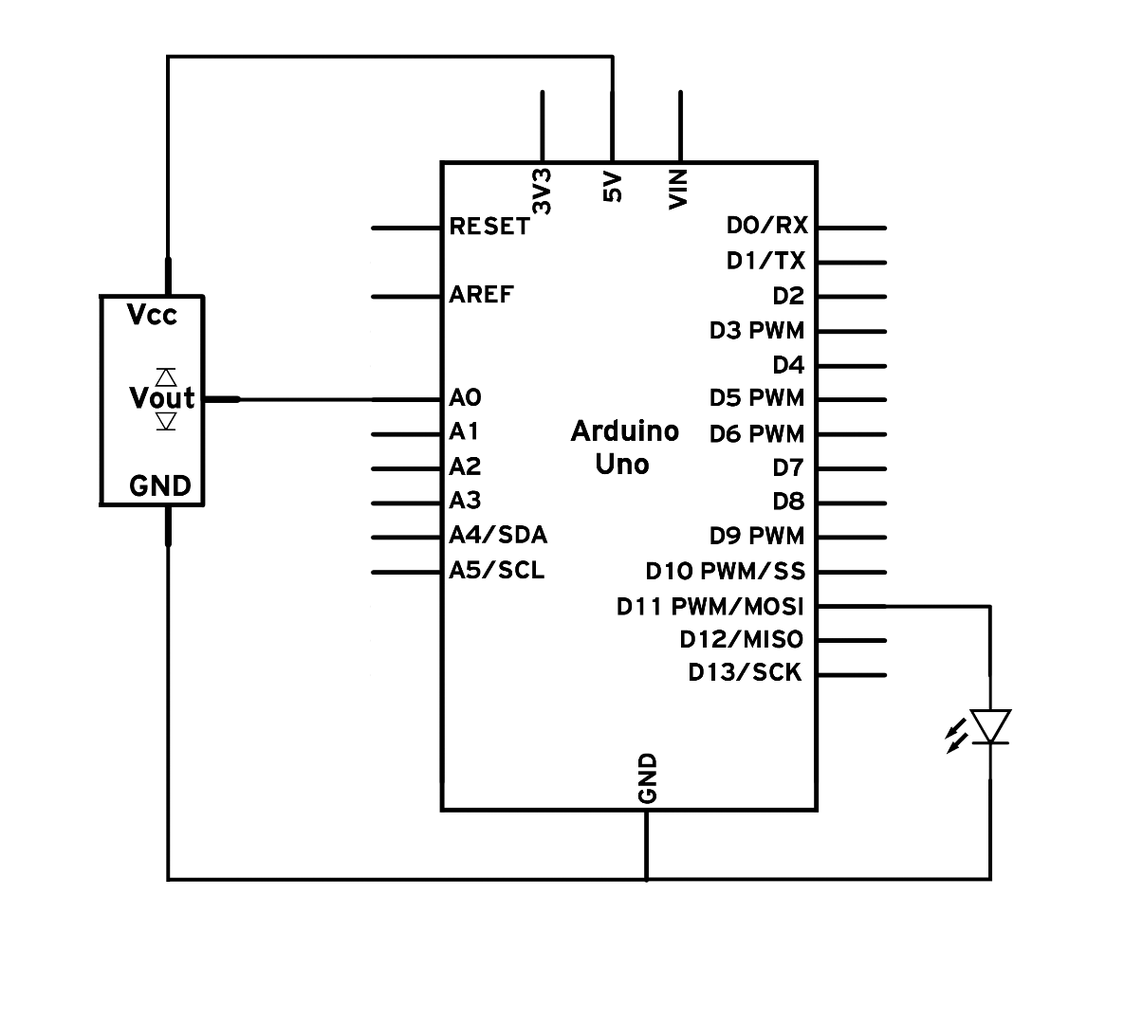
- Each Sharp IR has three pins. One is the power input, which we connect to 5V. Another is the ground that we will connect to one GND pin. Lastly, there is the analog output pin that needs to be connected to an analog input. Here, we used pin A0.
We will make a small illegal connection here. We will directly connect the LED to the Arduino without any resistor. For low-power LEDs, there is no problem, and neither the Arduino nor the LED will be affected. Plug the negative terminal to GND and the other terminal to one of the pins close by. Here, we used pin 11 for its PWM functionality.
But please don't exceed a 3 mm, 10–20 mA LED. No high-power LEDs here! It could easily fry the LED or the Arduino. If we don't know how powerful our LED is, we should just mount a 220-ohm resistor in series.
Step 2: Code
The following code will read the value of the sensor, print it on the serial connection, and vary the LED intensity using PWM, to match the distance:
// Declare the used sensor pin <br>int sensorPin = A0;
int LED = 11; // Declare the connected LED
void setup(){
  // Start the Serial connection
  Serial.begin(9600);
}
void loop(){
  // Read the analog value of the sensor
  int val = analogRead(A0);
  // Print the value over Serial
  Serial.println(val);
  // Write the value to the LED using PWM
  analogWrite(LED, val/4);
  // Wait a little for the data to print
  delay(100);
}
Attachments

Step 3: Code Breakdown
First, we declare two variables for the built-in LED and for the used analog port to which we connected the Sharp IR sensor:
int sensorPin = A0;<br>int LED = 11;
In the setup() function, we only start the serial connection. We don't need to declare the LED pin as output because we use the analogWrite() function, which doesn't require a declaration:
void setup(){
  Serial.begin(9600);
}
In the loop() function, we continuously read the value of the sensor using the analogRead() function; then we print it on the serial:
int val = analogRead(A0);
Serial.println(val);
Since PWM takes values from 0 to 255 and the analogRead() function returns values from 0 to 1023, we divide the value of analogRead() by 4 when we use it in analogWrite():
analogWrite(LED, val/4);
Step 4: More About Distance Sensors
Distance sensors have a huge market with hundreds upon hundreds of different models. Generally, in the cheap, hobbyist section, we can either find infrared sensors—such as the Sharp IR—or ultrasonic sensors.
An infrared sensor has a very narrow sensing beam. This means it can detect objects in tight places without interfering with other objects. However, if an object is too thin or has holes in its body, the sensor beam might go through it and give false readings.
An ultrasonic sensor, typically called sonar, uses sound above the normal hearing frequency to detect distance. It does so by emitting a short sound pulse and waiting for it to return. It measures the time it takes for the sound to travel, bounce on objects, and then travel back to the sensor.
Because the speed of sound is known, the total time it takes for the sound to return is dependent on the distance to the objects. This creates a very wide sensing beam. It is useful in many applications, especially when we need to detect large, complex objects. However, the wide beam will create interference if we have two objects in range. It will always detect the closer one.
An important thing to remember is that infrared sensors are dependent on the color of the measured objects while sonar is generally not affected by parameters except the shape and distance of the object.
More topics regarding sensors such as noise reduction, accelerometers or GPS can be found in my Arduino Development Cookbook available here. :D


