

Introduction: Arduino Pong Game - OLED Display


Dear friends,
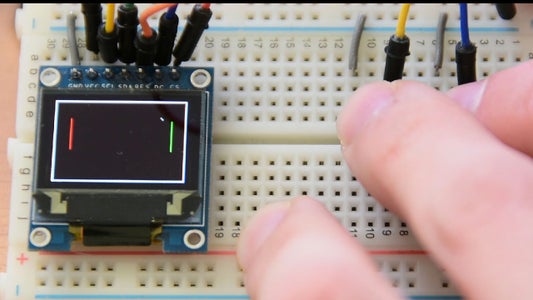
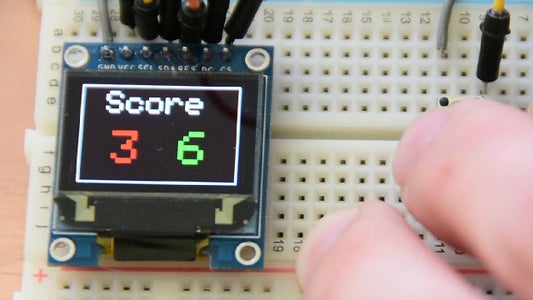
In this Instructable we are going to build an Arduino powered Game. It is the classic Pong Game! You can play against the computer by controlling the green paddle. Each time a player scores, the score is displayed on the screen. The first player to reach 8 points wins! It is a fun project to build and as you are going to find out, it won’t take you more than 10 minutes to build it.
Building a this game is a great learning experience. When you finish building this project you will have a better understanding of how computer games work, you will know how to wire a Color OLED display and you are going to see in action how powerful the Arduino platform can be. With this project as a base and the experience gained, you will be able to easily build more complex projects in the future.
Let’s start!
Step 1: Get All the Parts
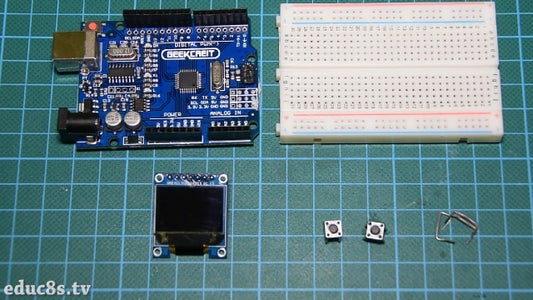
The parts needed in order to build this project are the following:
- An Arduino Uno ▶ http://educ8s.tv/part/ArduinoUno
- A 0.96” Color OLED Display ▶ http://educ8s.tv/part/ColorOLED
- A breadboard ▶ http://educ8s.tv/part/SmallBreadboard
- Two Push Buttons ▶ http://educ8s.tv/part/Buttons
- Some wires ▶ http://educ8s.tv/part/Wires
The cost of the project is around 15$.
Of course instead of an Arduino Uno, you can use any Arduino compatible board. For example you can use an Arduino Nano, in order to make the project smaller and more inexpensive.
Step 2: 0.96" Color OLED Display

This is the 0.96” Color OLED display. It is a new display on the market and it costs around $11. It uses the OLED technology so it is very bright, it has a great contrast and a low power consumption. On the other hand the display is small, and it offers a small resolution, only 96x64 pixels. It uses the SPI interface so we need 8 wires in order to connect it with Arduino. It works fine with the ESP8266 as well. I think this display is ideal for handheld projects that require color. Since the display is very new to the market, I think the price of it will go down soon, so it will be much more attractive.
I have attached a video in this intstructable with a detailed review of the display. You can watch it if you wish to find out more about this fantastic new display.
Step 3: Building the Arduino Pong Game


Let’s nowconnect all the parts together. At first we place the screen and the buttons on the breadboard.
We then connect all the grounds to the breadboard’s negative rail. Then, we connect the negative rail of the breadboard to Arduino GND.
Now, let’s connect the display.
Connecting the Color OLED Display
GND goes to the Breadboard GND
Vcc goes to Arduino 3.3V of the Arduino
SCL goes to Digital Pin 13 of the Arduino
SDA goes to Digital Pin 11 of the Arduino
Reset goes to Digital Pin 9 of the Arduino
DC pin goes to Digital Pin 8 of the Arduino
CS pin goes to Digital Pin 10 of the Arduino
The next step is to connect the left button to digital pin 3 and the right button to digital pin 2. If you wish to learn how to connect a button to Arduino without a resistor you can watch the detailed tutorial I have prepared. I have attached the video in this Instructable.
Now that we have connected all the parts together, all we have to do is to load the code.
Step 4: The Code of the Project

Let’s now take a quick look at the code. The code of this project is based on the code of a pong game for the monochrome OLED display. I modified the code to work with the color OLED display, I added the splash screen, and the score, and the game Over screen. The project needs two libraries in order to compile. We need the Adafruit GFX library and the library for the OLED display.
? Adafruit GFX: https://github.com/adafruit/Adafruit-GFX-Library
? Color OLED library: https://github.com/adafruit/Adafruit-SSD1331-OLED...
By adjusting the values of some variables you can change the difficulty of the game. You can set the ball speed, the paddle speed, the paddle height and the maximum score in order to make the game fit your taste. That’s it, upload the code to Arduino and have fun! As always you can find the code of the project attached in this Instructable. In order to download the latest version of the code you can visit the project's webpage: http://educ8s.tv/arduino-pong-game

Step 5: The Final Result

That’s today’s project. An Arduino Pong game with a color OLED display. It is an easy project to build and it can be further improved. We can design and 3D print an enclosure for it in order to make this project even better.
I would to hear opinion about this project. What kind of improvements can we make in this project? Please post your thoughts and ideas below, thanks!

Participated in the
Arduino Contest 2016

![Tim's Mechanical Spider Leg [LU9685-20CU]](https://content.instructables.com/FFB/5R4I/LVKZ6G6R/FFB5R4ILVKZ6G6R.png?auto=webp&crop=1.2%3A1&frame=1&width=306)


