

Introduction: Basic Electronics Skills for Robotics


Electronics seem scary, but they really aren't so bad. You don't need to be an electrical engineer to start learning electronics. You don't even need to mail away for a free brochure. All you need to do is follow along with this simple tutorial to get started.
Presented here is a simplified overview of electronics as is necessary for practical robotics. We will barely be scratching the
surface of the science and technology behind electronics. For a more
in-depth knowledge, you can take the Electronics Class.
To follow along with the later steps of this lesson - albeit not required - you will need a continuous rotation servo and a 4 X AA battery holder.
Step 1: What Is Electronics?

Electronics is the science and technology concerned with regulating flow of electricity. Put simply, it lets you move electrons around. While this may seem like a kind of pointless activity, the regulation of electrons has enabled some of the most important innovations of the last century including computers, televisions, rocketships, electric cars, rocketships, video games, smartphones, Tickle-Me-Elmo, hoverboards (both those that really hover and those that do not), and - of course - rocketships.
Step 2: Voltage, Current and Watts

Before we can regulate electricity, let us take a very brief moment and talk about what electricity is.
Electricity is basically a form of energy resulting from charged particles. It can exist either as a static charge or dynamically as a current.
We will be exclusively dealing with it as a current. A 'direct current' in fact. You may have heard of DC electricity. In case you have not yet figured it out, the abbreviation DC stands for Direct Current. What this means is that electricity flows in one direction only. Since it only flows in one predictable direction, it is easy to regulate.
There are two ways to measure Direct Current that you should be immediately aware of.
Voltage
symbol: V
Voltage is measured in volts. If you were to think of electricty as a river, volts would be how high the water rises above the river bed (or the depth you could say).
Current
Symbol: A
Current is measured in amperes (or - colloquially - amps). If volts is the water depth, than current is the force with which the water is moving.
Just as it is possible to have a really deep river moving with little force, it is also possible to have a really shallow river moving with a lot of force. Voltage and current need to be considered in relation to one another in order to have an understanding of their combined power. The relationship between voltage and current is measured in Watts (symbol: W). This is an expression of the overall power being exerted. You probably have heard this term before, and should just generally be aware of this. However, it is not a particularly important measurement for what we will be doing in this class.
Step 3: Batteries

Batteries are special containers which store DC electricity at a set voltage.
The most common types of batteries you will encounter are standard cylindrical dry cell batteries. Most notably these consist of AAA, AA, C, and D batteries.
What is important to know about these batteries, is that even thought they are different sizes, they are all rated at 1.5V (remember - V is the abbreviation for volts).
What changes as they get bigger in size is the amount of power they are capable of producing. A D battery will be able to provide power for much longer than a AAA battery. In other words, a bigger battery can provide more amperes for a longer amount of time than a smaller battery.
Batteries are measured in Amp Hours or Ah. This is basically the measure of how many amperes can be drawn from the battery in an hour. For instance, a 20Ah battery will let you draw 1 ampere for 20 hours. However, if your robot needs 5 amperes, you can run that robot for about 4 hours using the same battery (20Ah / 5A = 4 hours).

It may have by now dawned upon you that 1.5V is not very much. You might be wondering why we don't just use a 9V battery instead? Assuredly a 9V battery is producing more power than a 1.5V battery.
This, in fact, is not true at all. 9V batteries actually are not great in producing power at all. A good way to think of a 9V battery is to imagine 6 really small 1.5V batteries smushed together inside. In fact, if you take a 9V apart, that is essentially what you will find inside. Now, compare that to the size of 6 AA batteries for instance. The 9V batteries are rather tiny by comparison!
9V batteries are nice because they are small and can produce a relatively high voltage when you need it, but they don't offer much current and drain quickly when doing things like powering motors. Thus, they are not great for robotics. That is why we will be using a series of 1.5V batteries.
Step 4: Series and Parallel

Well then, you may be wondering how you can power anything if batteries are only 1.5V? The answer is rather simple. We connect them in series.
What this means is that we connect them front-to back in a row. So the positive (plus) end of one battery gets connected to the ground (minus) end of the next battery, and so on and so forth. We can then calculate the new voltage simply by adding 1.5V for each battery in the series. So, if you have three 1.5V batteries in series, we would calculate that thus:
1.5V + 1.5V + 1.5V = 4.5V
That's pretty much all there is to it.

As illustrated above, instead of putting batteries in series, we can also wire them side-by-side. This is called parallel. When identical power sources are connected in parallel, the voltage remains the same, but the amount of available current increases. This is useful when you don't have enough current to power your circuit.

For instance, say you had a 9V battery that kept draining too quickly or simply was not able to provide enough power to run your device. You could solve this by putting 6 AA batteries in series. However, for argument's sake, let's say your project does not have enough room to do this. You could also wire two 9V batteries in parallel. By doing this, you are essentially doubling the available current.
Keep in mind, this will only work if the batteries are the exact same voltage and should be avoided if possible. Without the proper protection circuit, fluctuation in voltage between the batteries will force them to try to charge one another, decreasing their lifespan.
Step 5: Battery Holders

There are two notable things to say about battery holders. Foremost, battery holders allow you to easily connect batteries to your circuit.

Secondly, they connect multiple batteries together in series. So you could count the number of cells it holds and multiply it by 1.5 to calculate the voltage of the battery holder. For instance a battery holder with 6 cells provides 9V (1.5 x 6 = 9).
Step 6: The Multimeter

A multimeter is a tool used for a wide range of electronics related measurements. Or you could say they could meter multiple measurements... multi-meter... painfully obvious - right?
A typical multimeter will measure voltage, current, resistance, and continuity. More advanced multimeters will also measure a host of other things that are not important to get into at this junction.

We have already discussed voltage (pictured left) and current (pictured right), and you should have a rough grasp of what that means by now. However, let's take a moment to discuss what is meant by resistance and continuity.

Another thing you can measure with a multimeter is continuity (pictured left). This is simply a test to determine if electricity can flow freely between two points. In other words, when you
touch the two probes to something, you are checking if there is
continuous path of conductivity. This can allow you to check whether
something is conductive or not. It is also very important for testing to
make sure solder connections are correct, and the electricity can flow
freely.
The other very important thing we can measure with a multimeter is resistance (pictured right). Resistance is the measure to which a component resists the flow of electricity within a circuit. In
other words, something with resistance makes it harder for electricity
to flow and converts the electrical energy to something else. It is
extremely useful to be able to measure how much resistance a component
provides.

To set up the multimeter, plug the black probe into the ground / common port. Plug the red probe into the voltage terminal. It's now all set up.
Step 7: Using the Multimeter

To use the multimeter simply turn the dial to the electrical property you would like to measure.
Sometimes meters have ranges within the property you are measuring. For instance, you can measure in the millivolt range, or the volts range. Turn the dial to the range you intend to get results in. For instance, if you are expecting a measurement of 5V you want to set the dial to select the option closest to that number.
For argument's sake, let's say we are measuring a 3 X AA battery pack. Touch the red probe to the positive terminal (or red wire) of the thing you are measuring and the black probe to the ground terminal (or black wire) of the thing that you intend to measure.
It should return a constant positive voltage reading. You may have been expecting a perfect 4.5V and gotten a number slightly above or below this. This is normal. Batteries are not regulated and the amount of charge they can provide fluctuates. Particularly, as you use up a battery, the amount of voltage they will be able to provide will drop significantly.

You can also measure resistance by turning the dial to measure ohms (that Greek symbol) on the meter, and putting something that provides resistance - like a resistor - between the probes. Like voltage, resistors can fluctuate a little. For instance, this 100K resistor gives us a reading of 99.7K, which isn't too bad really. It can fluctuate more.
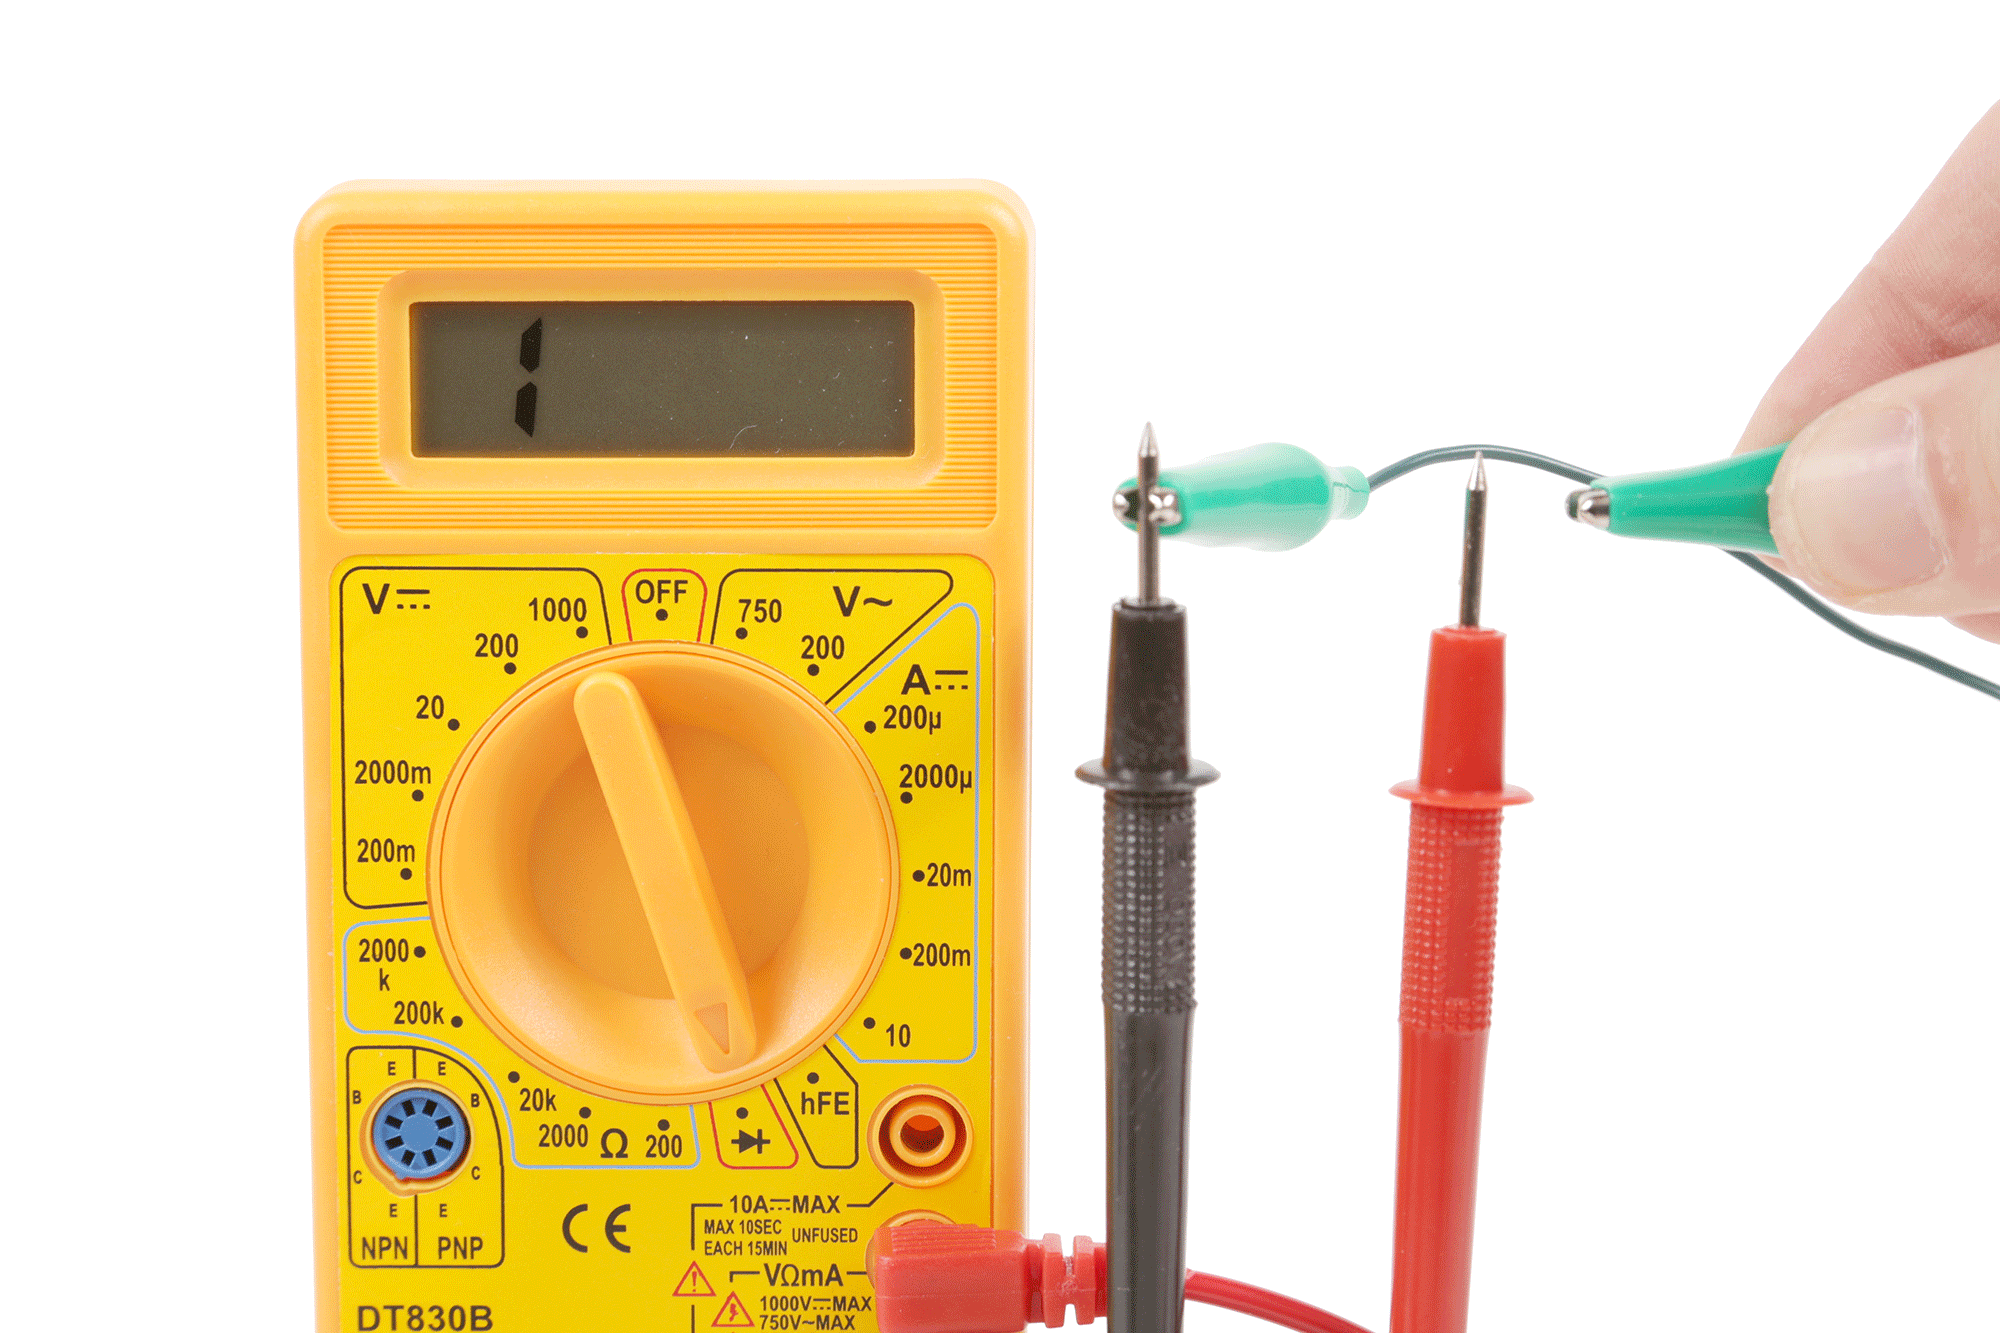
You can test continuity by turning the dial to the symbol that looks like a fast forward symbol on a cassette player (this is actually a diode symbol). Touch one end of the wire to the black probe and the other end to the red probe. When you touch the red probe, the reading on the meter should go from 1 to 0. On most meters, it will also make a beeping sound to indicate electricity can flow.
Lastly, there is the matter of measuring current. While current is a simple principle, is a little bit tricky to measure and we won't be going over it in this class. It will take a lot of time to go over, and you really won't use this too often as a beginner.
Step 8: Voltage and Ground

If you reverse the probes of the multimeter you will notice that the meter will give you a negative voltage reading. The reason for this is that DC electricity has a positive voltage and a ground voltage.
You can determine a voltage by subtracting the voltage at the red probe (presumably positive) from the voltage at the black probe (presumably ground). So, if when power and voltage are read correctly the formula is:
4.5 - 0 = 4.5
However, when you touch the red wire to ground and the black wire to the positive voltage, your formula actually becomes:
0 - 4.5 = -4.5
The reason for this is that DC electricity has a polarity where one side is always a positive voltage, and one side is not. When you measure the electricity backwards, you get a backwards reading. Thus, if you get a negative voltage reading, you are measuring backwards! Reverse your probes.
Anyhow...
Power always flows between the power source (positive voltage) and ground.
In order for an electrical circuit to operate, there needs to be a path that the electricity can flow between. In fact, given the option of mutiple paths, electricity will always travel the path of least resistance to ground. What this means is that electricity will always take the shortest path that offers the least amount of obstacles. Every electronic component that creates resistance in a circuit is basically an obstacle to the flow of electricity.
Upon hearing this, you may think then that you should provide electricity with the easiest path to ground by removing these obstacles and connecting it directly. However - and this is important to stress - you should NEVER connect your positive voltage source directly to ground. Aside from the fact that removing all obstacles entirely defeats the point of electronics in the first place, this is a very bad idea.

One of the other fundamental rules of electronics is that power must be used. If you connect power and ground directly together, there will be a lot of energy that has no way of expending itself. Your circuit will then try to release this unusued energy in highly antisocial ways. Basically, the energy will turn into heat. However, having nothing in particular to warm, either your power source or wire will start to dramatically heat up. This can potentially result in a damaged power supply, melted wire, or potentially a fire.
Another name of this phenomena is a "short circuit." You likely have heard this term before.
Basically, watch your power and ground connections carefully to prevent them from crossing. Don't release the "magic smoke."
Step 9: Circuits

A circuit is basically a closed conductive loop in which electricity can flow freely. Basically, a circuit is a bunch of things connected together in either series or parallel that enables electricity to flow between power to ground. This can be as simple as a battery source and a light bulb, or as complex as the controller board for a servo motor. In fact, let's take a closer look at the servo motor's circuit board.


Remove the screws in the back of a continuous rotation servo motor and lift the lid. Set the screws aside for later.

Inside the servo you will find a circuit board that consists of a series of electrical components that have been soldered together to form a circuit. These tiny little parts are arranged in such a way that lets a microcontroller communicate with the servo and control the motor. Don't worry about how. Right now we are simply concerned with the fact that this arrangement of odds and ends regulates electricity in such a way to perform complex tasks.
Step 10: The Soldering Iron

In order for all of the components on the servo's circuit board to be attached, they needed to be soldered. Soldering is a means of both fusing together two metal objects, and creating an electrical connection.
Unsurprisingly, the tool used for soldering is called a soldering iron.
It may seem intimidating, but a basic soldering iron is actually a rather crude device. It largely consists of a hollow metal tube with an electric heating coil inside. There is a pointy metal tip at one for melting solder, and a heavily insulated handle at the other end to keep your hand from getting burned. There is not too much more to it than that. Fancier soldering irons have fancy-schmancy temperature controls, which really are not remarkably important for what we are doing.

The correct way to hold a soldering iron is like a pencil. All you need to do is hold the insulated rubber handle as though you are holding a writing implement. This will give you a fair amount of dexterity for moving the tip around.
Keep in mind that the uninsulated metal tube gets as hot as the inside of an oven. Whatever you do, never grip the soldering iron from the metal part!
I once saw someone absent-mindedly grab the heated metal tube. It was not pretty! They had to go to the Emergency Room and have their hand treated for extensive burns. You wouldn't want to go to the Emergency Room and have your hand treated for extensive burns, so pay attention to what you are doing!


On a side note, I prefer soldering by a different method which I call the "gorilla technique," which is a bit like holding a spoon. Even though this technique is crude and ape-like, it is - in my opinion - a highly effective way of using it. Simply make a fist around the insulated handle, as though you are holding a sword. Next, rotate your wrist sideways to begin soldering.
Feel free to try it out and use the method that is most comfortable for you. However, should you choose to solder like a gorilla, be prepared for everyone and their mother to tell you that you are doing it wrong.
Step 11: Preparing the Iron

Before you start soldering your heart out, you will want to 'tin the tip.' What this basically entails is coating the top with an even coat of solder.
Simply plug in the soldering iron and wait a few minutes for it to heat up.
Melt solder evenly around the tip of the soldering iron until there is a nice even silver coat.
Step 12: Cleaning the Iron

After you tin the tip, you will want to quickly clean the tip.
Don't worry. This is easy.
Drag the tip of the soldering iron across a brass cleaning pad two or three times until it looks silver and clean-ish.
Finally, place the soldering iron to rest on its stand, or, should you have a fancier one, in it's holder.
Step 13: Desoldering

Okay. So you're rip, roaring, and ready to go.
However, we're going to do things a little backwards. We are going to learn to desolder (remove solder from a circuit) before we learn to solder.
There are a number of different desoldering techniques. We will be using desoldering braid, and ignoring all of the others.


Desoldering braid is basically a strip of tightly woven thin copper mesh that solder bonds well to. When solder is melted, it basically flows from wherever it is at, and gets caught up in the mesh.
To use it, place the desoldering braid atop whatever terminal on a circuit board you are trying to desolder. In our case, we are hoping to desolder the motor. Thus, locate the motor terminals on the circuit board. These are easy to spot because they are the large terminals to the left and right of the motor. In most cases, you can visibly see they are attached to the motor.

Once the desoldering braid is in place, place the soldering iron on top of it and firmly press down. The desoldering braid should now be sandwiched between the soldering iron and the terminal you are trying to desolder.

Typically, in about 10-20 seconds you will feel the solder begin to melt. Continue to hold the soldering iron there for about 5 more seconds. Once it feels like the solder has stopped melting, quickly move away both the soldering iron and the desoldering braid. Be careful not to touch the desoldering braid with your hands as it is likely very hot. Lift it by it's container.
If all goes well, you should now see a pool of solder on the desoldering braid, and the solder removed the circuit board. If not all the solder has been removed from the circuit board, repeat the process with a fresh section of desoldering braid until the terminal is detached.


This may take some practice to get right. Fortunately there is a second terminal to desolder before you can free the board from the motor. Desolder the other motor terminal as well in the same fashion.


Once both terminals are desoldered, gently remove the circuit board.
Also, keep in mind that soldering is going to seem like a piece of cake compared to this.
Step 14: All About Wire

Before we get to soldering, let us take a moment and discuss wire. You may be wondering what there is to say about wire? Well - a lot!

In electronics, the wire we will be dealing with is insulated. This means that there is a metal core inside of a rubber or plastic insulator. This allows electricity to flow, but prevents the wires from shorting if they were to touch (because they are insulated).

There are two types of metal cores we will be dealing with.
Solid core wire has a single peice of metal inside the insulation. This wire is good for electronic circuit boards or connecting components to a microcontroller because this type of wire can easily plug into the board's sockets. This type of wire keeps its shape when bent, but also it more prone to break if flexed too often.
Stranded core wire has a braid of thin metal strands inside. This wire is better for connecting to components which are handled a lot or move around (such as connecting to motors on a robot arm). This type of wire does not easily plug into a microcontroller's sockets, making it annoying for prototyping. However, it is very flexible and can be bent a lot without snapping.

The thickness of wire is measured in gauges. The thicker the gauge, the more current it can handle. In America, gauge is measured in AWG.
We will largely be dealing with wire in the 20 AWG to 22 AWG range.

Even though all wire essentially works the same regardless of color, there is a generally agreed upon color-coding system for wire when dealing with DC electronics.
Red indicates a power wire.
Black indicates a ground wire.
Green (or any color not red or black) indicates a signal or data wire.
While you are probably thinking we've exhausted all that there is say about wire, you would be wrong. However, there is still a lot more ground to cover and we should probably continue this wire discussion another day. We still have a lot left to do, like soldering wires to the motor terminals inside of the servo.
Step 15: Soldering

Using the servo motor we desoldered earlier, let's now solder new wires onto the motor!
To do this, strip some of the insulation from the end of 6" piece of red wire, and hook it around the motor terminal with a little red dot next to it. The red indcates that this is the motor's positive terminal.


Next, use the soldering iron to heat up the terminal and the end of the wire. While doing this, push the solder into the tip of the soldering iron. All goes well, you should get a nice shiny solder connection between the two. This might take some practice to get right.
Let the solder cool and you're done.
Repeat this process with a 6" piece of black wire and the motor's ground terminal.

When you are done, use your diagonal cutting pliers to trim away any excess leads sticking off of the soldered connection. The less conductive material you have exposed, the better. This will also help put the lid back on.


Take both wires and tie a knot such that the knot extends past the servo casing once tightened. The knot should be put on the inside of the servo assembly when you close the lid. This will prevent the wires from getting pulled out and keep the solder connections from being broken should something catch onto the wire and pull.

Finally, close the servo back up using its screws.
For a more in-depth soldering guide, check out the soldering collection.
Step 16: Test Your Work
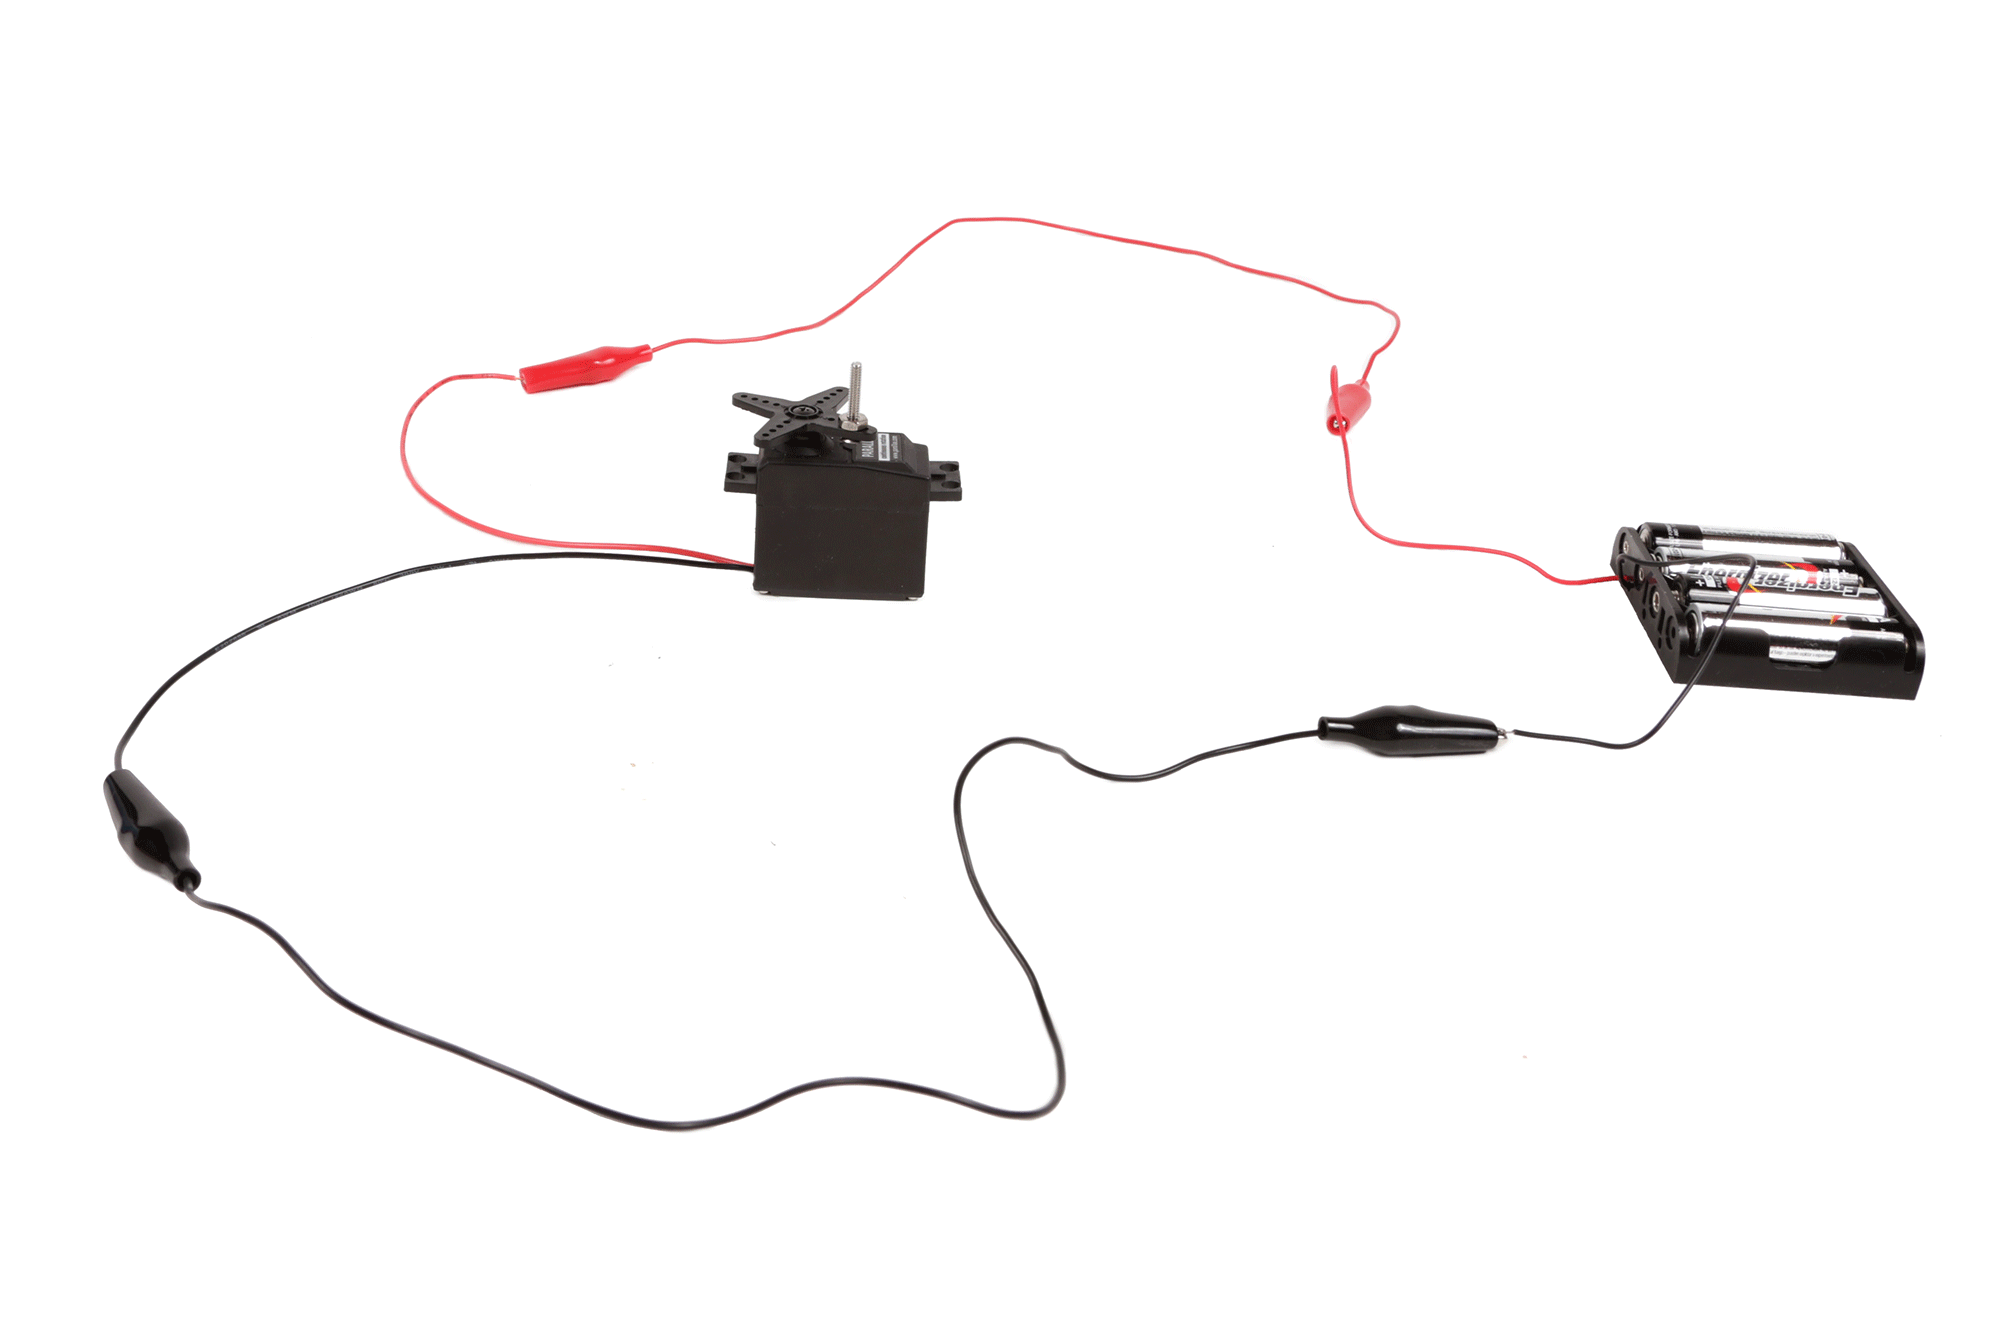
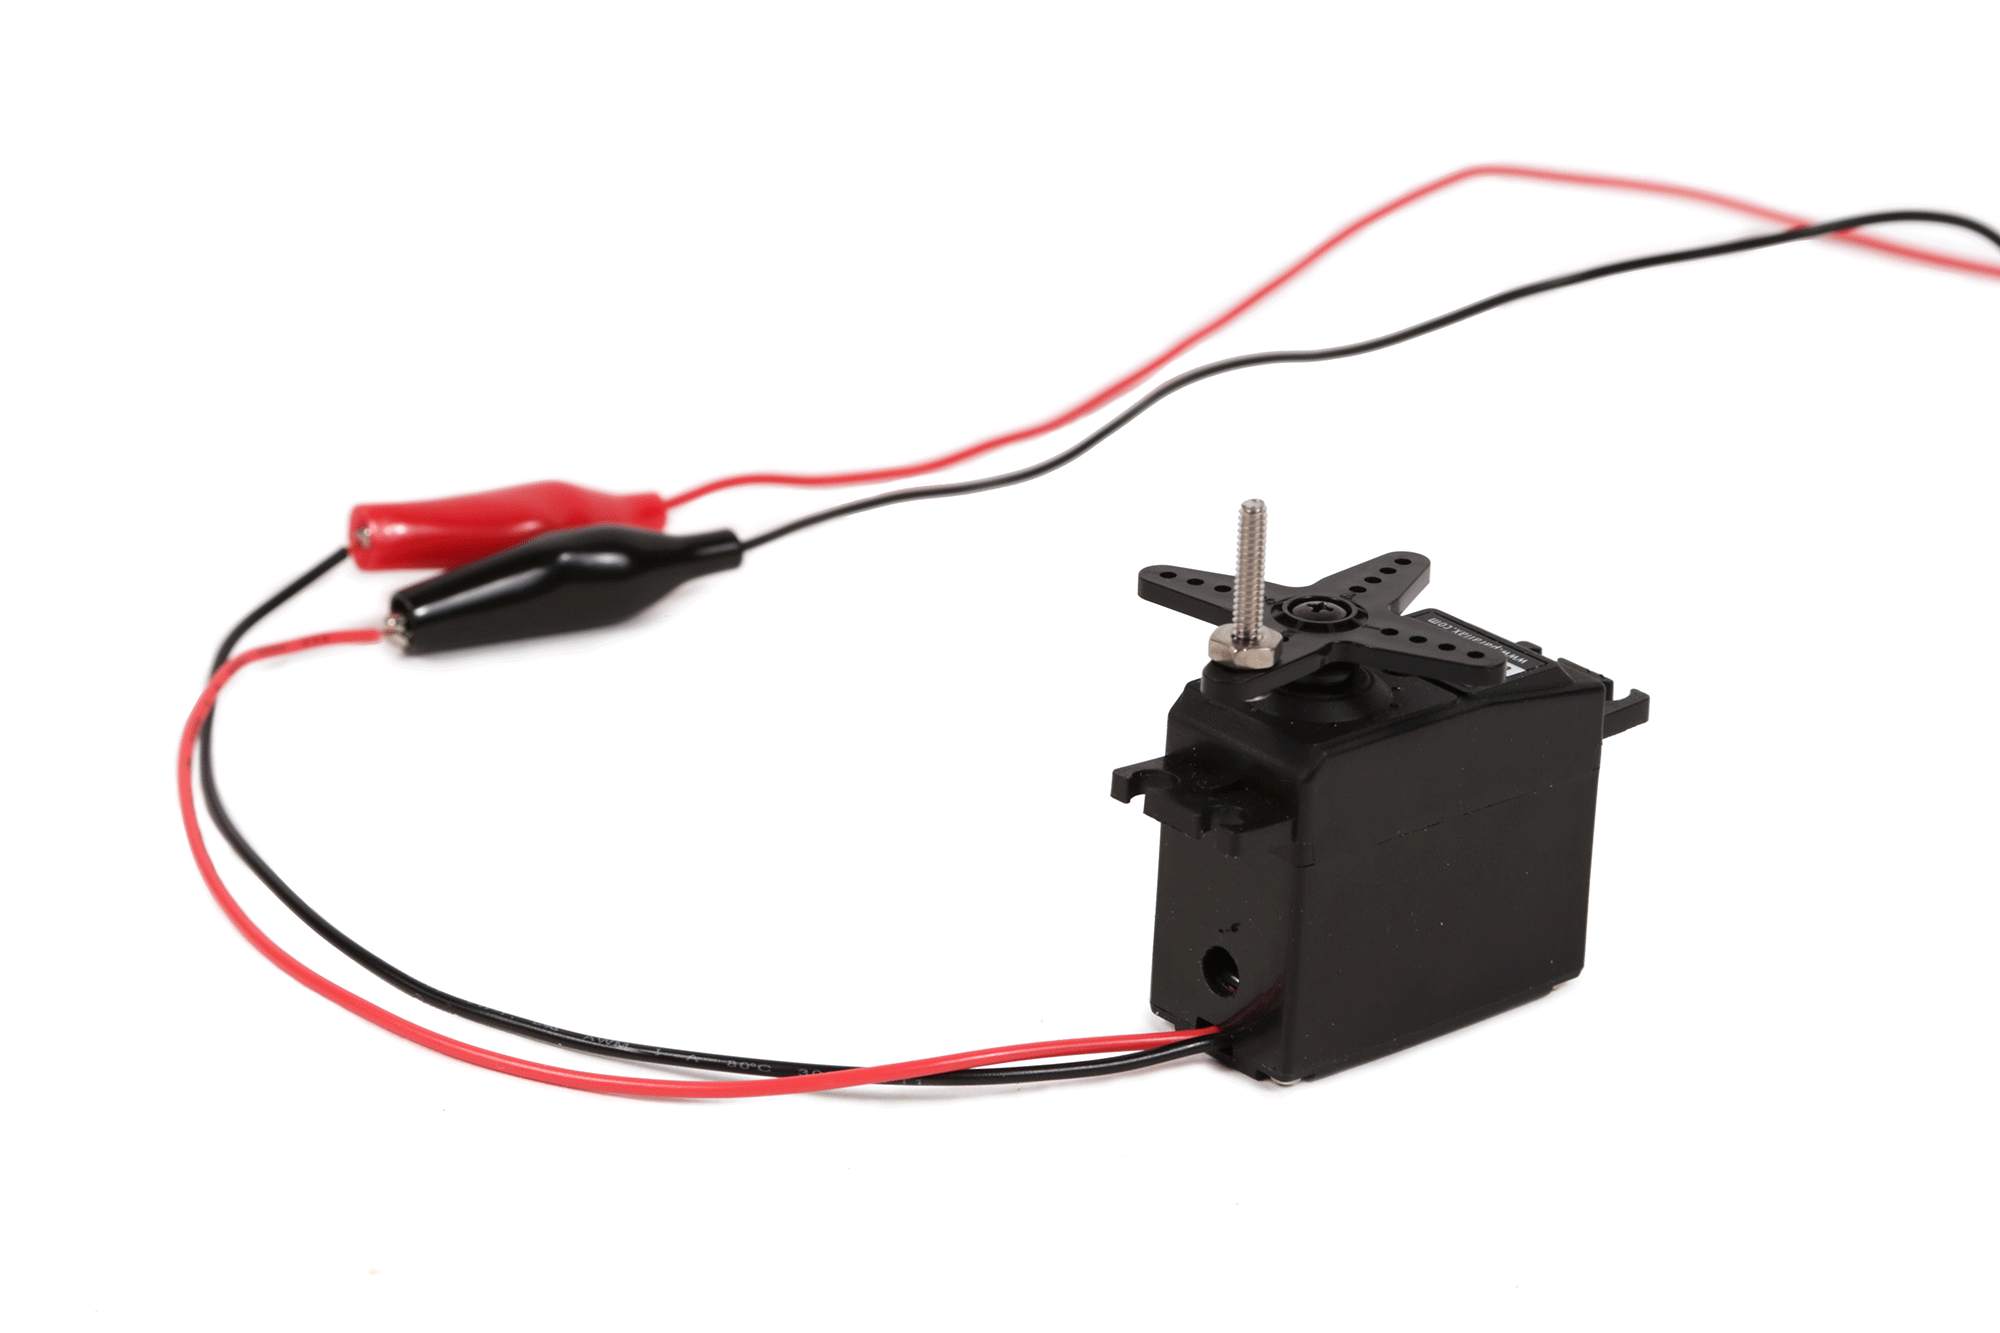
Take a red jumper cable and connect one end to the red wire on a 4 X AA battery holder, and the other the red wire on the motor.
Take a black jumper cable and connect together the black wire from the battery holder to the black wire from the motor.
All goes well, the motor should spin clockwise.
To reverse the motor direction, simply flip the connections by attaching the red jumper cable to the motor's black wire and the black jumper cable to the motor's red wire.
DC motors change direction when the polarity is reversed. In other words, when you flip power and ground.
Step 17: Solder Your First Circuit

To bring it all together, we will now be soldering together the modified servo motor with the 4 X AA battery pack.

To begin, slide a 1" peice of blank shrink tube onto the black motor wire, and a 1" peice of red shrink tube onto the red motor wire.

Strip a little insulation off the ends of each of the motor wires. Twist together the exposed metal of the red motor wire with the exposed metal of the red battery pack wire. Also twist together the black motor wire with the black battery pack wire.


Solder the black wires together, and then once those have cooled, solder the red wires together.


Slide the shrink tube over the exposed solder connections, and quickly blast the peices with a heat gun. This will shrink the shrink tube into place and snuggly insulate the solder connections. This is very important to keep them from accidentally touching and creating a short circuit.

Congratulations! You have just soldered your first circuit.

Test it out by placing batteries in the battery holder. The motor should now spin. If it is not, go back and check your solder connections.
Now that we have managed to wire up and power a motor, we are ready to begin building some bots.


![Tim's Mechanical Spider Leg [LU9685-20CU]](https://content.instructables.com/FFB/5R4I/LVKZ6G6R/FFB5R4ILVKZ6G6R.png?auto=webp&crop=1.2%3A1&frame=1&width=306)


