

Introduction: Borderlands 3 Tiny Tina Mask


Are you ready for more Borderlands?????!!!!! I know I am. Today we are making the Tiny Tina mask from Borderlands 3. You'll learn about how to use foam to create a cosplay prop all your own. Lets get right to it.
Supplies
good references
2mm foam
5 mm foam
10 mm foam
Foamclay
Foam dowel
boxcutter or xacto knife
scissors
hexflex clear (substitute with fabric medium)
spray plastidip
14 gauge wire
sculpting tools(optional)
heat gun
blow dryer
dremel with sanding bits
paintbrushes
paint cup
paint pallete
Americana Paints
light buttermilk, dark chocolate, lamp black, titanium white,
holly green, slate grey, royal fuschia, tuscan red, cadmium yellow
Step 1: Pattern and Cutting Out the Base


Big base piece
Trace out the small base pattern onto 10 mm foam and add 1/4 in around the entire edge to make the large base. Cut out that shape with your box cutter or xacto knife and round the edges with the sanding bit on your dremel.
Small Base piece
Trace out the small base pattern and take 2 mm off the entire edge. Cut on that line and sand the edges with the dremel again. Do not glue these pieces together yet. That step will be much later.
These pieces make up the base of the mask.
Step 2: Contouring and Detailing


The next thing we need to do is make the shapes of the face. The way I did this was by a method called skinning. In order to do this method, you start with a base of shapes that you drape a very thin foam over. So, in this step I created the understructure.
Understructure
Cut out the peices on the pattern with the corresponding foam. The forehead, nose, and cheek are 5 mm foam and the 2 circles under the nose and the eyebrow are 10 mm foam.
All you have to do with those pieces is round them out with the sanding bit on your dremel on one side. this does not have to be pretty because it will get covered.
I did not cut the eye hole until later but I recommend you do this first and round out the inside on the eye hole with your dremel BEFORE attaching those pieces.
Once you've done that, you can hot glue all of those pieces down to the base.
The Telescope Eye
For this, start by cutting out a strip of 10 mm foam 7/8 in wide and 7 in long and glue the ends together. Place that circle over a piece of 10 mm foam and trace out the inside circle. Cut out that shape and round the piece into a dome with your dremel. Again, it doesn't have to be perfectly smooth because it is getting covered.
Then, you'll use a heat gun to heat up a piece of 2 mm foam to stretch and wrap around the dome. You'll need to heat up both sides for about 4 seconds each. Stretch and wrap foam around the dome and hold it there for about 20 seconds. You don't need to stretch very much, just enough to have no wrinkles on the dome face. After the 20 seconds, it should be able to retain its shape pretty well.
Hot glue the edges of the 2 mm along the back of the dome. Again again, No one will see this, so it doesn't have to be pretty. Place the made dome into the circle you made earlier and glue it into place from the back.
Finally, glue the telescope eye down to the base.
Extra detail
Cut 2 small pieces of 15 mm foam dowel about 3/4 in long for the bolts on the forehead and put aside for now.
Step 3: A Technique Called Skinning


Skinning
Now that you've made the under structure we are going to do the actual skinning.
We start by cutting out a piece of 2 mm foam about an inch larger than the small base weve been working on. Use your pattern to trace and cut out a hole in the foam for the telescope eye to fit through.
Once you've layed it over the face, now its time to heat up the foam. The best way to do this is to do it in sections. Heat up one spot, then press along the shapes, holding for a little bit and then moving onto another section. just keep in mind that if you reheat a section,you'll lose the work that you just did because the foam will contract when heated. Once you've got it heated up and formed pretty well, glue in a few spots underneath the 2mm foam to hold it in place. Also glue down the 2 mm foam along the entire edge of the mask. If there is any overhang of the 2 mm foam, trim from the back and dremel down if needed.
Head Bolts
Make some holes in the forehead of the mask for the bolts(foam dowels) that you cut earlier. Glue them into place.
Step 4: Finishing Details and Fixing Mistakes


Nose
Cut out the nose from the pattern and round with the sanding bit on your dremel. Glue into place.
Nose Band-Aid
Cut out the nose bandaid shape. Cut in half on the line. Sand a bevel into both pieces on the underside and glue together. Now this piece should be on an angle.
Eye
To make the second eye, wet the mask with a little water on the place that you want to use the foamclay. You can smooth it out with your finger and some water and use plastic or metal sculpting tools if you think that would be easier. keep in mind that the foamclay is quick air drying. Once you get it out, you should use it as quickly as you can.
Fix Mistakes
I wasn't a huge fan of how the nose came out so I added a little more to it by sculpting onto it with foamclay. Its not absolutely necessary to use sculpting tools but it helps for fine detailing. I also fixed the seam on the telescope eye by wetting it and putting on a little more foamclay. If it isn't smooth enough for you, you can sand it with the dremel or by hand once its dry in about 8 hours.
Note about foamclay: The thicker the foamclay, the longer it will take to dry completely. I don't recommend going much over 1/4 in thickness when using foamclay. Especially if you want to make a project quickly. You can also rehydrate foamclay that has partially dried by kneeding in water until its sculptable again.
Step 5: Make Some Ears


Ear bases
Start by cutting out one of each ear shape.
Take your 14 gauge wire and bend it into a shape that fits inside the ear shape of both ears. Once youve got those bent, you can sloppily glue it into place.
Next, glue down those ears onto a second piece of foam and trim around the edge.
Ear Trim
Cut out the ear trim and glue them down to the edges of both ears. You,ll need to round the edges with your dremal on boththe inner and outer part of the ear, Otherwise it might look pretty jagged.
Finishing
The last thing you'll need to do if dremel the rest of the edges with your sanding bit, making the edges nice and smooth.
Now you have completely bunny ears to go along with the mask.
Step 6: Prime and Paint


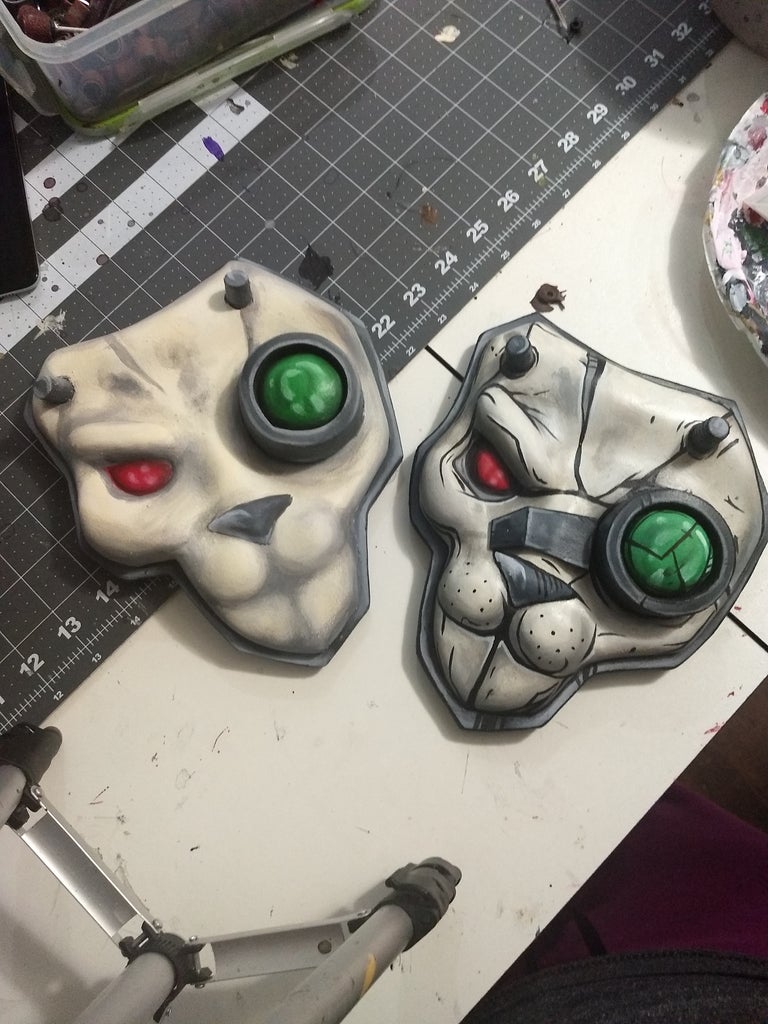


Prime and base coat
Because we made this mask entirely out of foam, the easiest way to prime is to use spray plastidip. You'll need about 3 coats. Make sure you do this outside and please don't skip this step. This is a crucial step in durability for both the foam and the paint.
After that you'll need to lay down a base coat of the base color you'll be using for each part of the mask.
Side Note: This is where the hexflex clear comes into play. The way to make your paint flexible is to mix hexflex clear in with every coat of paint that you do. By the end after everything is dry, your finished product will be totally flexible with the added advantage of having a built in clear coat AND will be more durable.
Start with the light buttermilk paint color that will make up the base of the bunny face. Do as many coats as you need of this until its completely solid (usually about 3 coats). Blow dry in between if you don't want to wait for paint to dry.
Painting
Blending gel method
This first video shows a very basic idea of how to blend colors. To get the shadow color, start with the light buttermilk add a little brown and a little black. Lay the color down and then with a clean brush you can blend into the buttermilk with a little dab of the blending gel.
Wet blending paint method
If you aren't feeling the blending gel method, this is another way that creates the same finished product. You may want to do this is smaller sections because acrylic paint is pretty quick drying. Lay down the shadow color like in the video, then lay down the base color next to it. With a clean brush, blend between the colors while they are still wet.
Cell shading Video Tutorial
Video 3 shows start to finish how to shade one section. It an be applied to any of the colors. Also the color chart provided in the pcitures shows what paint color you can use to lighten or darken each color.
Video 4 is a timelapse of the cell shaded black lines over the entire bunny mask. For the black lines all you need is black mixed with hexflex clear and blending gel is you need a little more flow.
If any of this is unclear, please, let me know and ill work on a better explanation.
Shading the green eye
Shading the inside of the bunny ear. Can be applied to any other color.
Timelapse shading
Step 7: Aaaand Finished!!


Now that youve got this part done, go onto apply some of these techniques to an entire costume. I hope you enjoyed this Borderlands tutorial. No doubt ill be making more related to borderlands in the future.
Adios for now!!!

First Prize in the
Paint Challenge


