

Introduction: Bronze Fabrication and Patination


This Instructable will guide you through the process of welding, chasing and applying a hot patina to a cast bronze sculpture.
Step 1: Preparing to Weld Castings

This is a sculpture I cast at my friend's foundry in Oakland, California and completed during my residency at the Autodesk Pier 9 Workshop. Lost wax casting is a process dating back nearly 6 thousand years and though there have been many advances in mold making and refractory materials, the general process is remarkably unchanged. That is, heat bronze until it reaches a liquid phase and pour it into a mold that can withstand the high temperature (1,950 + degrees Farhenheit) of the molten bronze. If you want to read up on the history, Wikipedia has a good entry here: https://en.wikipedia.org/wiki/Lost-wax_casting .
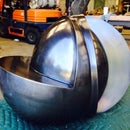
Step 2: Fitting the Castings


When casting hollow forms, it's necessary to cut the wax patterns to allow the mold material (ceramic shell in this case) to flow on the exterior and interior surface of the piece. I cut these waxes in half and made a couple of small registration "keys" to align the castings. After verifying that the castings fit, I took them apart and welded some bronze scrap on the inside to act as ballast to orient the piece. Since the piece is round, it didn't naturally sit the way I wanted it too. Adding a little ballast alleviates the nagging problem of having to mount the piece on a base and allows the sculpture to simply be set on a surface without too much danger of it rolling away.
Step 3: Welding and Repairing Misruns


After the ballast was welded in the sculpture, I tacked the piece together. You'll notice in the second photo above that there are a couple of holes in the castings. This is referred to as a misrun, which means that the bronze didn't fill that section of the mold. There are many things that could cause a misrun: pouring metal too cold, too few gates or vents. In this case, I think there were not enough vents to allow the bronze to displace the air in the mold quickly enough. The result is that the bronze chilled in these areas and left holes in the castings. It is never desirable but in this case the fix was relatively painless. I laid some paper over the holes, rubbed it to reveal the edges of the holes, transfered the paper pattern to bronze plate and cut the bronze patterns. The bronze patches were tacked in place, peened over with a hammer and welded.
Step 4: Chasing


After the piece was completely welded, all of the welds were dressed using angle grinders, die grinders, scotch brite hand pads and a wire wheel. The welds were initially dressed with a 4 1/2 " angle grinder, being careful not to grind into the texture that was worked into the wax before casting. With the welds ground until they were slightly proud of the surface, I then used a right angle die grinder with a small sandpaper and scotch brite pad until the welds were gone. To create a nice intersection around the "waist" of the piece, I used a file to create a sharp line so the forms were both blended together but independent. For some tight inside corners, I used a straight die grinder with a burr attachment to make them a little sharper. I then rubbed the entire piece with a scotch brite hand pad and followed that with a wire wheel attached to a 4 1/2" angle grinder to prepare for patination.
Step 5: Patina


We made sure the piece was clean and free of oil and grease by scrubbing it with a weak "pickle" solution of nitric acid. You'll know it's clean if water sluices over the piece without beading. My friend and colleague, Karl Reichley, is a master patina artist and generously offered to help with this piece. The first step was to determine what I wanted the piece to look like. Together we decided to go for a rich, organic chestnut or acorn brown. To achieve that tonality and value, Karl mixed three aqueous chemical solutions: ammonium sulfide, cupric nitrate and ferric nitrate. We applied a base coat by scrubbing the piece with a weak ammonium sulfide solution to slightly darken the sculpture and accentuate the deep texture of the piece.
Step 6: Building the Patina
After the cold base coat was applied, Karl heated the piece with a propane torch and started building the patina. When heating the piece, keep the torch moving to prevent hot spots. The chemicals are very heat sensitive and hot spots can ruin your patina in a hurry. Weak cupric nitrate was applied first to create some golden tones without being opaque. Karl then slowly built the patina by brushing and spraying ferric nitrate on the piece. The brush was used to scrub and burnish the sculpture while a fine spray was used to unify and even out the surface. After a couple coats of ferric nitrate, ammonium sulfide was applied to darken the sculpture and add some cooler silver and gray color. Finally, a medium strong ferric nitrate was sprayed over the entire piece, lightening it and adding some red tones. Knowing that the color and value of the sculpture would change as it cooled, we decided to stop and let it reach room temperature.
Step 7: Waxing


Sure enough, the piece continued to lighten and arrived at the acorn color we were looking for. The last step was to wax the piece. Waxing the sculpture protects and preserves the patina, adding a nice surface depth to the piece. The patina also becomes more transparent after waxing by allowing more of the bronze to come through to the surface of sculpture. A light coat of carnuba based wax was applied, allowed to dry for about 2 minutes, and then buffed out with a clean, soft cloth to shine. Add a second coat and wax and you're done!


