

Introduction: Build Android Bluetooth App for Arduino


Hi, today i am going to make a android app for arduino Bluetooth module HC-06.Through this app you can control a light or led form your android phone.Lets do it..........
Step 1: Go to Android Editor

Go to MIT App Inventor
Link: http://appinventor.mit.edu/explore/
In the menu bar click on “Create App!”
Login using your gmail account.
If you don't have gmail account or Google Account.Then create an account.
Step 2: Start Creating Android App


In the menu bar go to “Projects”.Click on it.You will see a drop down menu.In that drop down menu click on the “Start new project”.Then a page will came and want a project name.Give a project name.I give the project name "Bluetooth_Remot".Remember in this online editor you are not allow to give space in the name.So, i use this "_" .
Step 3: Designer Page(Step-1)

Now, you are in design page.In this page you will drag and draw the outer look of the app.
Step 4: Designer Page(Step-2)

From "Palette" in "User Interface" bar drag the "ListPicker" and drop it into the screen.
Step 5: Designer Page(Step-3)


In the "Properties" bar change the name of this "ListPicker1" to "Connect".
Step 6: Designer Page(Step-4)


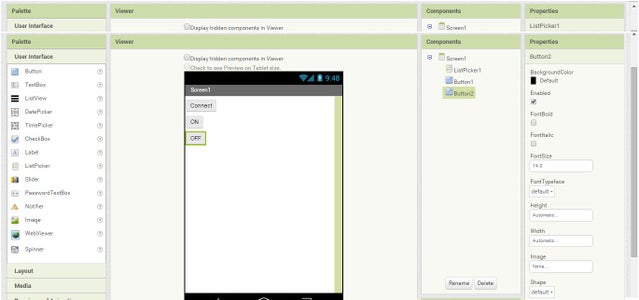
Like before from "Palette" in "User Interface" bar drag two "Button" and drop it into the screen.And from "Properties" bar change the name of that two Button "Text for Button1" and "Text for Button2" into "ON" and "OFF".
Step 7: Designer Page(Step-5)

Now, from "Palette" in "Connectivity" bar "BluetoothClient" and drop it into the screen.
Step 8: Designer Page(Step-6)

From "Palette" in "Sensors" bar "Clock" and drop it into the screen.
Step 9: Shift Designer Page to Blocks


On the top click on the "Blocks" and you will get a new page like shown in the picture.
Step 10: Blocks(Step-1)

From "Blocks" to "Screen1" to "ListPicker1" click it and you will get boxes like the picture.Now Drag "When ListPicker1 .BeforePicking do" and drop into "Viewer".Again from that list drag "set ListPicker1 . Elements to" and drop it into "When ListPicker1 .BeforePicking do".That will looks like the picture.
Step 11: Blocks(Step-2)

From "Blocks" to "Screen1" to "BluetoothClient1" click it and you will get boxes like the picture.Drag "BluetoothClient1 . AddressesAndNames" into "set ListPicker1 . Elements to".
Step 12: Blocks(Step-3)


Like Blocks(Step-1) and Blocks(Step-2) drag and drop like picture.
Step 13: Blocks(Step-4)

Like before from "Blocks" to "Screen1" to "Button1" drag "when Button1 . Click do" into "Viewer" .
Step 14: Blocks(Step-5)
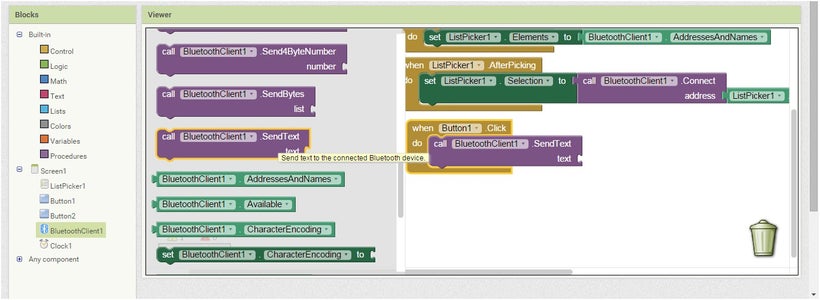
From "Blocks" to "Screen1" to "BluetoothClient1" drag "call BluetoothClient1 . SendText text " into "Viewer" .
Step 15: Blocks(Step-6)

From "Blocks" to "Screen1" to "Text" drag " " " " into "Viewer".
Step 16: Blocks(Step-7)

Now in the text box in " " write "ON".
Step 17: Blocks(Step-8)


Flow the same steps for "Button2" shown in pictures.Only change is write "OFF" in the box.
Step 18: Download Your App

Congratulation !!!!!!!!!!!!!!!! You just build your Bluetooth app.Now to download it go to top click on "Build" and then click on "App(save .apk to my computer)".
Step 19: Arduino Program for This App
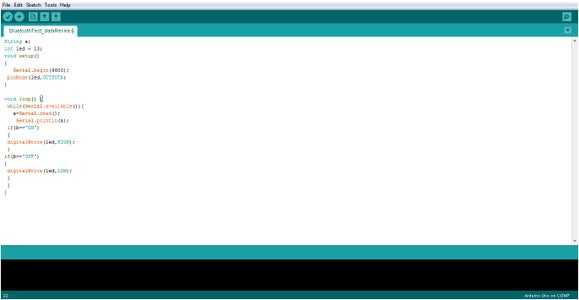
Now you have your remote to control arduino led light in pin 13.By using this remote you can ON or OFF any thing that you want.Here the simple code for arduino to control pin 13 led.
Code:
String a;
int led = 13;// add the pin number that you want to control.
void setup()
{
Serial.begin(9600);
pinMode(led,OUTPUT);
}
void loop() {
while(Serial.available()){
a=Serial.read();
Serial.println(a);
if(a=="ON")
{
digitalWrite(led,HIGH);
}
if(a=="OFF")
{
digitalWrite(led,LOW);
}
}
}


![Tim's Mechanical Spider Leg [LU9685-20CU]](https://content.instructables.com/FFB/5R4I/LVKZ6G6R/FFB5R4ILVKZ6G6R.png?auto=webp&crop=1.2%3A1&frame=1&width=306)


