

Introduction: Build an Electronic Random Character Generator for One Time Pad Cryptography in Bamboo Case


Foil the NSA! With this device you can make One Time Pads and create cryptograms that are unbreakable if used correctly. The concept is simple. Create a string of random characters (that is where this device comes in). Share this string of random characters with a friend. Use the random string to encode a message. Your friend can decode the message using the random characters you shared earlier. If the random string is kept secret, it is theoretically impossible for anyone but you and your friend to read the message.
Don't wait! Get your One Time Pad generator here!
https://www.etsy.com/listing/181967530
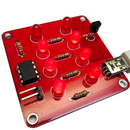
Step 1: Add the LEDs to the Board


To start, let's add the LEDs to the board. Start with the four corner LEDs. Once those are soldered add the rest, row by row. Each LED has a flat side which should be aligned with the white outline on the board. I have made it very easy for you since all the LEDs are oriented the same way :). Use a wire cutter or low profile trimmers to clip the leads flush with the board. The green ones shown in the pictures are from the craft section at Wal-Mart and work great. Be sure to save the cut-off LED leads as you will need a few later.
You should now have 15 LEDs soldered and oriented correctly. It is important that they face out straight to match the holes in the case.
Step 2: Add the Coin Battery Clip


Adding the battery clip is easy. Place it on the board with the curved edge facing the outside. It should match the outlines on the board. You may find it helpful to temporarily tape the battery clip to the board while you turn it over to solder the bottom side. A quick dab of solder on one terminal while you hold the clip in place works too.
Step 3: Adding the Microcontroller


The microcontroller is the last component to solder. Be sure the end of the microcontroller with the dot is aligned with the white notch of the outline on the board. Double and triple check it is oriented correctly before you solder.
Step 4: Add Battery


Insert the supplied CR1225 battery (positive side up) into the battery clip. Your One Time Pad Generator is now ready!
Step 5: Touch the Sensor to Generate a Character

Just touch the sensor at the top of the board with a finger to start random character generation.
The kits will sleep in low power mode until another touch is sensed.
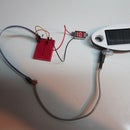
Step 6: Extend the Touch Sensor


This simple touch sensor extension will allow you to reach the touch sensor between the bamboo plates easily. Use a couple of the leads which you cut off of the LEDs in the first step. Most any thin wire will do but the cut off LED leads work great. Insert the led about 3mm into the front hole on touch sensor. Holding it in the hole, wrap it around the back of the board. The wrapped around wire should just touch the end you put through the hole. Trim the excess length and solder these two ends together. Do the same with the other touch pad. You may put a little solder on the front touch pads for extra security as shown in the last picture.
Congratulations! You are almost done!
Step 7: Assemble Bamboo Case


The bamboo case is attractive and easy to assemble. Just follow the pictures and add the pieces in order. Hand tightening the small nuts is sufficient.

![Tim's Mechanical Spider Leg [LU9685-20CU]](https://content.instructables.com/FFB/5R4I/LVKZ6G6R/FFB5R4ILVKZ6G6R.png?auto=webp&crop=1.2%3A1&frame=1&width=306)


