

Introduction: Built in Clock Shelf


Hey folks. As a service award for working for my employer for 15 years I received a clock... A timekeeping device for putting in the time... Anyway, the clock looks good on my wall, but I thought it would look better built into my wall. This instructable gave me the motivation to get off the couch and do something.
As part of this instructable, I decided to NOT to take any measurements, everything was cut to fit, not by measuring, but instead by using layout methods. I did make one quick measurement of the width to make sure it would fit between a standard 2x4 frame wall.
I don't claim any original or unusual methods here. I have picked up tricks over the years, from a variety of sources that I am unable to site anymore.
Step 1: Rough Out the Wood for the Box


The clock has a cherry finish. While I had enough cherry to make the box and the frame I went with oak to match some other trim work in the room. Another reason for choosing oak was to contrast the finish between my clock and the box. Anyway... On to the instructions.
The first 'measurement' was to use a piece of scrap to mark the depth of the box I needed. I honestly don't know how deep this is, probably about 4 inches. To make sure it would fit in a 2x4 frame wall I laid a scrpa 2x4 next to the case of the clock - pretty sure everything would fit.
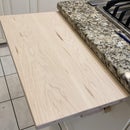
With the width of the box set on my piece of scrap wood I set my fence on my table saw to the proper setting. The last picture shows a piece of rough oak ripped to the proper width. The board looked long enough to make my box, but I wasn't sure since I didn't measure.
Step 2: Cutting the Box to the Proper Dimensions


The first picture shows me marking the length of the top&bottom of my box. I set my board even with one edge of the clock, and put a pencil mark on the other edge. If I the top & bottom piece just proud of the mark the clock should fit snugly inside. The second picture shows the top and bottom piece cut slightly proud of my line, and the clock.
To cut the sides of the box, again, I set the board flush with the bottom of the clock, then laid the top&bottom piece on next to the clock, and made a pencil mark. Again, I made the cut a bit prod of my mark so the clock will fit. The last picture shows the long line that I marked flush with the clock, and the shorter mark is where I made the cut for the sides to be long enough to hold my clock snugly.
I gang cut the top&bottom using my chop saw (not pictured) I had 2 pieces roughly the correct length, then with one cut on the chop saw I cut both pieces to the same length. Did the same with the side pieces.
Step 3: Box Construction


Pocket jig seemed to be the way to go for my box. It's fast, easy, secure. Since I didn't glue anything, no need to wait for a glue up to dry. If you do a lot of woodworking I highly recommend one. I like to use clamps to hold things square when I install the pocket hole screws.
Step 4: The Picture Frame


I happened to have some thin red oak that I am going to use for another project. Pretty sure I had enough to 'borrow' for a frame.... I don't know how wide the wood is. I used various scraps from my scrap box to find something with dimensions that I liked. Once I had the dimension I set my table saw and cut one of my boards to width.
First cut was a 45 degree miter on the chop saw. With the first cut I laid the board on my box and marked the corner. Back to the chop saw and cut on my mark. Repeated for the top and bottom. Again, once I had the length of the sides set I cut both sides at the same time to insure they were identical. Repeated the process for the top/bottom.
Next picture shows my miters line up.
Since the frame is going to hold the box, and my clock, in place I decided to glue and pin the frame to the box. Before I added the glue I used some spring clamps to hold the frame together on all 4 sides. The layout looked good so I glued the frame to the box - and put a couple finish nails to hold everything together while the glue dried. last picture shows the frame glued on, with the finish nail holes filled in.
Step 5: Install


I used the back of my box as a guide to cut the hole in my wall. Unfortunately the pictures I took to cut and finish didn't turn out. Essentially I put my box on a chunk of quarter inch plywood - set the fence on my saw and made the cuts.
I also used a stud finder to mark the location of a stud. Then held the back of the box against the wall and drew the outline on the wall. Picture shows my outline - it also shows the hole drywall anchor that was holding the clock.
I used a cordless saw to cut my drywall. I only had about a quarter inch clearance on either side of my hole. Because I had a stud on both sides I didn't feel the need to add additional framing in the wall to hold my box.
Used some finish nails to nail through the frame, drywall and into the stud. Put 3 nails on each side.
Last picture shows the box finished and installed - ready for my clock.
Step 6: Finished
The clock fits perfectly in my box. I knew it would since I used the clock to lay out all of my cuts.

Participated in the
Shelving Contest


