

Introduction: CNC Carved 3D Topography Map


The endless quest for christmas presents combined with procrastination and strong aversion of entering shops in christmas shopping season led me on the "homemade with love" route again.
Also I had to justify my somewhat recent purchase of a Snapmaker CNC/Laser/3D printer or how my personal surrounding calls it lovingly "that stupid and obnoxiously loud waste of money printer thing".
They are of course incorrect and this'll show em!
What I intended for this project:
- cheap (I had quite a lot of wood laying around but even then you only need 15x15cm)
- easy
- relative fast
I achieved one of those, I'll let you guess...
No but in all honesty once you have a few factors figured out its pretty easy and fast (without machine time ofc)
Good think I can list some factors for you here!
Hard facts:
Cost: 10-30€ depending on wood and finish choice
Time: 2h work, 14h machine time
Skill: I am currently studying at the University in Vienna, since my degree has some engineering aspects I wouldn't say that Im new to the subject.
Since this is my first bigger CNC project and I got the snapmaker 6 months ago I guess its manageable.
Supplies


You're going to need
a PC with fusion (or some other CAM software)
This operation isn't so demanding so you won't need a beefy rgb gaming pc, I did it on my Dell Laptop.
Also I used the free version of fusion 360 and can only recommend it, its a free, fantastic and capable work environment.
some wood
Something with least 30mm solid wood, alternatively I did one with multiplex (maybe glue 2-4 layers on top of each other to get proper thickness) that creates almost a contour map effect because of the alternating grain.
-> I used a piece of an old kitchen countertop, 40mm thick
a CNC machine with bits
-> I used a Snapmaker A250T with a 3,175mm flat and 3,175mm ball endmill
Snapmaker is great, because you could laser engrave the coordinates and location on the plate, I left a little strip (~3cm) next to the map for this purpose
finish
sandpaper
oil is what I used but clear varnish or some other finish is great too
something sprayable is recommended because of the fine details
optional
double sided tape for fixing the wood on the CNC mounting plate (don't need much, I used too much and it was a pain to remove)
Dremel tool for polishing if up even more
Step 1: Chapter One: the Files
After deciding what area you want to carve you'll head to Touch terrain. I read a lot of great recommendations and they were absolutely right!
- Select your desired area, select the best available resolution (10m for us, 30m world)
- play around with Sun direction and angle (didn't make a huge difference on my area but maybe it does on yours)
- at the nozzle diameter select CNC (high) detail
- export your .stl
- save the whole folder as it contains a file with the location details if you need to revisit it
Step 2: Chapter Two: Toolpaths


Now we get into the intestines of fusion 360 and try to get all details while optimizing toolpaths.
So open a new project and import the file you just downloaded
If you live in a mountainous are this might be enough and you can skip to the toolpath part.
Optimize the model part
I live in the hills of Vienna, while its beautiful here, the elevation change isn't a lot so I decided to scale up the Z axis-.
The difference between the highest and lowest point in the original export was about 5mm
I scaled it up to ~15mm so you can see more detail, check how much your tool can cut first!
To do that
- go to Mesh
- Modify
- scale Mesh
- select non Uniform
- play around with the Z-scale until it looks good (don't overdo it, maybe I did overdo it but whatever)
- now you scale it uniformly to the size you want your finished piece to be, mine was about 13.5x13.5cm
Toolpath part
Now that the model looks about good we change from the design to the manufacture milling tab.
If you have some experience with this you can skip to the next step.
If you use a Snapmaker:
Download the tool settings and machine, use this guide!
I didn't so here are my learnings:
After creating a new Setup with your base material size and properties you can get to the Toolpath.
We need to do two passes, one rough one to get as much material away as possible and one finishing pass to get the details. For the rough one you take your biggest endmill and let it do it's thing, for finishing you could use something with a ballpoint so the layer lines disappear afterwards.
For the first one I used a 3,175mm flat endmill with 1,7mm stepdown and the parallel settings. Now I saw some tutorials on this and everyone used adaptive clearing but since it took 3.5h to compute and would have take 34h to carve I didn't do that. I used parallel with 9 passes which gave me the toolpath after 5min and took 9h to mill.
Pay attention on the first pass, it wants to plunge down as far as necessary but maybe that’s too deep and damages your machine/tool. Select more passes than necessary and reduce if the first one is cutting air. I had it set to 11 passes since the deepest point is 15mm and I have 1.7mm stepdown (1.7 x 11 = 18.7 so more than 15) then I simulated it and saw that the first two didn’t cut anything so I reduced to 9. A great way to see what is being cut is to show the stock and hide the toolpath while simulating. There you only see a block and each pass shows what is being cut.
For the finishing pass we try to get as close as possible to the model. These are natural shapes so a Ballpoint mill seems like the best option. Alternatively you could maybe use a V bit to get in the cracks but you'll have to figure out that one for yourself honestly. Instinctively I would take a toolpath which follows a different direction than the roughing pass. I used the Morphed Spiral with the recommended settings from Snapmaker. Took ~5min to compute and 3h to carve.
Now simulate them to check if it makes sense!
Export the Toolpaths separately by right clicking on them and clicking post process
Step 3: Chapter Three: Get to the CNC!
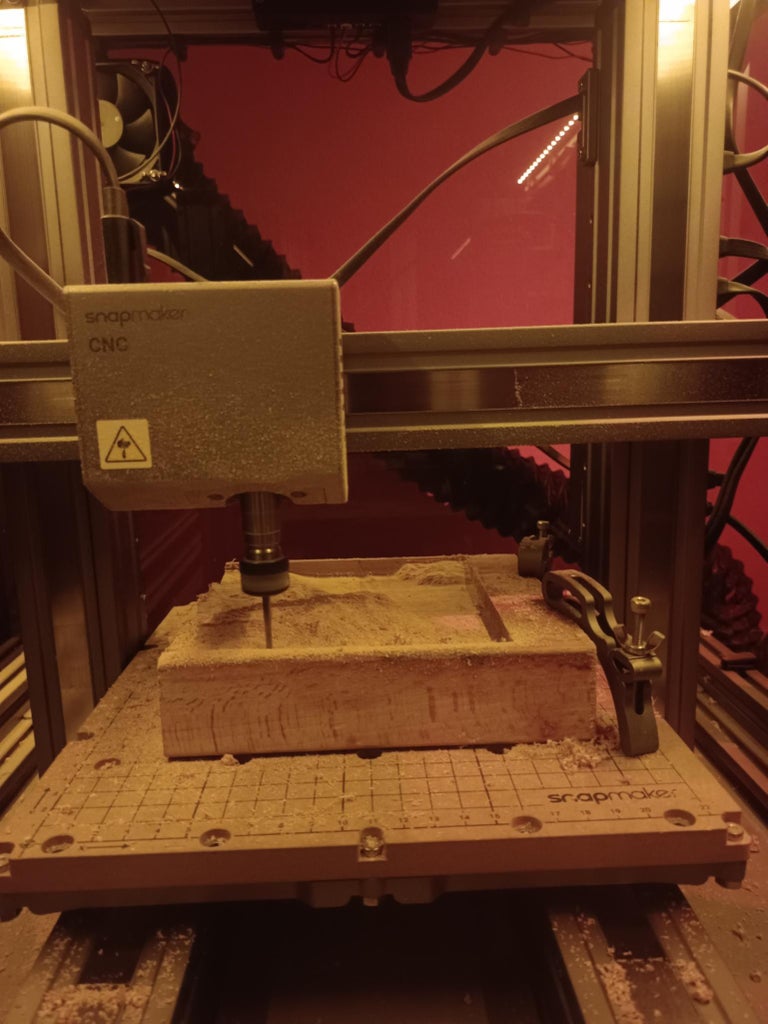
Now if you read that in Arnies voice you're sprinting to your CNC at this moment...
Take your piece of wood that you cut into the size of your model (or left a bar on the bottom for an extra inscription like I did) and fix it into the CNC. I used double sided Tape to fix my wood to the wasteplate because the machine cut almost all around the edges. That should be strong enough but I added 2 extra clamps on the inscription part.
This process is ofc different on different machines.
Put in the roughing bit you selected and choose the correct toolpath.
After levelling and positioning we say "Ladies and gentleman start your Machine" and press start.
If you use a Snapmaker:
I don't have a dust suction system so I vacuumed the bed after every half pass (roughly 1x/30min)
The tool change is easy with these steps:
- don't change the home point!
- put your tool in loosely
- manually go to a point of the stock where the original hight is still there without changing the Z axis (I used the inscription bar which I left extra)
- slide the tool down until it touches the surface
- secure the tool
Now change to the fine tool and do the finishing pass
Step 4: Chapter Four: Aftercare


Like we do with all things we love, we check our model after we did the rough machining.
If you're happy with the level of detail you can finish it rightaway. Maybe you have some nooks that need sanding or some rough layers where the finishing tool didn't get that need smoothing than a Dremel could get in there.
For finish I used spray varnish but you could also use oil and maybe even paint. I wouldn't leave as is because it sucks water and gets patchy with time. Also I would use something clear so you see the wood grain.
Other details I added:
- I painted the river blue (even if the Danube is grey at best) and covered with clear UV nail polish I
stoleborrowed from my girlfriend. That stuff is basically resin, gets hard af and looks great. - drilled a tiny hole where the person I gift it to lives and filled it with red UV nail polish (used a syringe). Now you have a tiny red dot with your home :)
- Laser engraved the coordinates and location into the bar I left (I dont know if I mentioned it before).
Now the most important thing:
Take care of the best and most capable machine!!
Yourself, take a well-deserved coffee break.
I think that's about it, I hope this was helpful or at least a worst practice.
If you did this or have any suggestions/ improvements please let me know!

Runner Up in the
CNC Student Design Challenge


