

Introduction: Cat Tree


Several years ago when my son was in scouts for his eagle project he made a couple dozen cat trees to donate to the local shelter to give to folks who adopt a cat. Since he had such a large number to make we came up with some techniques to help production.
For this 'ible I scavenged some plywood, a 2x4, some carpet remnants, and some sisal rope.
Step 1: Raw Materials - and Cutting


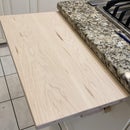
Found a couple scraps of plywood, cut them down to an attractive size. The base is about 15" by 18". The top platform is about 12x16 (the first picture shows the top piece before I cut it down a bit.
The 2x4 I cut to about 30" or so.
Obviously - you can feel free to adjust these dimensions however you see fit. We have a couple cats in the house, and they tend to like the top platform being around 30-35 inches off the ground. In order to keep stability the base needs to be a bit larger than the top platform.
I cut the carpet by marking the carpet with about a 4" overhang over from the carpet (I used a 2x4 on either side as a gauge. This allows ample room to wrap the plywood.
Once you have the carpet cut to size, need to cut the ears off each corner. This step allows the carpet to be wrapped around and not have a ton of material to contend with. I used a scrap of plywood and eyeballed about a 45 degree angle - and used a pencil to mark where to cut the carpet.
The last carpet cutting step is to cut a notch at each corner. Again, this allows the carpet to be wrapped around the platform and stapled providing a nice clean look.
The last picture shows the top and bottom platforms with the carpet cut and notched..
Step 2: Marking the Middles


I used a straight edge to make a 'X' in the middle of each rectangle - and drilled a pilot hole in each piece. This will help align all the parts in future steps.
Step 3: The Carpeting Jig - Cool Part 1


We tried a couple approaches to carpet the plywood when working on some prototypes for his project, all were rather difficult to align and hold while we applied some staples. Then hit on a cool solution - a carpeting jig....
I took a piece of scrap plywood and screwed a scrap 2x4 on edge into the plywood. I used 3" screws through the plywood into the 2x4 to hold it secure - there will be some stress put on this piece, don't want it sliding about..
Then screwed a scrap 1x into the plywood.
The difference in heights on the jig allows the carpet to wrap around the plywood - and stay put while you put a couple staples in it.
To set the gap between the 2x and 1x I used a piece of plywood and ONE piece of carpet. This forces the carpet to be very tight in the jig.
I carpeted the BOTTOM piece only at this time. Put a couple staples to secure the carpet to the top of the bottom chunk of plywood. This keeps everything aligned while you staple the carpet wrapped around the plywood.
Put the top of the panel against the 2x4, then push the piece between the 2x and 1x - the carpet will nicely conform to the plywood allowing you to put a couple staples to hold the carpet in place.
When we were doing this with the scouts they seemed to enjoy this part - some of the younger scouts didn't quite have the power to push things together but the older ones didn't have any issues.
Step 4: Assembly Step - Getting Ready to Wrap the Rope


I decided to add some carpet to the top and bottom of the 2x4 - mainly because I wasn't sure if I had enough rope.
The assembly steps here require driving a lag bold from the BOTTOM of the bottom piece (that has already been carpeted into the 2x4 stand. At this point the bolt should be snug, but loose enough to allow you to turn the post.
The TOP piece is screwed into the top of the 2x4. I used 3 screws, they were about 2" long. The middle screw goes through the middle of the plywood into the middle pilot hole on the top. The other 2 screws add additional security. This piece is tightly secured.
Step 5: Wrapping the Rope - Cool Bit Number 2


Put some staples into the rope where you want to start. I wrapped from top to bottom, but don't see any issues going from bottom to top.
Once the rope is secure use the TOP of the piece to turn the entire top piece and 2x4, your partner will hold the rope and you will wind the rope around the 2x4.
The second picture shows my son guiding the winding rope as I turned the top piece. This approach seems to be a lot easier than wrapping the rope around the wood. Also, it is easy to get everything nice and snug.
When you get to the bottom finish it off with a couple staples and cut the remaining rope. In my case I only had a couple inches of rope left over - glad I added some carpet to the top and bottom.
Step 6: Finishing It Up


We are done spinning around now, so line everything up and drive the lag bolt tight. I added a couple more screws to make sure things don't loosen up.
Now all that remains is to carpet the top piece. This is just like the bottom piece, but you have the whole cat tree to deal with when pushing things into the carpeting jig.
Conclusion - Using these techniques my son was able to explain the assembly instruction to a bunch of middle school boys (and a few high school age) and they were able to assemble about 25 of these cat trees in several hours.

Runner Up in the
Cat Challenge 2016


