

Introduction: Chimney Pipe Installation for Wood Stove Through a Flat Ceiling


Are you thinking about installing a wood stove? You will be able to install a wood stove with chimney pipe after reading this instructable and you can do the job with common household tools. Installing a Class A Insulated Double Wall Chimney Pipe through a flat ceiling can be done by DIY homeowners and is an economical, efficient way of heating your living space. We explain in depth how to transition from single wall black stove pipe to double wall insulated chimney pipe.
First, you must determine which size pipe you need to use with your wood stove. We used Rock Vent single wall black stove pipe and Rock Vent insulated double wall class a chimney pipe for this wood stove in the 6" diameter. Visit https://www.rockfordchimneysupply.com to learn more about the products we used in this chimney pipe installation.
Step 1: Locating the Center Point for the Chimney Pipe


We will first start by locating the center point where the chimney pipe will penetrate the ceiling. The single wall chimney pipe needs to be at least 18 inches away from combustibles. Once the center point is found, use the ceiling support box to mark the ceiling to make your cut. A sawzall is the best tool to cut the opening in the ceiling. The ceiling support box will come with two brackets to mount to the ceiling joists. From the attic, slide the ceiling support box through the opening and attach the ceiling support box to the ceiling joists.
Step 2: Locating Where to Cut the Hole Through the Roof


Now that we have penetrated through the ceiling, we need to mark the hole to penetrate through the roof. By sliding a section of single wall stove pipe with a level you are able to mark the where you will cut the hole through the roof. Running a screw through the roof deck will make it easy to identify where you will need to cut your hole on the roof side.
Step 3: Marking and Cutting the Hole on the Roof


Take your Adjustable Roof Flashing and center that on the screw you ran through the roof deck. An easy way to mark the hole you need to cut is by using the flashing as a stencil and spray painting the inside on the roof shingles. Once the hole is marked, use your sawzall and cut the hole through the roof.
Step 4: Installing the Adjustable Roof Flashing for Chimney Pipe


In order for the flashing to slide underneath the shingles, you must cut the nails on the top half of the circle with your sawzall. Next, with tin snips, cut the shingles 2" back on the top half of the circle. Apply a healthy amount of silicone to the bottom side of the adjustable roof flashing. Then, slide the adjustable roof flashing underneath the top half of the shingles. You will then screw the roof flashing to the roof deck. Make sure to silicone all of the screw heads and the top half of the flashing.
Step 5: Installing the Insulated Double Wall Chimney Pipe


Now it's time to start putting our insulated double wall class a chimney pipe together. Locate the end of the pipe that has the insulation recessed down. This is the male end of the chimney pipe. To make the transition from insulated chimney pipe to single wall stove pipe a universal pipe adapter will be needed. Insert the universal pipe adapter on the male end of the insulated chimney pipe. With the provided screws, attach the adapter to the pipe. When you have the universal adapter connected, lower the first section of the chimney pipe through the flashing and through the support box.
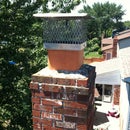
Step 6: Installing the Storm Collar and Chimney Rain Cap to the Chimney Pipe


While you're still on the roof, attach the storm collar to the chimney pipe. Make sure to put a bead of silicone around the storm collar where it meets the chimney pipe. The chimney pipe must protrude through the roof a minimum of 2 feet and it must be at least 10 feet away from the roof line. Next, using a 5/16 nut driver attach the chimney rain cap to the chimney pipe. Now that we are completed on the roof, it's time to connect the single wall stove pipe to the insulated chimney pipe.
Step 7: Installing the Single Wall Wood Stove Pipe


For the easiest installation, we elected to use a telescoping chimney pipe for the first section. Attach the female end of the single wall stove pipe to the male end of the universal adapter. You can use a level to make sure that your stove pipe is straight all the way down to the wood stove connection.
Step 8: Installing the Trim Collar Around the Ceiling Support Box


The last step is to put the trim collar around the ceiling support box. With the screws provided, anchor it to the ceiling.
Congratulations! We have just completed the installation of a class a double wall insulated chimney pipe with single wall stove pipe for your wood stove. If you have any questions or need assistance in ordering your wood stove chimney pipe supplies feel free to give us a call or contact us.


