

Introduction: Communication Bluetooth Module With HC-05 HC-06
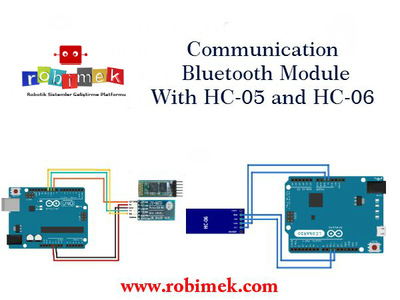


Bluetooth module for Arduino is one of the modules are widely used in wireless communications.
HC-06 and HC-05 module will explain how to communicate with each other. First, the administrator to do a wireless communication module (master) which is managed by other modules (slave) should be mode.
Hc-06 Bluetooth module works only in slave mode. Therefore, we will take fashion HC-05 module master. Also one of the most important advantages of this module is the easiest way to master the passing fashion. Then explain the HC-05 module master fashion set.
Step 1: Hc-05 Settings:
I installed the Arduino software.
#include <SoftwareSerial>
SoftwareSerial mySerial(10, 11); // RX, TX
void setup()
{
Serial.begin(9600);
pinMode(9,OUTPUT); // key pin
digitalWrite(9,HIGH);
Serial.println(“Enter AT commands:”);
mySerial.begin(38400);
}
void loop()
{
if (mySerial.available())
Serial.write(mySerial.read());
if (Serial.available())
mySerial.write(Serial.read());
}
Step 2: Wiring Diagram
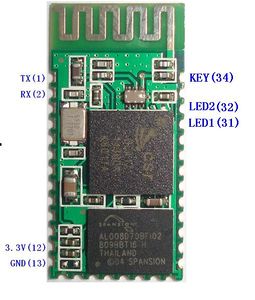


Modülünüzde key pin çıkışı yok ise modülün 34. pininden bir kablo ile çıkış alınız.
Bu pin key pinidir.
I Takala other pins except VCC pin of the bluetooth module after installing the software.
Hold the button on the module's put the pin to the 5V Vcc pins and buttons I leave. If the LED flashes at intervals of 2 seconds module on the module is ready to AT commands. Now we can make changes in the module with AT commands.
Whether you want the arduino serial monitor screen in 'Tera Term' You can use the program. Sometimes you can not get answers from the Arduino serial monitor. We 'Tera Term' will make using the program. This program can get answers smoothly.
Download the program >> Tera Term
Step 3: Let's Follow the Steps Below.

File >> New Connection Select the type of connection from the serial port denote the Arduino board is connected.
Step 4: Setup >> Terminal Setup

File >> New Connection Select the type of connection from the serial port denote the Arduino board is connected.
Step 5: AT Commands

Serial screen 'EC', then we send the answer 'OK' when the statement is ready to AT commands.
Now we can get the master Bluetooth module with AT command mode.
'AT + ROLE' statement indicates that what mode the module. They're already coming in slave mode by default.
'AT + ROLE = 1 we get typing module master fashion.
AT Commands:
AT+NAME :Shows the default name
AT+ADDR : Indicates default address
AT+VERSION : Version Shows
AT+UART : The set Baud Rate 's show
AT+ROLE: Master or Slave not show the state (1 = master / slave 0 =)
AT+RESET : Remove from AT mode settings and reset
AT+ORGL : Return to factory settings
AT+PSWD: Shows the default password
Example:
AT+UART=9600 >>We had a baud rate of 9600 the value of this expression.
Step 6: Result
Hc-05 Bluetooth module that can communicate with the master mode and HCR-06.
Hc-06 module not only need to do adjustment for working in slave mode. But if you want to change other settings you will need to make connections in the same way. Since there's no need to do this module key pin to 9 pin connection.
In the sensing area while the other two open Bluetooth connection will automatically install.
Hc-06 communication made with the example of our project hc-05 can see from the link below.
Arduino and Visual Basic RF Over Temperature Humidity Measurement
Step 7: Video:
More information : http://www.robimek.com/hc-05-ile-hc-06-bluetooth-modullerin-haberlesmesi/


