

Introduction: Compile Using GNU GCC From Visual Studio

This instructable will show how to use Visual Studio 2013 Community Technology Edition to compile a program using a GNU GCC compiler toolchain. In the resulting project template, Visual Studio retains the intellisense and code completion feature, however built in debugging is lost in this scheme. Scheme shown was developed to allow programs to be written and compiled on a windows computer and then run on a Raspberry Pi (Model 1). The procedure could be adapted to other purposes with relative ease.
Step 1: Download and Install the Tool Chain
Get a GNU GCC toolchain that compiles to a linux executable while running on windows. This instructable was created to compile programs to run on a Raspberry Pi. You could also get one that compiles to a windows executable, but given that Visual Studio is essentially free for most hobbyists it wouldn't make much sense.
We will use the tool chain provided by SysProg. Here is a link: http://gnutoolchains.com/download/. Pick the package that is appropriate for your target platform. I picked raspberry-gcc4.9.1-r2.exe. I installed it with the following options. Don't check the path option.
A quick word about SysProgs. They are selling a package that does all of this automatically and also provides remote debugging capabilities among other things. This instructable is fine for small applications that are not too complicated. However, if you intend to build Skynet to take over the world using your Raspberry Pi then I suggest you spend some money to buy their product. This author is not affiliated with them in any way, but they deserve credit for providing the tool chains in a free and easy to use manner.
Step 2: Install Visual Studio
If you haven't done so already already, Install the Visual Studio 2013 CTE version. Installing Visual Studio is well documented elsewhere, so it is not repeated here.
Open Visual Studio
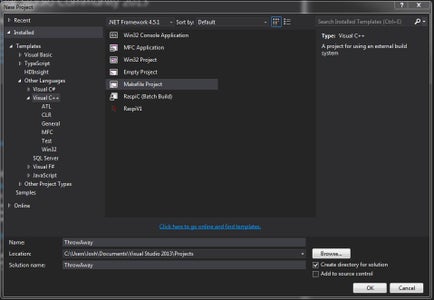
Start a MakeFile Project, name it something that can be thrown away. You won't keep this particular project. Click OK. Click Next.
Step 3: Create the Build Batch Files

Enter Build.bat in the Build Command Line box. Enter Clean.bat in the Clean commands box. Delete the contents of the Output box. Skip to release configuration by leaving the same as debug box checked. Click Finish.
Visual Studio is now in an empty project.
Step 4: Setup the Search Paths


Goto the Project Properties. Delete all of the VC++ Directories. Goto Nmake. Delete the Preprocessor Definitions Add the following path to the Nmake Include Search Path (change the path to suit your machine):
C:\SysGCC\Raspberry\arm-linux-gnueabihf\include\c++\4.6.3
C:\SysGCC\Raspberry\lib\gcc\arm-linux-gnueabihf\4.6\include
C:\SysGCC\Raspberry\arm-linux-gnueabihf\sysroot\usr\include\arm-linux-gnueabihf
C:\SysGCC\Raspberry\arm-linux-gnueabihf\sysroot\usr\include
C:\SysGCC\Raspberry\arm-linux-gnueabihf\include\c++\4.6
Step 5: NMake Setup

Click OK. NMake should look like this.
Step 6: Create a Source Code File


Add a source file for the main function. Main.cpp
Add super simple hello world code:
#include <stdio.h>
int main()
{
printf(“Hello Pi from windows.\n”);
return(0);
}
Note that the code completion worked. It used the GCC header files as it's source.
Step 7: Setup the Batch Build Files

Add a batch file to build using Utility/Text File called build.bat. Make sure it is located on the project level. Add a batch file to build using Utility/Text File called clean.bat. Make sure it is located on the project level. This file will not be used in this version of this instructable but a clean function should be created eventually. Rebuild is also good but in a small program we can do without it.
Save all.
Type the following script to the build.bat file (you will need to change the path to your target machine).
set sources=*.cpp
set executable=Main
PATH=C:\SysGCC\Raspberry\arm-linux-gnueabihf\bin:$PATH
PATH=C:\SysGCC\Raspberry\bin:$PATH
C:\SysGCC\Raspberry\bin\arm-linux-gnueabihf-gcc-4.6.exe -Wall -O3 %sources% -o %executable%
move %executable% "\\PI\user\Home\Programs\%executable%"
Note that the script automatically move the executable to my Raspberry Pi.
Step 8: Create a Project Template
Most people would not want to go through this procedure every time to write a program for Pi. Luckily, Visual Studio has us covered. Save the project as a template (File/Export Template). The options are self explanatory. Close the throwaway project/solution.
Start a new project. Under VisualC++, select the “throwaway” template (you may have changed the name to something more sensible.) Rename the project as you would any other project. You should see a new project with the same files as the model project used to create the template.
Step 9: Thoughts and Comments
If you have ever used GNU GCC or most command line compilers, then you are probably asking what is wrong with this person right about now. Why isn't make being used to build this. Well here is a little secret, you don't have to use make. This batch file works fine and it isn't too complicated. Make is excellent, but it is too complicated for a very simple program like this. If you want to use make then by all means. However, you should start it from the build batch file in order to keep Visual Studios' make system separate from the GNU make system.
A word about compiling on this scheme. The debugger system will not work, this scheme is not designed to setup remote debugging. You will need to compile the code using "Build/Build Solution" and debug the old fashioned way, using printf statements. That is the biggest reason that this scheme is not suitable for complicated programs.
This may cause you to ask why you would want to do this in the first place. In this author's opinion Visual Studio puts the right options in front of a user but it has all of the options anyone could need somewhere in the menus. They can be hard to find from time to time, but they are there. It also hard to beat the intellisense and code completion features in Visual Studio.
Of course you could also use Eclipse or Code Blocks, or one of the other IDEs' out there. They are clearly very powerful, but they can be overwhelming. Microsoft has gotten a lot of stuff wrong over the years, but Visual Studio is one they have gotten right.


