

Introduction: Control of a DC Motor With Arduino and Visual Basic


Hello friends this is my first post in instructables.com where I will try to bring more Novelty des often.
Today theme is with Arduino and Visual Basic.
The project that we see today is controller one dc motor with Arduino and Visual Basic.
To control a dc motor is not enough voltage of 5 v arduino I used a BC547C NPN transistor because as you know allows us to control a great power with a small.
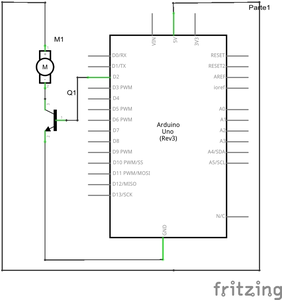
Here I present the assembly drawings
Step 1:
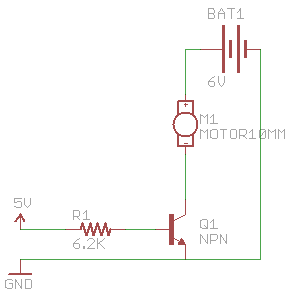
I did not put resistance to connect the pin of arduino to the base of transistor because the values of the resistors that I have not allowed to circulate much voltage the motor you need in my case a lot of power so I tried without resistance and works but recommend the use of a 220 ohm resistor.
Materials:
· A one Arduino
· A DC motor
· An NPN transistor BC547C
· Cables to connect
· A breadboard
· A resistor of 220 ohms
Step 2: Understanding Visual Basic Program
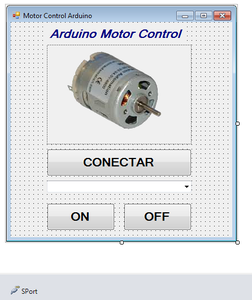
I will
explain a little Visual Basic program design:
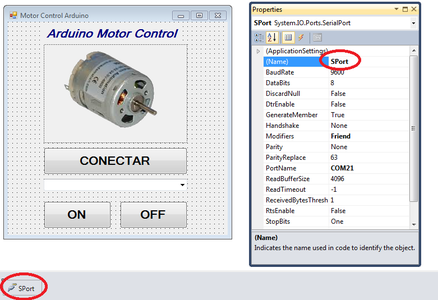
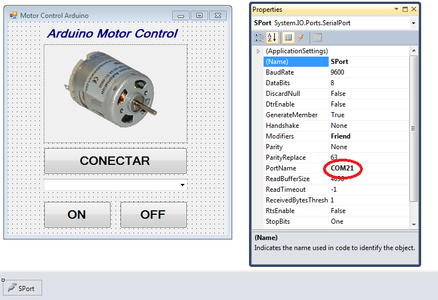
Here you see the serial port and changing its name in the properties.
It is the most important thing of the program and where friends found more problems is to put the name of the serial port on the properties, in my case is COM21.
To find yours have two ways:
- Entering the Arduino IDE and connect the USB cable to your Arduino. On the Tools> Serial Port menu, you may see the name of the port
- Go to Windows Control Panel - Hardware and Sound - view devices and printers. If the cable is connected you will on the screen.
Step 3: Arduino and Visual Basic Programs
Here you have the Arduino and visual basic programs:

Step 4: Conclusion
Hope you like this post and if there is any doubt may be able leave your comments here and be in your disposal to clear them. And for people who are new to the world of programming and Arduino not be afraid to ask and try because you learn so. I leave my friends and the next. Thanks and regards.


