

Introduction: Cook a Whole Roast Pig - Lechon Baboy


There is no better indicator of a seriously good party than a whole roast pig. For centuries this dish has been the hallmark of the no-holds-barred celebration. It's a time honored indicator of social status and generosity.
I spent some time living and working in Philippines. I was based in Cebu where - I'm told - they roast the best pigs. There it is known as "Lechon Baboy". Traditionally cooked slowly over charcoal, rotated by hand on a bamboo spit. They are then wrapped in delaminated banana trunk for delivery - sometimes even put on a plane to Manila.
The thought of cooking a whole pig can be a little daunting the first time, so I will present my method step-by-step to show that it's really just like any recipe - only bigger.
Step 1: What You'll Need

You will need some equipment and some outdoor space. Your method can be as basic as a an earth pit and a bamboo stick, or you can buy, hire or make a spit roaster with an electric motor to turn the pig. Whatever you do, you need a spit that the pig can be secured to with the minimum of movement.
Charcoal - you will probably need way more charcoal than you think. Be sure you don't run out. Nobody likes eating raw pork.
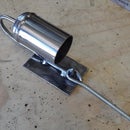
I made my own spit. You can see my Instructable of its construction here.
You will also need something to stitch up the pig's stomach. I used stainless steel MIG wire, but thick cotton thread will do. Just remember that you don't want it to melt.
My recipe uses the following ingredients:
- One pig. Be sure it isn't to big for your spit.
- Lemongrass. Lots.
- Spring onions. Masses.
- Salt and pepper. A big handful.
- Bay leaves. I really don't know what these do.
- Garlic. About 23 cloves.
- Oil.
I found it helps to have a friend with some experience. I have a friend in Philippines whose family has a Lechon Baboy business. On my first attempt I would send him progress pictures from my phone and he would text back advice. It was a nice confidence boost, but not essential.
Step 2: Prepare Your Pig


Preparation is best done the night before you plan to cook.
One of the most important things to consider is the structural integrity of the pig on its spit. It will rotate hundreds of times during cooking and any unwanted movement will only get worse. You don't want the pig to fall off the spit or fall apart before it's properly cooked. I used my own home made tools for attaching the pig, but it would be easier and safer to use a proper kit. I also had to resort to fencing wire and stainless steel zip ties (this is one instance where duct tape will not help).
Once the pig is happily secured to the spit it is time to add some seasoning.
Step 3: Seasoning


First grind up a heap of garlic, pepper and salt with some olive oil. Rub this paste into the inside cavity of the pig.
Clean and bruise a large bunch of spring onion and stuff it inside the pig.
Clean the lemon grass and smash it a bit to release the gorgeous lemony aroma. Stuff it into the pig with the spring onion.
Throw in a handful of bay leaves. I still don't know why.
Step 4: Suturing


I think it's traditional to use cotton thread or special butchers' twine, but I have found that stainless steel works really well. It is sharp enough to easily poke through the skin, and it is unaffected by heat. I'm no needle worker, but I think the stitch I used is a blanket stitch.
Sew the wound nice and tight so the contents don't spill out. This includes the delicious juices that will be produced as the pig cooks.
It has just occurred to me that a veterinary skin stapler would be even better. They would be very quick and easy to use, and the staples would be sterile.
Step 5: Cooking


The first thing to do is to get your fire started. I like to start it with wood and then gradually load it up with charcoal. When the charcoal is white hot and spread evenly it is time to put the pig on and start it rotating.
The height of the pig will depend on a lot of variables, so it is best to keep a close eye on it and raise it up if it is looking like burning, and lower it down if it's not doing anything. I usually start at about 600mm high and then adjust it as required.
As soon as possible paint the entire pig with olive oil. This seems to prevent burning and scorching, but allows the skin to develop that wonderful crispy red-gold skin. Mmmmm, my mouth is watering as I type. Keep on basting the pig from time to time throughout the cooking process.
There are a lot of differing opinions on what to baste a pig with. Some even use Sprite, or coke. But I have found simple olive oil to be perfectly fine.
When your pig is rotating nicely - cooking slowly, but not burning - it is time to crack a beer and get out the guitar. Take a seat, strum the guitar, sip the beer, and poke the fire occasionally. This is the joy of slow food.
Usually the shoulders and hind legs are the slowest to cook and will need more charcoal piled up under them than the middle in order to have the whole thing ready at the same time. This will take some experimentation, but don't worry there's plenty of margin for error.
After two or three hours you might suspect the pig is almost cooked. The most reliable way to test it is to use a meat thermometer. Insert it into the thickest parts and check the temperature. It is considered cooked when temperature is at about 71°C/160°F.
Step 6: Presentation


If you have timed this operation right, you will now be surrounded by salivating friends and family. Any other foods will be coming out, but the star of the show will certainly be the pig.
With the help of a volunteer lift the pig off the fire and transfer it to a table for serving. It's good to have a massive platter or some such as there will be a lot of juices. Remove the spit and the other hardware.
It is acceptable to carve the pig for your guests or to let them help themselves
Step 7: Conclusion

Although this process seems quite daunting, it is in fact pretty straight forward. With a little planning and with some patience and the help of some good friends it is a fun and rewarding thing to do.
Please consider voting in the contests.
And please feel free to post questions and comments, and pictures if you do it yourself.
If you are interested in my other work please check out my website and my Etsy shop.

Runner Up in the
Outdoor Cooking Challenge 2016

Runner Up in the
Summer Fun Contest 2016

Participated in the
Outside Contest 2016


