

Introduction: Darth Vader Wood Burner Remix


Hello and welcome to my Instructable.
Today I'm going to show you how to make a wood burning stove inspired by Star Wars villain Darth Vader. At least I'll show you how I made one, and I hope you can be inspired to make one for yourself.
I'm not the first to create an instructable featuring a Darth Vader stove. I have been inspired by jasewauk with his Darth Vader Log Burner, and doddieszoomer with his vader gas bottle log burner. Both great projects which I recommend you have a look at. My project can be considered a remix of these; there will be some differences which some might chose to use.
Before I go any further I should mention that I have used an old gas cylinder for this project. This can be very dangerous so don't do it unless you are certain you are safe. If in doubt consult an expert.
Also, this is designed for outdoor use. Please don't risk burning down your house or asphyxiation.
Step 1: Materials and Equipment


Materials:
- Gas cylinder. Empty. I used an old barbecue cylinder. Remember it is still DANGEROUS even if it is empty.
- 25mm x 5mm flat bar. About 1 metre.
- 8mm round bar. About 500mm.
- Steel sheet for the back of the helmet. About 700mm x 220mm. Depends on the size of your cylinder.
- Pipe for the chimney. I used the stainless steel body from an old 4" bore pump.
Equipment:
Here's what I used, but of course there's always other ways to do things.
- MIG Welder
- Plasma Cutter
- Angle grinder with flap discs, cutting discs, grinding discs, and a wire brush.
- Vise
- Hammer
- Very big stilsons (pipe wrench).
- Various usual workshop hand tools.
- Safety gear. Protect you lungs, eyes, ears, hands, feet, and the rest of your body.
Step 2: Prepare the Gas Cylinder


Here's how I prepared my gas cylinder. I'm not guaranteeing that this is a perfectly safe method, but it worked for me. If others know of a better way please feel free to comment below.
The cylinder was already empty. I made sure the valve was tightly closed and then I removed the cowl from around the valve. I did this very carefully with an angle grinder; making sure I didn't heat the cylinder or penetrate the cylinder wall.
With the cowl removed I could access the valve with my very big wrench. The valve is really hard to remove but with effort and incredibly strong arms it will unscrew.
I then marked the eye holes using a template I had prepared earlier. Just see my picture and adapt it to suit your cylinder.
Having removed the valve I filled the cylinder with water to displace any remaining gas.
Leaving the cylinder full of water I blasted one of the eyes out with my plasma cutter. If you do this try to stay dry and consider electricity. An oxy set might be safer, but I don't have one.
Once the eye holes were roughly cut I drained the water.
Now is the least fun part of the process: removing the paint. I used flap discs on the angle grinder. Noisy, dirty, and time consuming, but satisfying to finish.
With the paint gone I used my template to mark out the face properly, then cut the eyes more accurately and cut the opening just were the hinge and door handle go.
Step 3: Create the Facial Features and Door Hinge and Handle


Use your flat bar to create the eyebrows, nose and the vertical thing on the forehead. Bending the steel would be easier with some heat, but I just used the vise and elbow grease.
Weld the brows on.
Before welding the nose part on cut the vertical vents. I used the plasma cutter, but an angle grinder would be just as good. At this point I also cut the holes below the door. Again with the plasma, but a drill would be neater (but slower).
Before cutting the remainder of the door opening attache the hinge and handle. These I made from some 8mm rod. The hinge is a piece of rod bent to 90 degrees. The vertical part sits in a piece of pipe welded to the face. Have a look at the pictures for more clarification. Bend the rod so it sits nicely against the face - see the pictures. Weld the pipe to the stove, the hinge rod to the door and the handle to the door.
Now weld on the nose and the forehead piece.
Cut the remainder of the door opening.
The door should now swing open and closed. And you should be able to remove the door by lifting the hinge rod out of the pipe.
Add a little square of steel to the top of the door between the eyes to keep it straight when closed. I also put some stops inside the door opening at the bottom.
You may need to do some adjustments and grinding to prevent clashes when opening or closing.
Make a little hook for the handle to lock into when the door is closed and weld it on. See the pictures.
Step 4: Make the Back of the Helmet


I don't know what it's called; the skirt around the back of the helmet.
You will have to dimension this based on the size of your cylinder. See my pictures to give you and idea. Basically the skirt goes from eyebrow to eyebrow.
The curved edge goes at the bottom and makes it possible to have the centre higher than the ends while having the skirt even length and flared.
Try to test where the best position is. Then weld the centre back into position. My metal sheet was quite stiff so I had to use a ratchet strap to force the skirt into shape.
Weld it on.
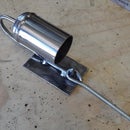
Step 5: Add the Flue


I found making a vertical flue really tricky. I'm sure there are better ways - please comment if you know one.
I used an old stainless steel bore pump body. Any pipe will do the trick though. Ideally about 100mm diameter.
I marked the pipe for cutting by holding above its final position and scribing it by eye. I cut it out base on that mark and then did lots of trial and error to get it right.
Once the shape is correct mark out the final position on the stove and cut out a hole for the smoke. Allow at least 5mm to accommodate the weld.
Now care fully position the flue and tack weld it on. If it looks right weld it all round.
Step 6: Finishing


Now's the time to get out the grinder. Tidy up any rough cuts or welds. Adjust the eyebrows, etc.
Give it a final once-over with the wire brush.
Paint with high temperature paint. Follow the manufacturer's instructions.
Step 7: Conclusion


I've made a few of these over the years. Sold some on my Etsy Shop and at an art show. They are fun to make and are always well received.
I hope I have inspired you to try something yourself. If you do make one please post a photo in the comments.
If you have any questions or comments please post them below.
I'm entering this in competitions so please vote. There's a button top right.
If you are interested in my work please feel free to visit my little website or check out my Etsy Shop.
Thanks for reading.

First Prize in the
Sci-Fi Contest 2016

Grand Prize in the
Remix Contest 2016

First Prize in the
Trash to Treasure Contest 2017


