

Introduction: Create an Action Sequence With a Series of Pictures


It is very rewarding to create an image that conveys much more than what can be captured in a single picture. Whether it is baby’s first steps or an Olympic gymnast, the process at work here is conveying motion in a static image.
Stitching multiple images together is a form of time-lapse photography. You are displaying a change in an object’s position over time. In traditional time-lapse work the output is a video, however here we will go through the steps to place each frame on top of the other allowing the viewer to re-play the action in their mind.
Photo sequencing only works when the object moves across a static background. A dog running through a series of tricks at a show works well, a runner coming directly at the camera does not.
Subjects can be anything from a bird in flight to a snowboarding jump, all you need is a camera with an Action Sequence mode, a computer and the patience to experiment.
Photographer: Ethan Ford
Step 1: Set Up Your Canvass, Align the Images.

First off you will need a graphics application that can handle multiple layers. www.gimp.org is a free open source application similar to Adobe's Photoshop. You will find some steps much easier if you have a graphics pen. Using a mouse is OK but a little cumbersome. I recommend whatever you can afford from www.wacom.de
Picture yourself with your series of photographs in hand and you start to lay them out on a table. In the digital world this is called the canvass. Create your canvass with a height double that of the image and as wide as all your images end to end. That is if you had 3 pictures, each 800 by 600 pixels then your canvass should not be around 2400 by 1200 pixels. Its fairly easy to adjust this later if you find yourself running out of room, but making it too big might slow your computer down.
Now you will place your images on the canvass. However, instead of laying them all together as you would on a table, they each have their own layer. There is one important rule to follow, place the first image in the first layer, image 2 on the second layer, etc.
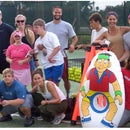
If the photographer has panned the camera during the sequence then you need to line up the background. In the example here I used the horizon for vertical alignment and spaced the rider evenly for horizontal alignment, the waves were moving to so I had no other common point of reference between images. Tip: start by aligning image 1 & 2, turn all other images to 'invisible' and set image 2 to 50% transparent. Then move image two around until you are set. Repeat with image 3 at 50% over 2 and so forth.
All lined up, on to the next step, image editing.
Step 2: Editing

Now the real fun begins. This is where have a graphics pen helps..
Similar to the alignment step. Set image 2 to 50-80% transparent, dont adjust image 1 and turn all other images to 100% transparent/invisible/off.
Now approach your editing as you would a set of stairs. Step 1 at the bottom, the second step sits on top of it, and the third in turn sits on top of of the second. You can cut away any part of the second step as long as there is a piece of the first step below it. If you cut too much away you will see all the way in to the basement, aka the background layer.
In the example image where I've practically sliced image two in half and followed the outline of the rider fairly closely, I didnt have to be so exact. You can set your eraser to 50% and blend the two images together, try it, you'll see what I mean.
Step 3: Addtional Tips
When taking the photograph:
Its better to capture more surrounding background than to focus in on the object.
Switch off any automatic features for shutter speed and aperature, you want all your images to be the same brightness and contrast.
When working on the computer:
Familiarise yourself with the undo feature (o;
Good luck!


