

Introduction: Creating a Program in Visual Basic: Web Browser


This Instructable explains the process of creating a simple web browser application in VB.NET
It is designed as a followup to my first VB.NET Instructable: Creating Your First Program In Visual Basic. It is recommended that you read through that instructable first, as this instructable assumes you have a basic knowledge of the Visual Basic Express Edition Interface, as covered in my other instructable.
Although Visual Basic 2005 Express Edition work fine for this instructable, I am using Visual Basic 2008 Express Edition, available from Microsoft
Step 1: Create the Project

Create a new Windows Forms Project, and call it Web Browser. Resize the form to your liking.
Step 2: Add the Controls, and Change Properties

From the toolbox, drag a TextBox, WebBrowser and A Button onto the form. Place them like they are in the picture. Then, edit the Anchor property of the TextBox and WebBrowser so that all of the boxes around the grey square (shown when you edit the anchor property) are selected, this will allow the controls to 'stretch' when the form is resized. Do the same for the Button, but only set it to "Top, Right".
Also change the Text property of Form1 to Web Browser, or something similar to change the title bar.
Step 3: Code!
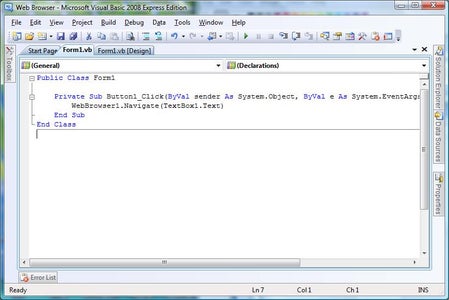
WebBrowser1.Navigate(TextBox1.Text)This code simply tells the program:
When someone clicks Button1, Get WebBrowser to Navigate to whatever is in TextBox1
That's It! You have a functioning web browser. Click the play button to test it out.
Step 4: More Stuff
Over the next few steps, we will implement the following:
- Address bar that changes as the page changes
- Back, forward and refresh buttons
- Status bar.
Step 5: Adress Bar
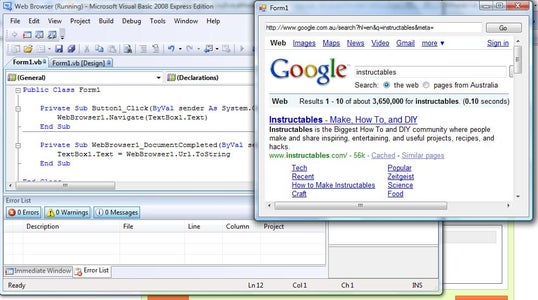
Go back to the design view, click on "Form 1.vb (Design)" and then double click on the WebBrowser control. It will switch back to the code view, however there will be some more code there, notice that it says "WebBrowser1_DocumentCompleted", this is the code we want, so we don't need to make any changes here, but there is a blank line under that one, before the End Sub statement, and we want to add some code there. Type the following in there
TextBox1.Text = WebBrowser1.Url.ToString
This tells the program that once WebBrowser1_DocumentCompleted, we should change TextBox1.Text to the WebBrowser1.Url. The ToString is there because, by default, the URL property of the web browser is not the same data type (string), as needed by our text box. The ToString writes the URL to a string for the TextBox.
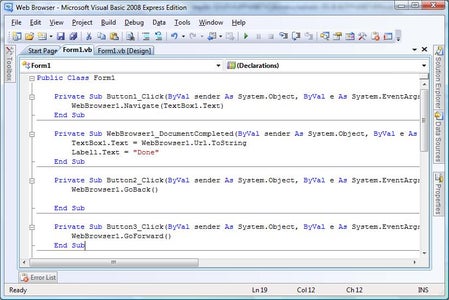
Step 6: Action Buttons

Double click on the Back button, and type the following code.
WebBrowser1.GoBack()Back to design, double click Forward and type
WebBrowser1.GoForward()
Design view, and a double click to Refresh.
WebBrowser1.Refresh()
Test the browser, and try out the new features.
Step 7: Status Bar
Now, go into code view by clicking on the Form1.vb tab. Find the WebBrowser1_DocumentCompleted entry and type below the code you placed there earlier
Label1.Text = "Done"
Now, click up where the code says DocumentCompleted. Move your mouse up to where the two Drop down boxes are. Select the second one (The one that says DocumentCompleted) and select Navigating. Then, some new code will appear - type
Label1.Text = "Loading"This just provides an indicator when the page is loading.
Also, you might want to set the anchor property of the label.
Step 8: Comlete!

As in my first instructable. I have some homework for those who complete this instructable.
Implement the following:
- A home function
- Change the Refresh button to a Stop button when a page is loading.
Step 9: Solutions
- Change the background colour
- Add some copyright info
- Make the form change size with the Image
Done!
Still to come: I will be creating some more VB.NET Instructables. Keep Coding!

![Tim's Mechanical Spider Leg [LU9685-20CU]](https://content.instructables.com/FFB/5R4I/LVKZ6G6R/FFB5R4ILVKZ6G6R.png?auto=webp&crop=1.2%3A1&frame=1&width=306)


