

Introduction: Cyberpunk 2077 Metro Map Laser-Cut LED Sign


If you like our work, please vote for this in the "Maps" contest! It would mean a lot to us!
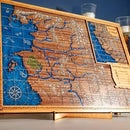
Like just about everyone else in the world, we are so jacked for CyberPunk 2077 to come out. Ever since seeing the trailer and locking eyes with that Subway map...I knew I wanted to make it. I wanted to make it flicker light the trailer but still be an art piece for the house. This is what I came up with! I hope you like it!
We have moved all of our Laser Files to Patreon. If you would like access to ALL of our laser files moving forward, head over to www.patreon.com/whengeekscraft For $2 dollars a month you get access to all of our laser files that have been shown in videos as well as some that never made it to youtube!
Supplies
Below are Amazon Affiliate Links to tools used in this build. Using these links don't cost you any extra, they just help us feed the cats and leave the lights on:
- Glowforge - https://amzn.to/2SUXPAm - or on the glowforge website
- We used a Glowforge to make our map. If anybody is interested in purchasing a Glowforge you can use our referral code to get: $500 off a pro, $250 off a plus, or $100 off a basic. We'll get credit too! Use the link below. We love our Glowforge. Feel free to message us with any questions! https://glowforge.us/r/DSKCNJZL
- MDF Boards, 11x14 - https://amzn.to/32o7fYk
- Walnut veneers - https://amzn.to/32o7fYk
- Acrylic Sheets - https://amzn.to/32o7fYk
- Artisan Pigments - Mica Powder Ultimate 25 Color Set - https://amzn.to/32o7fYk
- Pinata Color - Alcohol Ink - https://amzn.to/32o7fYk
- Alumilite Clear Cast Epoxy Resin - https://www.alumilite.com/resins/amazing-clear-cas...
- use code GEEKS10 for 10% off your purchase!
- Insta-Cure Gap Filling 2oz Bob Smith Ind. - https://amzn.to/32o7fYk
- Vallejo Model Paints - https://amzn.to/2SYmVyC
- Army Painter Model Paints - https://amzn.to/37UUGVH
- Arduino Nano - https://amzn.to/32o7fYk
- 22GA Hook up Wire Kit - https://amzn.to/32o7fYk
- Aluminum Electrolytic Capacitors - https://amzn.to/32o7fYk
- Hacko Soldering Station – https://amzn.to/32o7fYk
What we did for lighting to make the Arduino Nano work with the 12V lights:
- Daylight White LED Strip Lights Kit 12v- https://amzn.to/2CDDOc6
- Digi-Key Part Number FQP30N06FS-ND - Mosfets - https://amzn.to/2CDDOc6
What we recommend is getting a 5v light strip so Mosfets arent necessary to power the lights:
- USB Led Strip Lights, Waterproof DC 5V - https://amzn.to/3hUOxz7
- K&S Solid Rod 1/16" X 12" Brass Pack for border accent - https://amzn.to/3hUOxz7
Step 1: Laser Cut EVERYTHING


When designing this map, I wanted three clear acrylic panels spaced apart so lights can shine on them independently and for there to be room for the electronics to hide within the box.
For actual laser files, join us on www.patreon.com/whengeekscraft
The file is made up of 4 parts:
- The Three Acrylic Panels - Made from 1/8th inch Clear Cast Acrylic - 0.115 inches thick actual - laser engraved in reverse for more depth. Cut with Glowforge Medium Acrylic Proofgrade settings:
- Engraves
- Engrave Speed - 1000
- Engrave Power - Full
- Lines per inch - 340
- Cuts
- Cut Speed - 170
- Cut Power - Full
- # of Passes - 1
- Engraves
- Inner Frame - Designed to hold the resin as well as the acrylic panels. Made from 1/8th inch thick Medium Draftboard - 0.135 inches thick actual - Cut with Glowforge Medium Draftboard Proofgrade settings:
- Cut Speed - 170
- Cut Power - Full
- # of Passes - 1
- Outer Frame - Made to hold the Inner frame and give space for the electronics. Made from 1/8th inch thick Medium Draftboard - 0.135 inches thick actual - Cut with Glowforge Medium Draftboard Proofgrade settings:
- Cut Speed - 170
- Cut Power - Full
- # of Passes - 1
- Veneer Exterior Pieces - Made to cover the boxes finger joints as well as provide a clean finished look. Made from Glowforge Proofgrade Adhesive backed Walnut Veneer - 0.041 inches thick actual. Cut with Glowforge Veneer Proofgrade Settings:
- Engraves
- Engrave Speed - 1000
- Engrave Power - 71
- Engrave Lines Per Inch - 340
- Cuts
- Cut Speed - 257
- Cut Power - Full
- # of Passes - 1
- Engraves
Step 2: Paint Anything That Has Been Engraved


- Before removing the masking tape from the pieces, paint in all the engraves with white acrylic paint. (photos 1-3)
- When the paint is dry, remove the masking tape (photo 4)
- Clean the acrylic panels with a glass cleaner to remove fingerprints and streaks. (photo 2)
Step 3: Tape the Frame Together and Pour the Resin


Tape the frame with Red Tuck Tape. This will allow the frame to pull apart when the resin is cured.
RESIN TIME! -Put on Gloves! Resin gets messy fast! Work in a clean space and prepare something to use as a dust shield.
- Using your choices(We used Alumilite Clear Cast) of 2 part 1:1 Epoxy Resin, pour out two equal parts A and B in two different cups.
- This Map needs 7oz of resin. Pour 3.5oz of each part.
- Add in the pigment colors into Part A.
- I use a mix of all the Black and Ghost Satin Green powders from Artisan Pigment Powders and Black Diamond Pigments. I also used black alcohol ink to round out the black screen color.
- Using a Popsicle stick, scrape the resins from the first cup into a new combined cup and mix thoroughly ensuring that the resin is fully mixed.
- Pour mixed resin slowly into the void (Photo 2) and with a tool or stick of your choice (I used a tool meant for carving clay) push the resin into every corner it needs to be in.
- Use a heat gun to pop all bubbles. Check back often for the first 15 minutes and apply heat when necessary.
- DO NOT OVERUSE HEAT, you can overheat the resin and cause extra bubbles.
- Add Lines to the resin and cover for 24 hours to make sure no hair or dust gets in the resin.
- If you notice hairs with in the first 2-3 hours of curing, you still have the ability to remove them. Make sure you do with tweezers and hit the area you touched with a heat gun to level the resin back out.
Step 4: Build Out a Breadboard and Write the Code for the Arduino Nano


- Using a breadboard - map out the paths all the circutry. This pieces takes 3 small sections of White LED strip. (photo 1)
- We were trying to use leftover materials we had around the house. We had extra 12v white LED strip laying around. This caused us to need mosfets in our build because the Arduino can only power 5v.
- Check out the Supplies section above to know what kind of lights you need to make this build simpler.
- TEST OFTEN - with every wire we plugged in, we tested. You can never test too much! (photo 2)
- Solder the wires to a PCB board (photo 3 + 4).
- If you plan ahead and use a smaller board you won't need to trim the PCB down. If you do need to trim it, a Dremel works great with a cut off wheel!
- If you would like the Arduino code we used, it is available below! It is meant to power three lights and have a randomized flicker effect that is constantly changing.
Attachments

Step 5: Glue Everything Together and Put Everything in Its Forever Home


- Glue all the pieces you laser cut for both the outer frame and the inner frame individually, making sure to include the acrylic panels in the glue-up of the Inner frame
- DO NOT GLUE THE OUTER AND INNER FRAMES TOGETHER
- Test fit the inner frame in the outer frame to make sure everything is snug. (photo 1)
- Paint the inside of the inner frame black so it blends with the resin color.
- Drill a hole for the lights power cord to come out off the outer frame (Photo 2)
- Attached the lights to the acrylic panel.
- We used electrical tape and hot glue.
- Run the wires for the top lights down to the Arduino by using electrical tape on the side panels.
- Insert the inner frame into the Outer frame and situate it in the middle.
- Stick the Vaneer pieces in place on the exterior of the outer frame.
- To help prevent light leak add a piece of 6mm EVA Foam to the lid piece. (Photo 3)
- Hot glue the electronics in place in the bottom section of the outer frame. (Photo 4)
- Attach the top piece of the outer frame with the assistance of CA Glue (Photo 5 + 6)
Step 6: You're Done!


And that is! You're done! Put it on a shelf and watch it flicker. That's really what we do with it :)
If you want access to the files, check out our Patreon: When Geeks Craft
You will get access to all out past projects as well!
Check us out on social media
- Instagram - @whengeekscraft
- Twitter - @whengeekscraft
Go Make Something Awesome!
Nicole - When Geeks Craft

Participated in the
Maps Challenge


