

Introduction: Simple Magnet Sticker Board


Since we started sharing our projects on the internet, we learned quickly that maker stickers were a big part of the community. Slowly, we sticker swapped with other makers via snail mail and accumulated a small pile. It wasn't until last week that we had a problem!
We just came home from a conference called WorkBenchCon - "A convention for diyers, makers, influencers & bloggers discovering new techniques, products and skills all while learning how to take their businesses to the next level".
This convention was one of the best experiences of our lives. We got to meet with many of our Instagram friends as well as meet some of our idols! This convention gave us a huge problem though.....too many stickers.
Stickers have always frightened us weirdly enough. Their permanence is not something we want in a house we don't plan on staying in forever. We knew there had to be a better way to display these stickers in a nondestructive, removable way. That's when it dawned on us.....MAGNETS.
But where are these magnets going to go? The fridge? There is not nearly enough room for them and we don't want our fridge to become insanely cluttered. So we thought more about it and it became clear that the best way to showcase these amazing makers was to frame them in our workshop.
So lets make this super simple Maker Sticker Frame!
Supplies
Any Amazon Links are Affiliate Links for When Geeks Craft. They don't charge you any extra money, they just help support our projects and feed our cats!
- Galvanized Steel Sheet - Home Depot
- 24in x 36in Frame - Hobby Lobby
- Extra Strength Double-Sided Tape - 1/8" - Hobby Lobby
- Magnet Sticker Sheets - Amazon
- Xacto blades or Scissors- Amazon
- 1/8th Inch Acrylic Sheet (12″ x 12″, Black) - Amazon
- Canal Plastics Mirror Blue Acrylic - 12" x 12" - 1/8th inch thick
- Glowforge Laser Cutter - https://amzn.to/2SUXPAm on Amazon or through Glowforge for $500 off a Pro, $250 off a Plus, or $100 off a Basic – https://glowforge.us/r/DSKCNJZL
- STICKERS!!
Step 1: Gather Your Supplies


This Project really only consist of a few necessary components (All links listed above):
- 24" x 36" Galvanized Steel Sheet - Home Depot
- Magnet Sticker Sheets - Amazon
- Maker Sticker - Internet Friends
- 24" x 36" Frame - Hobby Lobby
- We removed the glass from the frame and are re-purposing that for a future project.
- Remove with Caution. The edges are sharp.
- Remove the sticker back from the large magnet sheet and place the stickers (back side down with the paper still on) on the paper.
- This is allow you to be able to remove the stickers in the future if you ever decide to use them as stickers!
Step 2: Add Some Flair!


We wanted to make this board really stand out. We could of just made it a simple sticker board, but we really wanted to add a touch of WhenGeeksCraft.
- Using Black Acrylic and Canal Plastics Mirror Blue Acrylic, we recreated our Logo using our Glowforge Laser Cutter.
- Both Acrylics were cut at
- Speed: 155
- Power: Full
- Mirrored acrylic was cut upside-down to make sure no laser light bouncing on the mirror!
- If you are going to use mirrored acrylic, make sure your file is mirrored as well.
- Both Acrylics were cut at
- Using the laser cut piece as a guide, we used double-sided tape to attach the individual pieces in the proper spots. (as seen in the photo)
- Double-sided tape allowed us to have something permanent enough but still easily removable if necessary.
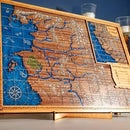
Step 3: Show It Off and Hang It on the Wall!

The nice thing about the stickers being magnetized is the fact that we can rearrange them as many times as we want. As we get more, we can over lap or just make another one!
I recommend checking out ALLof the makers featured on our board but if you want to focus on just us for now, here's our links:
- Head over to https://whengeekscraft.com for more free laser files and information on the tools we use
- Youtube
- Support our crafting habits on Patreon
- Etsy
Now go make something AWESOME!
Nicole C - When Geeks Craft

Participated in the
After School Challenge


