

Introduction: DIY Bronze Clay - Filigree Egg


This my second Instructable on DIY metal clay, this time using atomized bronze powder to make bronze metal clay (base metal clay). See DIY Copper Clay Trilobites for a brief history of precious metal clays and base metal clays.
Metal clay allows anyone to make complex objects from metal without traditional metal working skills - no soldering, forging, casting etc. Shape metal clay, dry it and 'fire it' to produce a sintered metal object. Sintered metal consist of tiny metal particles that are fused together, but not melted into solid metal. Sintering allows the metal clay to retain its shape, whereas cast metal must be melted and poured into a mold to form a shape: a long process. Metal clay is heated close to the melting point of it's metal, and the metal particles partially fuse together to form a metal matrix with tiny holes, about 70-90% the density of solid cast metal. Think of a bucket of ice cubes left at room temperature. After a while you try to pick up an icecube and you end up with a hunk of icecubes stuck together along the edges.
You can buy commercial metal clays made from pure powdered silver, and more recently base metal clays are available - copper, bronze etc. Commercial metal clays are high quality, somewhat expensive and must usually be mail ordered. They also come only in selected package sizes... what if you want to only use a little clay, or you want LOTS all at once? A work around is to make your own metal clay. Just a word about expectations: DIY metal clay will probably not produce quite the excellent quality of commercial metal clay - but I've had very good results and a lot of fun making my own stuff. This is my experience trying to make something for the EGGBOT contest.
Step 1: Bronze Clay Recipe


Metal clay consists of organic binders, water and atomized metal (-325 mesh or smaller), sometimes with a few added conditioners for better handling, flexibility etc. Here is a bronze clay recipe, it's very similar to my previous copper clay recipe, but with one different binder. You can vary organic binders and see which ones you like best. Just use binders that are non-toxic and burn cleanly. Nasty binder residue can interfere with the sintering process and you could end up with a fragile hunk of charred, black metal, not the wonderful sculpture or jewelry you envisioned. (I even tried using egg white and egg yolk as a binder, but neither worked well... too bad, there went my easy 'egg connection').
ALWAYS wear a fine particulate mask when handling dry powders, preferable N95 - no excuse not to BE SAFE and use safety equipment.
Bronze Clay
1/2 tsp. potato starch
1/4 tsp. powdered xanthan gum (do not breathe in the powder! It forms a VERY gummy slime when mixed with water - horrible for your lungs)
3+ Tbsp atomized bronze*
distilled water in a small spray bottle.
other options - a few drops of glycerin, oil or a drop of dish soap can change consitency.
Wear your mask and carefully mix dry ingredients until you have a uniform mix, no visible clumps of startch..
Spray surface with some distilled water and carefully stir. Add more spritzes of water and keep stirring until the mix starts to clump together. Mix well between spritzes until your mixture starts to feel clay-like. Lightly oil your hands with olive oil or natural hand balm and squeeze mixture. If it holds together then you can knead by hand. If mixture starts to crumble, work in a little more water. If it is very sticky, let it dry a bit and rework, or add a little more metal powder or cornstarch.
You can let clay rest in a sealed plastic bag or container.
You can also mix some of the clay into a smooth paste, like peanut butter, which can be extruded in a clay press, or icing bag.
* Use metal at least -325 mesh, about 44 micron particle size. -325 mesh atomized metal is sold for use in 'cold casting metal', basically a cast resin binder and metal powder to achieve a look similar to cast metal. Various art suppliers sell -325 mesh atomized metal, also available online at Doughlass and Sturgess. Tap plastics sell powdered bronze in their retails stores, it's a copper/tin alloy. Sometimes bronze powders contain other metals too, such as copper/tin/silicon. Each alloy has a slightly different melting temperature.
Step 2: Using an Eggshell for Filigree Mold.


1. Crack some eggs and save the shells to use as a mold for a bronze filigree egg. If you want to control how your egg cracks, use a pin to carefully punch tiny perforation holes in your egg. Use the pin to crack the shell between each hole.
2. Mix homemade bronze clay with some extra distilled water until it forms a stiff paste, similar to peanut butter.
3. Load clay paste into an extruder or icing bag.
4. Extrude lines of clay on the inside of the egg shell. Be sure to form a solid lip of clay around the hole. Criss cross the strings of clay to mostly cover the inside of the egg with a filigree pattern. Stop every few strings and gently press the clay together with lower strings (use a greased finger tip, pencil eraser or rubber clay tool). For added interest, change to a smaller hole for the later strings of clay. Keep going until you have a pleasant lacey pattern of clay covering the inside of the egg.
5. Let clay dry for a couple of days, or speed drying using a mug warmer or hot tray.
6. Clean any clay off the outside of the egg.
Step 3: Firing Your Metal Clay in a Kiln - 1st Fire


Base metals such as bronze, copper and brass will get oxidized ('rust') when heated to sintering temperatures (1500-1580 F for bronze). The oxides interfere with the sintering process and you will end up with a black mess. To prevent oxidation of the metal, one needs to reduce the amount of oxygen in the kiln. Commercial sintering kilns are sealed and filled with inert gases, way beyond what you can do at home. Several years ago (2007-8 ish) a guy named Bill Struve, (inventor of BRONZClay and COPPRClay) came up with the brilliant idea of firing base metal clays in activated charcoal to produce an oxygen poor environment - really awesome! But, before we can sinter our bronze particles, we need to remove the organic binders by burning them - which requires good old oxygen. It turns out that this can be done in a two firing process: first firing to remove binder (800-1000 F) and a sintering firing in activated charcoal (reduction environment).
To fire our bronze clay egg, you need:
1. A kiln with a controller and an accurate pyrometer (high temperature thermometer). Digital controllers are awesome, but expensive. If you don't have one for your kiln, you can manually controll the kiln with a pyrometer and a kitchen timer. Check the temperature every 10-20 minutes and adjust you power controls. Whe you get better, you can maybe check every 20-30 minutes. Ugh... REALLY try to get a digital controller.
2. Stainless steel container with a lid (try thrift stores - a small stainless steel bowl will work too - you can cover it with a sheet of metal). For a single firing, you can even fire in a clean food can. To prevent steel from spalling/flaking as it cools and making a mess in the kiln, coat container with glass kiln primer.
3. Activated charcoal: buy online, activated coconut charcoal. Do not use aquarium filter charcoal because it may contain impurities which interfere with the sintering process.
4. Line your firing container with about 1 inch of activated coconut charcoal. Take the egg shell, with your dried bronze filigree inside, and gently place it upside down in the firing container. This helps the clay support itself, by forming a dome/arch inside the egg shell. I fired my first egg with the open side up, like a bowl, and the filigree pulled apart during the first firing. Place each egg shell about 1 inch from sides and at least 1/2 inch apart. Leave container uncovered and set it on stilts or post in the center of your kiln to provide good airflow all around your container for more even heating. Check that the sides of the container do not touch the kiln walls or probe tip.
SAFETY warning: Kilns get VERY HOT, so don't touch the outside of the kiln, it can give you a nasty burn. Wear heat resistant gloves, or at least leather work gloves.
5. Close the lid and heat kiln slowly. Leave at least one peep hole open to vent burnt binder. If you don't have peep holes, leave the lid slightly ajar until binder is burnt away. You will smell the binder and egg shells burning, so ventilate the room well to remove any smoke or fumes. Heat kiln to 800-1000F and hold for 15-45 minutes to fully burn off the binders.
Step 4: Firing - Second Firing

1. After the first firing, your clay items are VERY fragile with no binder. They are black and charred. Do not touch them. When you can safely handle the contianer, carefully blow off any ash (or use a key board vac) and pick out the large pieces of shell. Cover the egg domes with 1/2-1 inch more charcoal (completely over the top!) and cover the container. (NOTE: my eggs did partially collapse, so you might want to try getting some charcoal inside the egg dome to help support the weight. Your call, because you could break the filigree egg just by looking at it wrong)
2. Heat kiln rapidly to 1500-1550F and hold at that temperature for 2 hours. Results vary depending on the bronze alloy you have. Try it and see - if the metal breaks, or is powdery inside, then it is not fully sintered. Raise the temperature a bit, and/or increase the hold time to 2.5 hours. If the metal is blistered, you went too hot... reduce tempperature 25-50 degrees Farenheit, and try again. Keep firing records.
3. Cool the kiln down until you can safely remove the firing container. If you have a brick kiln, prop the lid open and inch or two to speed cooling. Use a metal scoop to sift items out of the charcoal. You can dunk items in hot water to cool them quickly. For safety, do not remove container from kiln until it is below 400 or 500 F. Don't burn yourself!
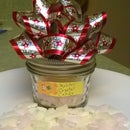
4. Fired items should look metallic, and will probably have some color variations (patina).
Step 5: Finishing - Burnishing, Polishing, Brushing

You can leave your metal clay items just as they come from the kiln, or change their appearance.
Just sintered metal often has a matte appearance, the surface is microscopically porous and does not reflect light. An easy way to finish complex shapes is to toss the item into a rock tumbler, along with steel shot, water and a little soap or burnishing compound. The longer you tumble, the shinier the finish.
You can get a soft, brushed look by using a brass bristle brush, or a stainless steel brush. Very high polish needs various sanding wheels and/or buffing wheels.
Over time, the metal will darken and develop a natural patina. Use wax, laquer or some other sealant to preserve a shiny finish.

Participated in the
Egg-Bot Challenge

Participated in the
MakerBot Challenge


