

Introduction: DIY Heart Box!


More by the author:


About: Dream It! Build It! Teach It! AHA is a community workspace with shared tools and knowledge for Coders to Crafters to Makers to Hackers. We are among the oldest continually operating Makerspaces in the nation…
For Valentines day or Mother's day, this heart shaped box is a perfect homemade gift. It's easy and cheap to construct and looks beautiful when finished!
Tools
- Inkscape / svg reader
- Inkscape Files
- Utility Knife / Razor Blade
- Scissors
- Ruler (13'' minimum)
- Pen
- LASER Cutter (Optional)
Materials
- .022 Chipboard, at least 11x14”
- Wood Glue
- Spray Paint (Optional)
- Adhesive Artisan Paper (Optional)
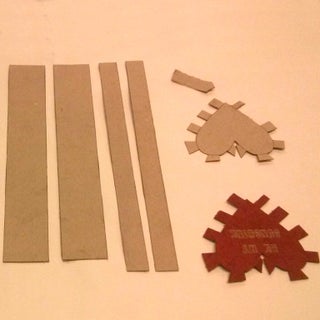
Step 1: Prepare Pieces

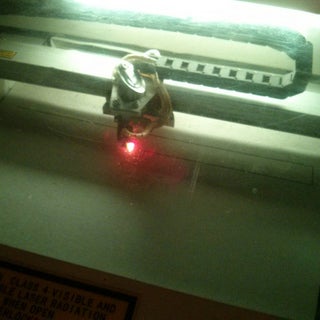
This step is best done using a LASER cutter.
(If not, you can try and hand-design this by printing the hearts on paper and using that as a template to cut the cardboard!)
Tools
- LASER Cutter (OR Scissors & Printer)
- Inkscape / svg reader
- Inkscape Files
Materials
What needs to be prepared
- Top of the Heart Box, this is slightly bigger than the bottom
- Strips for the Lid (3/4” x 13”)
- Bottom of the Box
- Strips for the Bottom (1” x 12 3/8”)
LASER Cutter Settings
- For cutting: *DSJ:QIOWJDOQWIJ*
- For marking grooves (this makes folding tabs easier): *JEIOC:EWJOEIJ*
- For etching the text: You want to Raster Engrave the text.
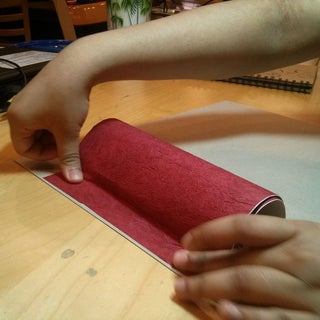
Part 1: Roll the artisan paper over one sheet of cardboard. (Optional)

Part 2: Personalize the Top of the Box. (Optional)

Part 3: Laser cut the top heart on the fancy cardboard.
Careful to cut the outside, mark grooves on the inside lines, and *raster* the text on the top.
Part 4: Laser cut the bottom of the heart on regular cardboard.
Part 5: Laser cut the strips!
Part 6: Cover one face of a Top Strip in the artisan paper. (3/4'' x 13'') (Optional)
This one strip will be the outside facing side of your heart. Make it fancy!
Step 2: Construct the Bottom


This is probably the trickiest step. This requires dexterity and patience! Constructing the bottom first allows you to construct the top while the spray paint dries!
Tools
- Utility Knife / Razor Blade
- Scissors
- Ruler (13'' minimum)
- Pen
Materials
- Bottom Heart
- Strips for the Bottom (1” x 12 3/8”)
- Wood Glue
- Spray Paint (Optional)
Part 1: Prepare the Strips for Gluing
- Take each strip of card board and mark the center of the long side.
- Fold in half along the center
- Curl the strips. This is like curling ribbons! (Watch Video for more details)
- Strip A, the center of the strip will be at the bottom of the heart (The pointy part of the heart)
- Strip B, the center of the strip will be at the top of the heart. (The valley of the heart)
Part 2: Prepare the Bottom Heart for Gluing
- Fold all the tabs of the heart.
Part 3: Glue!
- Lay the inside strip (Strip A) along the curve of the heart. Put wood glue on the side of edges of each tab and stick it to the strip.
- Feel free to do this in two steps, one half of the heart and then the other half.
- Wait a few minutes for the glue to dry.
- You may need to snip off a little off the end of the strip in order for it to fit properly
- Cover Strip B in wood clue and slowly stick it to the outside. Press along the edges to really get it glued to the strip and the tabs.
- Wait a few minutes for the glue to dry.
- You may need to snip off a little off the end of the strip in order for it to fit properly
Part 4: Spray Paint! (Optional)
- Spray paint the finished product. Make sure you're in a well ventilated area. Recommended colors are White, Black, and Gold.
Step 3: Construct the Top


This step is the same as constructing the bottom!
Tools
- Utility Knife / Razor Blade
- Scissors
- Ruler (13'' minimum)
- Pen
Materials
- Top Heart
- Strips for the Top (3/4” x 13”)
- Wood Glue
Part 1: Prepare the Strips for Gluing
- Take each strip of card board and mark the center of the long side.
- Fold in half along the center
- Curl the strips. This is like curling ribbons! (Watch Video for more details)
- Strip A, the center of the strip will be at the bottom of the heart
- Strip B, the center of the strip will be at the top of the heart. This should have fancy paper on the outside of it!
Part 2: Prepare the Top Heart for Gluing
- Fold all the tabs of the heart.
Part 3: Glue!
- Lay the inside strip (Strip A) along the curve of the heart. Put wood glue on the side of edges of each tab and stick it to the strip.
- Feel free to do this in two steps, one half of the heart and then the other half.
- Wait a few minutes for the glue to dry.
- Cover Strip B in wood clue and slowly stick it to the outside. Press along the edges to really get it glued to the strip and the tabs.


