

Introduction: DIY Smart Home Monitoring Bottle


Each year about 100 million accidents happen in homes across the world like fire, theft, earthquakes, smashing sounds, many many more. Because of this lives of common people are affected, their family and property is lost.
The idea is to make a simple device that can be kept on your dining table, near your door, or gas stove that can notify about any issue within seconds like gas leaks, or motion detected, or high air pollution, or strange sounds, etc etc.
Step 1: What Do You Need?

Boards & Parts:
1) Arduino or any other microcontroller
2) Grove base shield
3) An empty soda bottle
4) Some jumpers
5) A battery for powering your board
6) A breadboard
Sensors:
1) Grove temperature & humidity sensor
2) Gas sensor
3) Grove air quality sensor
4) Grove dust sensor
5) PIR motion sensor
6) Sound level detection sensor
Tools:
1) Cutter/Dremel
2) Some tape to sticking up things
Web Services:
1) Ubidots.com account
Step 2: Assemble All the Sensors
Here we'll assemble all the sensors to the board.
Step 3: Set Up the Web Service (Part 1)


1) Go to Ubidots.com and then sign up
2) Log into you dashboard
3) Click on the sources button
4) Click on add source
5) Select Arduino as source
6) Name it as you want
Now you have successfully make your account!
8) Now click on add variable
9) Chose a line chart
10) Name your variables and add different icons to them
11) Create all of them and then go to your dashboard
Copy your account ID as well as we will need it in the next few steps.
Step 4: Adding the Gas Leak Sensor (Part 1)


Now we'll hack into the gas stove. Search for a location where gas could leak in case of an accident, it could be a pipe connection, near the stove mesh, near a valve, or a gas meter.
We'll fix the fire sensor there to sense some fire and gas leaks!
Step 5: Attaching the Gas Leak Sensor Module (Part 2)


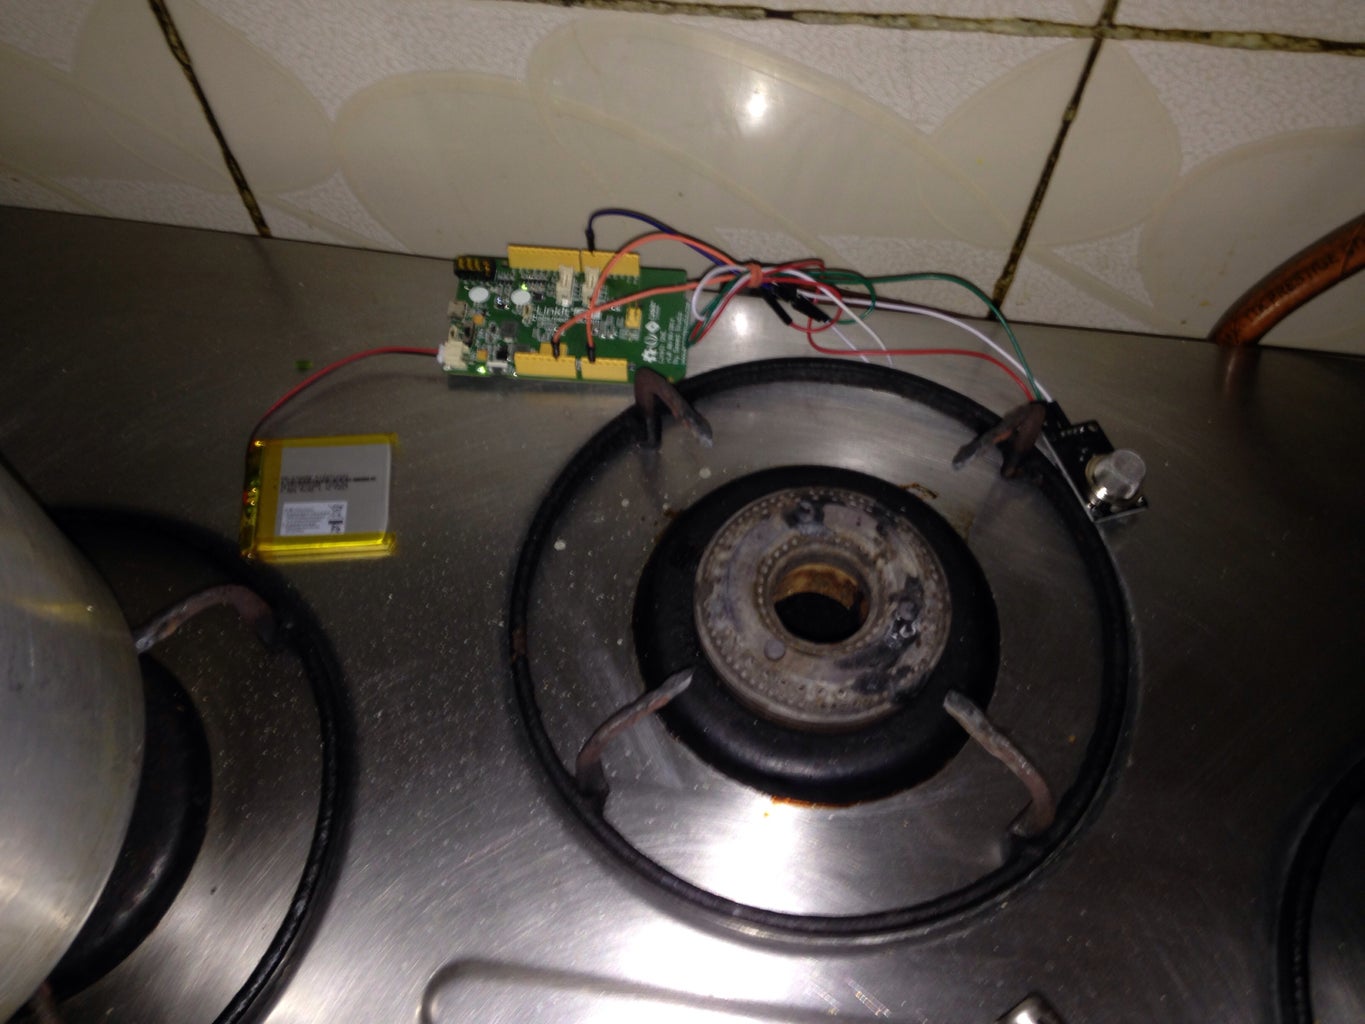
Now connect your sensor to the board. Do it tightly so that it doesnot comes out.
Test it using your board's ADC.
Step 6: Adding the Motion Detector (Part 1)


Here i'll show you how to assemble your sensors with the board.
First, take your sensor, you'll see 3 pins in it-
1) GND
2) DATA
3) VCC
Connect your sensor to a breadboard and then connect the GND pin to GND pin of your linkit, VCC to 5V, and DATA pin to A0 pin.
Finally connect everything and lets move on to the next step!
Step 7: Testing the PIR Module (Part 2)


Many PIR modules give errors. Test your module by testing it out on an ADC.
Step 8: Attaching the Sound Sensor Module


Now assemble all the parts together.
First of all, connect the jumper wires to the sound sensor. Connect 3 wires to VCC, GND and AOUT pin of the sensor.
Now connect the sensor to the A0 pin of the board.
Pin connections:
AOUT - A0
VCC - 5V
GND - GND
Step 9: Attaching the Dust Sensor for PM10 Gas


Now, assemble all the parts together.
First off all, put the grove base shield on your LinkitONE carefully. Check if the pins are placed correctly. If thats done, then connect the sensor.
We'll be using the digital pin 8 of the linkit for communication, so connect the dust sensor to that pin.
Make sure everything is secure, and handle the sensor with care so that it doesnot fall.
Connections:
Red Wire - 5v
Black write - GND
Yellow wire - Data pin 8 /D8
Step 10: Adding a Temperature Sensor


Here i'll show you how to assemble your sensors with the board.
First, take your sensor, you'll see 3 pins in it-
1) GND
2) DATA
3) VCC
Connect your sensor to a breadboard and then connect the GND pin to GND pin of your linkit, VCC to 5V, and DATA pin to A0 pin.
Finally connect everything and lets move on to the next step!
Step 11: Adding a Humidity Sensor


Similarly add a humidity sensor. Test that out using an ADC.
Step 12: Building the Base


we'll use the soda bottle to make the base. It'll make the work easy as 3D printing is really costly.
Step 13: Adding All Components Inside Our Bottle


Now hook up everything! Put your assembled circuit into the cut bottle carefullly. Be careful to put the air quality sensor outside the bottle for air. Once you are done neatly with this step, proceed to the next steps.
Step 14: Taping Up All the Components in the Bottle


Now we'll tape up the bottle so that its tight up.
Step 15: Setup Your WiFi Router for Static IP and Web Server


We'll need to setup a static IP for our board, for that we'll make virtual servers on our router.
Now open your gateway page. It'll give you the connection settings. Here you can forward your local IP to public IP.
Now navigate to the advanced setup option and click on "NAT". Then go to "Virtual Server Option"
Noe enter the public and local IP in the setup virtual server page. Here you can edit any of the ports you forwarded earlier.
Mine local IP is 192.168.1.3 and i'm forwarding it to 122.160.202.xx
Enter all the details correctly and save them!
Step 16: Attach Your WiFi and GSM Antenna


Now carefully attach your board's wiwi and sms antenna. We'll use them in next step.
Step 17: Connecting Sensors to the Web Service


Now we'll make variables for our board. It'll transmit data to the cloud in our web service.
Step 18: Writing the Code
Burn this code into your board
CODE-
#include "Barometer.h"
#include
#define WIFI_AP "iPhone"
#define WIFI_PASSWORD "helloworld1"
#define WIFI_AUTH LWIFI_WPA // choose from LWIFI_OPEN, LWIFI_WPA, or LWIFI_WEP.
// Ubidots information
#define URL "things.ubidots.com"
#define TOKEN "WF1hbsrYltg5vwGDowAejTykHigEi5" // replace with your Ubidots token generated in your profile tab
#define VARIABLEID "55d5f6047625422bxxxb0441"
#define VARIABLEID1 "55d5f5e37625xxxce1e0358f" //temprature
#define VARIABLEID2 "55d4c74xxx25424830973c35" //dust
#define VARIABLEID3 "55d5xxx7762542363264e715" //crow
Barometer myBarometer;
float temperature;
unsigned long duration;
unsigned long starttime;
unsigned long sampletime_ms = 3000;
unsigned long lowpulseoccupancy = 0;
float ratio = 0;
float concentration = 0;
int counter = 0;
void setup()
{
LTask.begin();
LWiFi.begin();
pinMode(8,INPUT);
Serial.begin(9600);
myBarometer.init();
// keep retrying until connected to AP
Serial.println("Connecting to AP");
while (0 == LWiFi.connect(WIFI_AP, LWiFiLoginInfo(WIFI_AUTH, WIFI_PASSWORD)))
{
delay(1000);
}
}
void loop()
{
temperature = myBarometer.bmp085GetTemperature(myBarometer.bmp085ReadUT()); //Get the temperature, bmp085ReadUT MUST be called first
duration = pulseIn(8, LOW);
lowpulseoccupancy = lowpulseoccupancy+duration;
ratio = lowpulseoccupancy/1000; // Integer percentage 0=>100
concentration = 1.1*pow(ratio,3)-3.8*pow(ratio,2)+520*ratio+0.62;
save_value(String(analogRead(A0)), String(temperature), String(concentration), String(analogRead(A2)));
delay(500);
}
void save_value(String value, String a, String dust, String crow){
Serial.println("Sending value to Ubidots...");
LWiFiClient c;
while (!c.connect(URL, 80))
{
Serial.println("Retrying to connect...");
delay(100);
}
String data = "{\"value\":"+ value + "}";
String thisLength = String(data.length());
// Build HTTP POST request
c.print("POST /api/v1.6/variables/");
c.print(VARIABLEID);
c.print("/values?token=");
c.print(TOKEN);
c.println(" HTTP/1.1");
c.println("Content-Type: application/json");
c.println("Content-Length: " + thisLength);
c.print("Host: ");
c.println(URL);
c.print("\n" + data);
c.print(char(26));
data = "{\"value\":"+ a + "}";
thisLength = String(data.length());
// Build HTTP POST request
c.print("POST /api/v1.6/variables/");
c.print(VARIABLEID1);
c.print("/values?token=");
c.print(TOKEN);
c.println(" HTTP/1.1");
c.println("Content-Type: application/json");
c.println("Content-Length: " + thisLength);
c.print("Host: ");
c.println(URL);
c.print("\n" + data);
c.print(char(26));
//////////////////////////////////////////////////////////
data = "{\"value\":"+ crow + "}";
thisLength = String(data.length());
// Build HTTP POST request
c.print("POST /api/v1.6/variables/");
c.print(VARIABLEID3);
c.print("/values?token=");
c.print(TOKEN);
c.println(" HTTP/1.1");
c.println("Content-Type: application/json");
c.println("Content-Length: " + thisLength);
c.print("Host: ");
c.println(URL);
c.print("\n" + data);
c.print(char(26));
///////////////////////////////////////////////////////////////////
data = "{\"value\":"+ dust + "}";
thisLength = String(data.length());
// Build HTTP POST request
c.print("POST /api/v1.6/variables/");
c.print(VARIABLEID2);
c.print("/values?token=");
c.print(TOKEN);
c.println(" HTTP/1.1");
c.println("Content-Type: application/json");
c.println("Content-Length: " + thisLength);
c.print("Host: ");
c.println(URL);
c.print("\n" + data);
c.print(char(26));
//////////////////////////////////////////////////////
// read server response
while (c){
Serial.print((char)c.read());
}
c.stop();
}
Step 19: Include the Variable/sensor ID's in Code


we'll copy the variable ID's from the web service and paste it in our code.
Step 20: Add Sensor Data Visualisations From the Web Service


We'll now make some widgets on dashboard. they look nice and you'll be able to show it to your friends.
Step 21: Add a Power Bank


We'll need to add a power bank so the battery life becomes about 15 days. Mine is a 7200 mah one and gives me about 15-20 days of battery life!
Step 22: Making the Web Interface (Optional)

Now we'll make a web interface. You can copy the embedd code in this option.
Step 23: Adding Some SMS Alerts to Web Service


Now using events tab, add some events like sending SMS and email to a person.
Step 24: Finalize Everything


Now test the SMS service!
Try keeping a burning paper near the device, and watch yourself get SMSs!
Step 25: Testing It Out!


Now test it out!
keep your bottle anywhere in your house, and have fun with it!

Participated in the
Arduino All The Things! Contest

Participated in the
Full Spectrum Laser Contest 2016


