

Introduction: DIY Woven-Macrame Wall Hanging


Hello everyone and welcome in my Woven-Macrame Wall Hanging instructable.
I hope you will like it. I tried to make it as easy as possible to understand with many pictures and illustrations.
Before I begin my tutorial, I would like to apologise for the mistakes I made in English. I'm French and it has been a long time since I have been practicing english. Thank you for your understanding.
There are many reasons why I love this project and I find it very interesting :
-It's unique and original original : each project, even if you follow exactly the instructions is unique and it's different from the one that someone else would make because there is no exact science into it and the design of the wall hanging appears as you create it.
-It doesn't requiere expensive materials or tools. I'm sure that you already have most of it at home.
-It spices up any room in the house, it encourages happiness and radiates a positive vibe for your home.
It adds instant texture and charm to any space in your home
-It is handmade and quality
-It mixes up macramé and weaving
-It implies weaving technics but no looms or special weaving tools than you may not have at home.
-Very simple knots, that I explain step by step, are all that are needed to create a graceful pattern.
-It is very relaxing to realize, and it enable you to develop your creativity.
-And much more.... :D
Enough talking, let's get down to business.
Step 1: What Do You Need


This project do not requiere many equipments, tools or materials. That's what I like when I start a project : I know that I will be able to finish whithout missing of anything and without spending too much money on it.
Moreover, I find very rewarding and gratifying to create something very beautiful (even more than the one you can buy in general store), very personal and unique, on the basis of almost nothing.
Here is the couple of things you are going to need :
-Something to hanging on : I used a piece of driftwoof 50cm long but you can use something else that has approximately the shape (anything you can hanging on), and you can take a smaller or a larger one depending of the size you want it to be at the end.
-Scotch or string : This is just to attach to the and hang up on a wall so that you can do your work and not have to worry about holding it and trying to do it at the same time.
-Scissors
-Some kind of rope, You can even use yarn, it would be softer and will give you another finish. I used 100% coton 3mm 200g cord that you can find on : https://www.maillenameis.com/en/macrame/167-fil-co...
I used two different colors (white and dark gray) so that it's easier for you to follow the instructions with the photos and I really liked how it ended up to be at the end.
-Some yarn : It's for the weaving part : use different colors, different sizes, different textures... Let go your creativity ! You do not need a whole ball but only a few meters each tim, so if you have some yarn that you didn't use for a previous project, you should use it :)
-a big needle
That's all ! Let's move on to the practical side !
Step 2: Cutting the Rope
I started by cutting all I needed of the basis of my wall hanging. Cut 26 strands, each 1.40m long.
I suggest to cut longer stands than smaller ones.
Cut other smaller pieces (45cm) of cord : they are going to be the working cords that will mark out the different areas of your work.
Step 3: Loop the Strands on the Driftwood


Now that you have all your strands, you are going to loop them on the hanging support (the diftwood or whatever you chose as your support).
For that, all you need to do, is folding a cord in half, pass it under the wood, fold it over, grab it and pull it through the loop. You can see the different steps in pictures. This knot is calle a Lark's head. You can easily find some tutorial on the internet.
Repeat for all the remaining cords.This gives you 52 cords each 70cm in length.
Maybe you decided to use more or less ropes that me, but be careful to always have an even number of ropes because you're going to work with groups of 4.
Step 4: Tie the First Line

Using a working cord (about 45cm) that you didn't attach to the diftwood as the knot bearer (in white on the picture), tie a row of horizontal double half-hitches (with each cord hanging, in blue on the picture).
Half-hitch:
One of the basic macramé knots, worked over another cord as shown here, or over a ring or bar.
Take one cord and pass the working end under the other cord and behind the starting end to make one half-hitch. Make a second loop in the same way passing the working end through the loop between the two half-hitches for extra security.
Step 5: Macramé Square Knot Pattern


You will tie a 3 row alternating square knot pattern.
Square knot:
Work a half knot passing the right-hand cord under the core cords and over the left-hand cord. Take the left-hand cord over the core cords and pass it down through the loop on the right.
Reverse the process, passing the left-hand cord under the core cords and over the right-hand cord. Then take the right-hand cord and pass it down through the loop on the left. Repeat.
Step 6: Create the Curved Wavy Line

This step is the continuity of the last step. To form a cuved shape, just add some square knots here and there to make some of them longer. They will arch up and then go down
If it's too confusing for you, you can skip this part. It's totally fine to have a straight across line. It will still work perfectly so don't worry for that.
Step 7: The Curved Line


Then grab another spare piece of cord and you are going to create another line of double half-hitch, just like you did at top, only this time, you are going to curve it to the shape of the square knots.
Step 8: An Other Cuved Line


Next, what you are going to do is add another row of double half-hitch leaving an empty space, because, once we complete our full macrame design, we will go back and add in our weaving.
Step 9: Macramé Half Knot Pattern


Half knot
*Pass the right-hand cord under the two middle core cords and over the left-hand cord.
Take the left-hand cord over the core cords and pass it down through the loop on the right. Pull the cords to firm up the knot. Repeat from * until the spiral is the length required.
Make some longer than others (tie different number of half knot) to keep the wavy design. But if you prefer, or if it is easier for you, you can keep all the same length to keep it straight.
Step 10: Double Half-hitch Lines


Then add some lines by adding an extra cord as a working cord and tie a row of horizontal double half-hitches.
Leave some space between the horzontal cords for the same reason as in step 8.
Step 11: Macramé Square Knot Pattern

Arrange the cords in groups of 4 cords each. Ti a square knot, having two filler cords, in each set of 4 cords. (read step 5 if you forgot how to make a square knot).
Step 12: Add Two Final Rows of Double Half-hitches


Repeat step 3 for 2 rows. I also added some extra white small pieces of cord in between the existing ones. For that, cut several cords measuring 20cm approximately each. Fold the cords in half and mount it onto the working horizontal cord between the existing cords with a Lark's head.
Some of the cords were too short to be tied on the horizontal lines. I just left them hanging at there point. I like the way it looks so I didn't try to hide it or cut it.
Step 13: Fray the Edges

It's an optional step but I really like the way it looks.
I separated the different cords that make up one cord. It create more hanging cords , and it gave them a curly look.
Step 14: Filling the Hole : the Weaving Part


Last but not least, the weaving part. It is time to complete the spaces you left between the half-hitches rows.
Take a piece of the yarn of your choice, the length you want (it's not a problem to attach another piece of yarn if these one is too short to weave the whole space so don't worry about that).
There are many ways to weave your yarn, each way create a different pattern so you can play with it to make different parts in your wall hanging.
I started with the basic weaving technics but first, let me teach you or remember you, some basic vocabulary of weaving.
Woven cloth is formed when parallel yarns (or cords in our case) that are held taut are interlaced by a second yarn. As a unit, the taut yarn is called the warp; individual yarns (also called threads) are called warp ends. The yarn that travels over and under (or weaves) between the warp ends is called the weft; individual weft threads are called picks. Woven cloth is made by interlacing the warp ends with weft picks.
As I said earlier, there are many weaving patterns you can use on your work, but the most common is the basic weave pattern is a simple over and under pattern (the weft yarn passes alternately over and under the warp ends to weave cloth).
You can make up your own variations of the basic weave by changing the number of warps you weave under and over, for example:
over 2, under 2
over 1, under 2
over 2, under 1
You will be surprised by the designs you can create with these simple patterns and combinations. There are a number of textural and decorative stitches you can add to your weavings. Here are a few of the most common.
SOUMAK STITCH (illustrated in picture)
Soumak stitch uses a continuous weft thread that loops around a group of warp threads, traveling from one stitch to the next, to create a raised texture or ridge. It reminds me of hand embroidery. A single row of soumak weaving creates raised slanted stitches. However, when you weave two lines together, slanting them in opposite directions, then something exciting happens—it creates a braided effect.
I mostly used this stich because I love the braided effect it gives.
How to do:
1-Fold over the end of the weft yarn by 2 in. (5 cm). Tie this loop to the first warp thread on the left-hand side using a Lark’s Head Knot. Begin working in the direction of the tails (moving from left to right). Tuck the short tail to the reverse side of the weaving.
2-With your fingers, lift up the next two warp threads to the right. Pass the yarn underneath these two warp threads and then pull up to the left side of the weaving once more.
3-Draw the stitch down toward the completed weaving.
4-Lift up the next two warp threads to the right and tuck the yarn under again. Tuck so that the weft travels over four warp threads and back under two.
5-Continue in this way until you reach the last warp thread. Adjust the size of the stitches as you go, if necessary. You will see that this creates a stitch that slants upward to the left. (Soumak stitch always slants in the opposite direction to the one in which you are working.)
6-When you reach the end of the row, wrap the weft once around the last warp thread.
7-To complete the braid with the slant going in the opposite direction, you will need to weave another row of soumak stitch. Lift up the next two warp threads to the left. Pass the weft over these two threads, then tuck the weft back under the raised warp threads toward the right again.
8-Continue across the row, as you did before, so that the weft travels over four warp threads and back under two. The new direction you are working in changes the direction of the slant. To finish, wrap the weft once around the last warp thread on the right and tuck it to the back.
Step 15: Finishing Stage : Cut and Hide the Remaining Cords


Once you have the full line of double half-hitches, we have an extra string hanging over each side. We want to hide that at the back of our work. For that, we can tape off the ends, wrapping some tape around it and then cut them short. Tuck them under the existing knots at the back of your work.
Congratulations you've made it!
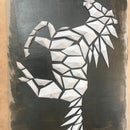
Step 16: Another Example

Here is another macramé woven hanging wall. I used exactly the same technics I explained above, simply using other kind of cord, yarn (color, thickness, texture), and drawing different shapes with cords.
It shows you that you can create an infinite number of designs, starting from what I just explained you in the instructable. It will help you to express and develop your creativity.

Participated in the
Weaving Challenge


