

Introduction: 3D Paper Mosaic : the Colibri


Hi !!!
Welcome to my new papercraft instructable !
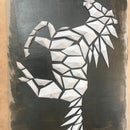
I'm going to show you how to make a big (40cm high) geometric 3D paper colibri using only A4 sheets of paper, glue and scissors.
I'm hospitalized for a long term illness so I’m trying to keep myself busy, to develop my creativity, and to share my work with you. I try to use the long empty moments I have in my hospital room to develop other skills.
I’m studying in engineering school (when I’m not in hospital of course) so I don’t have enough time to make creative and art stuff. I just discovered here that I love it and that people like what I create.
Moreover, my dad is blind and I wanted to show him what I created. That’s one of the reason I created something in 3 dimensions, that has a specific shape so that my dad can “see” it by touching it.
I found inspiration in several existing intructables projects and in one japanese artist, Kota Hiratsuka, and made my own version of it. I worked hard, and it took me a lot of time to create it but I'm quite proud of the result and I would like to share it with you.
You can find the work of Kota Hiratsuka here : http://www.origamimosaicworks.com/story.html.
I really enjoy the way he turns simple sheets of paper into beatiful art work. I really wanted to create something similar by my own, but I didn't know how to do at all. Then, instructables helped me a lot and enabled me to develop my computer skills and to discover softwares that I didn't know.
Here are the instructables I used, to create the template of the colibri:
Papercraft With Blender : https://www.instructables.com/id/Papercraft-With-...
What Is Pepakura and How to Start : https://www.instructables.com/id/What-is-Pepakura...
Bunnie's Papercraft/Pepakura Help Desk : https://www.instructables.com/id/Bunnies-Papercra...
I also watch many videos on youtube and tutorials on skilleos to learn how to use Blender 3D.
I never found a template to make something similar to Kota Hiratsuka with his origami mosaics, so here it is, I created it for you. I used the previous ressources to create my own project. I won't show you how to create a template but how to make this beautiful 3D colibri (that you can hang on a wall).
I hope you will enjoy it.
Before I begin my tutorial, I would like to apologise for the mistakes I
made in English. I'm French and it has been a long time since I have been practicing english. Thank you for your understanding.
Step 1: What You Need

You need very few materials to realize this stunning paper colibri that is :
-scissors
-glue stick and liquid glue
-a large paper sheet or cardboad (60cm x 42cm)
-paint of your choice and paint brush (a large one)
-sheets of paper (I used very the cheaper ones 80g/m2 but you can also use thicker ones)
Optional:
-a bonefolder : it is an essential tool for all folders. With it, you can precisely fold the sheet and its tip marks the crease to help folding.
Step 2: Print the Template

The first step is to print the model I joined in pdf.
This model is made to be printed in A4 and will give a colibri that is 40 cm x 35.1cm x 3.5cm in size. Of course, if you have a bigger printer you can also print it on larger paper format to get a bigger horse.
You can also print it on smaller format. However, some pieces could be difficult to fold if they are too small so be careful about that.
Attachments

Step 3: Write Each Part Number

If you don't want to spend to much time to rebuild the colibri with all the polyhedrons, I have provided for you an option.
Before to cut all pieces, just write the number I wrote in red on the template I joined in this step on each geometrical figure.
Each number corresponds to a specific place in the colibri figure shown in the picture.
Attachments
Step 4: Cut


Cut out all pieces along the black, solid lines.
You should end up with 66 pieces of paper.
Step 5: Fold and Glue


Folding
You have all your piecies separated. The next step is to fold them and glue the flaps so that you can build the polyhedrons that will make the bird.
Folding can be a bit confusing, but not in my project because there is only one type of folding (and not the two valley and mountain fold). That's why there are only dot-dashed lines ( - . - . - . - ) on the template.
If you are printing on the paper you want to build with you will want the printed marks on the inside.
Place the printed side up and fold following the dot-dashed lines as shown in the picture.
To make the folding process easier, you can score the pieces first with a ruler and a scoring pen. If you don't have a scoring tool, an (empty) ball-pen will also work. Just make sure that you can't see any ink from the other side.
Gluing
Line up the numbers, and just pair them up. So 1 and 1 go together and so on.
Put the glue on the flaps, on the side that is not printed. If you have the printed side up, the flap should be just in front of you, and between you and the matching side.
Warning !
Be careful, there are 3 polyhdrons that are divided into two parts. I put all of them on the last page of the template file (page 16). Look at the picture.
You should now have 63 polyhedrons.
Step 6: Paint the Background


I used a large sheet of paper (50 x 65 cm) as a background and I painted it with some iridescent copper paint.
You can also use a cardboard or any support large enough so that we can glue the colibri on it.
You can paint it the color you want. Maybe you printed the template on color paper. I advise you to chose a background color that contrasts with the colibri color.
Step 7: Have Fun : Playing With a Jigsaw Puzzle


Now that you have all your pieces, it's time to assemble them to make the colibri shape.
It's a kind of a jigsaw puzzle, so have fun !
I recommend you to place all of the pieces on the background before to glue them.
Indeed, you may need to move them a little bit afterwards.
If you wrote the number on each polyhedron as I explained in step 3, you just have to put the pieces to their place (indicated in the picture of step 3).
Step 8: And the Last Step : Fix It !


Keep going, you're almost done !
Now that all the pieces are put right and well arranged, you to glue the whole colibri, piece by piece on the painted background. You can use a hot glue gun or just basic liquid glue.
I advise you to start by one end (the top of the wing for example) and then add the neighbouring pieces to it one by one until the bird is complete.
Good job !!
I hope you liked this instructable :D

Participated in the
Paper Contest


